Welcome new users!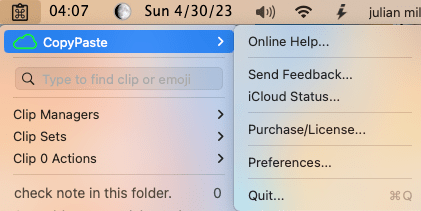
The very first time you start CopyPaste, this online manual opens. It won’t open automatically In the future. Next time you can open the manual by tapping on the CopyPaste icon in the menu bar (screenshot on the right) to open the CopyPaste menu. The first item has a cloud icon CopyPaste, select that to get the CopyPaste Admin Menu select top item ‘Online Help’. Or in the Preference Panel you see a ? icon at bottom right you can tap there for contextual help.
Please browse the manual. The Table of Contents on the left is very useful for finding info. Or command f and typing in a keyword for something you want to find. The QuickStart is one way to jump right in to using CopyPaste.
Install/Uninstall
Install
- Download the app from PlumAmazing.com
- Put in the Application folder
- Double-click to launch the app.
- CopyPaste is ready to go when the icon is in the menubar (see ID by Icon below).
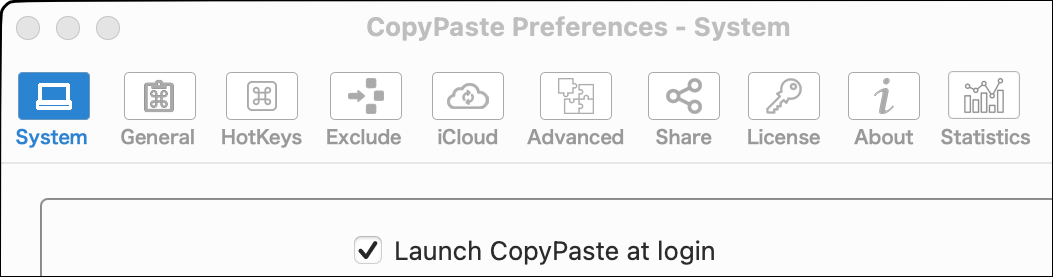
Make sure to set ‘Login at startup’ for CopyPaste by opening the preferences and making sure the item is checked like in the screenshot below. You can open the pref by tapping this link:
Tap to open the Login panel in System Preferences
Uninstall
- CopyPaste is an app. Quit first from the menu to remove the app.
Quick Start
IMPORTANT: CopyPaste is easy to install and use immediately. Don’t let the comprehensive manual scare you. Install and immediately use the power of CopyPaste instantly from the menubar. Learn the other features and key commands as you have time. Below is a quick overview also there are video tutorials here.
Get the latest version of CopyPaste from plumamazing.com. Put the unzipped app in your application folder. Double click the app to launch it.
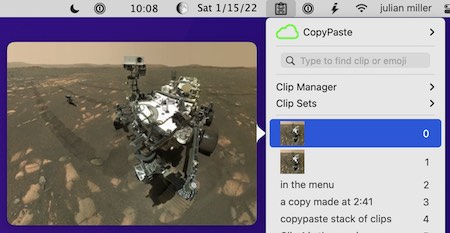
Once launched the CopyPaste icon (a clipboard with command key symbol) is seen at top right in the Mac’s menu bar (screenshot below). We call it the Clip History Menu.
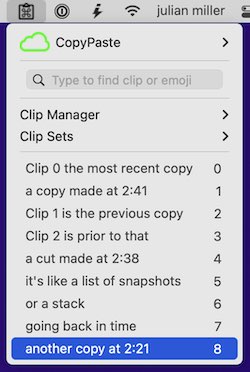
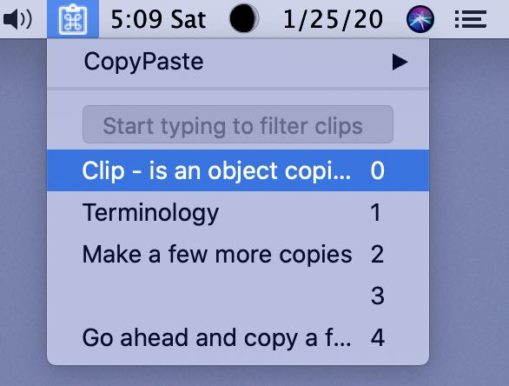
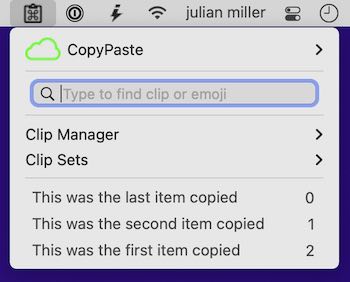 Now with CopyPaste running whenever you make a copy from the Edit menu or by command c it remembers that copy and adds a one line preview of that clip to the Clip History. At the bottom of the screenshot (right) the last 3 copies are displayed at the bottom of that menu next to the numbers 0, 1 and 2. 0 is the most recent copy and the higher numbers are progressively older copies. CopyPaste acts like a stack, ledger or log of every copy you made. It’s a time machine of all your copies or cuts. You will soon find this to be very very handy. CopyPaste magnifies your productivity and saves you from an immense amount of frustration.
Copy as usual select some text select it, then, either use:
1. Command c always copies the selected text or go to the Edit menu and select the ‘Copy’ menu item. Try it now to see your copy in CopyPaste. Go to the CopyPaste menu and see your copy there in clip 0 (we call each copy a ‘clip’) . Make a second copy of something different. Look and you’ll see your recent copy in clip 0 and the previous copy is now in clip 1. Do some more copies to see how the Clip History is a stack of your previous copies. Each copy appears first at clip 0 (zero) then migrates down the list with each new consecutive copy. 0 becomes 1 becomes 2, etc. with each new copy, CopyPaste makes the previously invisible clipboard visible. Now, you can see each copy or cut. CopyPaste remembers every copy and that is called the Clip History. The above is fundamental to understand CopyPaste.
Or
2. Control Shift c allows you to copy directly into a Clip Set. A Clip Set is explained here.
To Paste
Put your cursor in any field or content area then use one of these 6 ways to paste:
1. Command v always pastes the system clipboard. In the CopyPaste menu it’s clip 0. Or…
2. Control Shift v opens the ‘Paste from Clip Sets’ panel. From the hierarchical menu, first select a clip set, then a clip to paste. Or…
3. Tap once on any of the clips in the CopyPaste Clip History or Clips Sets menu. Or…
4. Paste by clip number, seen in the menu. Control # (Example: control 4 will paste clip 4). Or…
5. Control b opens the Clip Browser, a panel with colorful clip boxes you can tap to paste. Or…
6. Also with the Clip Browser open drag and drop drag any clip box and dropping it to any field to paste.
At some point try all of the above methods to paste to see how they work and which you most useful in different situations. Building the muscle memory and gaining experience with all these new options for copying and pasting is a little like when you first used a Mac and like that will increase your productivity.
Use an Action on a Clip
Use the cursor to click on the CopyPaste icon to drop down the CopyPaste menu. In it now you should see all the copies you have made. Right-click on one of your copies of text in the menu and a the Action menu will appear and drop down. With your cursor select, ‘Letter case’ in the menu and then in the new menu that appear, ‘UPPERCASE’ and let go of the mouse. There will be a small sound and the clip you had selected will now all be in uppercase in clip 0. Try it again and use, ‘NUt cAsE’. Try some other actions keeping in mind that some actions are for text, others for images, others for url’s. More details about Actions are here.
To Search Clips
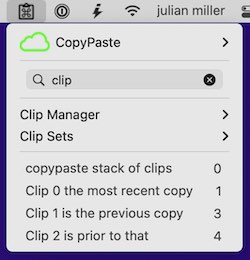
In the screenshot above the search field is at the top of the CopyPaste menu. Once you open the menu if you type that text will appear in the search field and immediately filter all clip for what you typed. Please try it.
To Quit CopyPaste
CopyPaste just sits in the menu bar. It’s there if you need it at any time. You can also quit CopyPaste anytime by tapping first on the ‘CopyPaste menu’ then the ‘Admin menu’ and selecting the menu item ‘Quit’ at the bottom of the menu. Click on the center of the video below to see the menu which takes you to ‘Quit’ & also ‘Help’.
To Open Preferences
In the Admin menu in above video is also a menu item for the Preferences for CopyPaste. Please to the Admin menu and select the Preferences and have a look at all the preferences. Learn more before changing preferences. If you have a hotkey not work in CopyPaste it probably means another app is using it. We recommend changing or removing that hotkey from the other app so CopyPaste can use it. But there is a preference panel for changing HotKeys if you have to.
Summary
- Get comfortable launching and quiting CopyPaste and also copying and seeing your copies appear in the CopyPaste History.
- Try some of the new and different ways to copy and to paste.
- Try Actions on clips.
- Open and checkout the CopyPaste Preferences, Help and other menu items in the CopyPaste Admin menu.
- Try out TriggerClip and Actions on clips.
- Learn more via the manual by browsing or using the Table of Contents
- Experiment to get to know the app.
All kinds of people use CopyPaste, from totally newbies on the computer, to experts. If you’re a beginner keep in mind you don’t have to learn everything at once. Launch CopyPaste and copy and paste as usual. Use the CopyPaste menu at first to access previous copies in the clip history. Over time learn the hotkeys. Take it a step at a time. Even just using the main CopyPaste menu, in the beginning, will increase your productivity.
In this quick start you’ve learned that with CopyPaste installed, you can copy just as before but instead of being invisible each copy is remembered and displayed in a Clip History and can be viewed anytime.
Recommendation

3:55
5:19

1:26

1:42

6:40

3:20

3:46

2:10
Previous Users
Compare Old & New Specs
Tap here or above link to compare the specs of ‘CopyPaste Pro’ to the new ‘CopyPaste’
Compare Old & New Icons
Icons for CopyPaste Pro & CopyPaste 2022
 |  |
| Older ‘CopyPaste Pro’ | New ‘CopyPaste’ |
 |  |
| Older Menubar icon | New Menubar icon |
For the new CopyPaste the icon at top-right is the file icon.
At bottom-right is the new CopyPaste menubar icon.
IMPORTANT: Mac OS hides menu bar apps when there is no space left in the menu bar. This is a common problem on newer Mac laptops with a notch. Try quitting some menu bar apps to free up space.
Migrating From Old To New
IMPORTANT: Users Of The Older ‘CopyPaste Pro’ Upgrading to ‘CopyPaste’, Read & Do This First
The new app is called just ‘CopyPaste’. It is different from ‘CopyPaste Pro’ which has been available for many years. The new ‘CopyPaste’ has different features, user interface and price from the older ‘CopyPaste Pro’. Though they share a similar name and icon, ‘CopyPaste’ is not an upgrade for ‘CopyPaste Pro’, it is a completely new app. We will continue improving the older ‘CopyPaste Pro’. They will continue in parallel with a different look, feel and features. There is no upgrade from one to the other.
- Import the old CopyPaste Archives and Clips to the new CopyPaste. It’s done from the new CopyPaste Preferences:advanced:backup. In that pref, tap the ‘Archives’ button and the ‘History’ to import your data. Then you data from the the old CopyPaste will appear in the 2022 CopyPaste as new Clip Sets called ‘Old CP Pro Clip History’ and ‘Old CP Pro Clip & Archive Name’.
- TAP HERE: For more details on importing your data from the old to the new CopyPaste
There have been many major versions of CopyPaste since 1996, the last being CopyPaste Pro. All of them were changes or additions of code to the original. Meaning it was always the same app, getting slowly improved over time.
The latest CopyPaste circa 2022 is a total rethink with some of the original architecture coded using a new language:swift and depending on modern API’s (Application Programming Interfaces) supplied by Apple and other companies.
That means for previous users it will be quite a different experience but the apps goals are similar, to put the power of the clipboard in the hands of the user to magnify their productivity. This manual aides the transition.
- Clip History is in both but may look different and is accessed differently and in more ways in the new CopyPaste.
- Clip Palettes which were the way to display the Clip History and Archive are now replaced by an infinite number of Clip Sets, which are displayed in menus and in Clip Managers. The old CopyPaste Clip Archive could only hold 43 items. In the new CopyPaste a Clip Set can be basically infinite depending on memory.
- To imitate the old Clip Browser, use the new Clip Browser, control b. More details at Clip Browser.
- To show the new CopyPaste menu, control h, appear anywhere on screen set the pref, ‘Open menu at cursor location’ in Menu Prefs. Details are here.
- Archives are now called Clip Sets.
- Tools are similar to Actions. Actions work differently and that is their function.
- More info for previous users is found in the ‘Quick Start‘ below.
Q: When I paste it pastes the clip twice.
A: That means you have the older CopyPaste Pro and the new CopyPaste running at the same time. Only run one app that edits the clipboard at a time. Make sure you are not running the old CopyPaste Pro by accident by going to it’s prefs and unchecking the, ‘Launch CopyPaste Pro at login’.
The original CopyPaste was fun for users for years as new features arrived over decades. We expect the same for the new CopyPaste which will also provide entertaining totally new features for years to come.
Compatibility
We will put things here which are important to compatibility.
Q: In the old CopyPaste Pro we used command c c and command v v to copy to the archive and paste from the archive can I still do that?
A: Yes, but you may not want to. We found that using command c c and command v v inserts a pause as the app waits for the second ‘c’ or ‘v’ to be typed. Having the system wait/listen for a second ‘c’ or ‘v’ to be typed also meant that when an ordinary command c was typed there was a 0.5 sec pause and while many didn’t notice but which was a problem for some that wanted to copy or paste very quickly. This is now solved by using a regular hotkey for both. By default it is control shift c to show the ‘copy to clip set’ menu. And a new default hotkey control shift v to show the ‘paste from clip set’ menu. There are also 2 new preferences in the ‘Hotkey’ preferences tab to allow using other regular (and fast) hotkeys. Also options for the old command c c and command v v if you want the compatibility with the older CopyPaste Pro and don’t mind the 0.5 sec pause.
If you have a new Mac laptop with a notch use version 0.9.74 or higher. If you have many menubar items CopyPaste and other menubar apps can get hidden behind the notch.
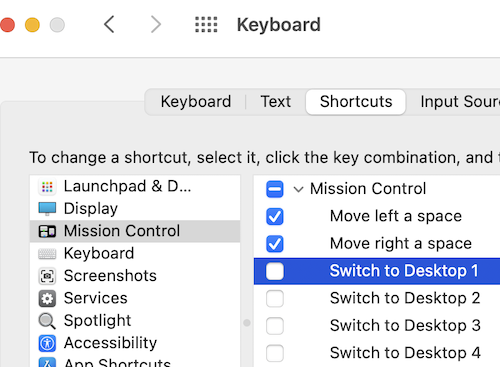
If you can’t paste clips from the CopyPaste menu by the number using control and a number then make sure to turn off the, ‘Switch to Desktop #’ (screenshot below). These got turned on in Mac OS 12.4 update. These prevent CopyPaste from using control # to paste clips with that hotkey. You can change those (depends on the number of space you have) hotkeys here:
Setting Up iCloud
**Please keep iCloud off for now^^. Later iCloud will be used for synching between Mac devices and to iOS when that becomes available.
In future, CopyPaste will iCloud to sync all your clip sets and clip data to your iCloud account. That way, if you have a Mac elsewhere using that same iCloud account then all the same CopyPaste is data synced between devices. Automatic syncing to all your Macs and soon iOS.
For now we recommend skipping this iCloud section and continuing on to become more familiar with and learn how to use CopyPaste on the Mac first.
In the future why use iCloud with CopyPaste?
- Use iCloud to back-up CopyPaste settings, clips and clip sets.
- To transfer files and clips to iCloud and share with your friends via a link.
- Most important, iCloud allows sharing clips with the new CopyPaste for iOS (coming).
 Setting up iCloud with CopyPaste
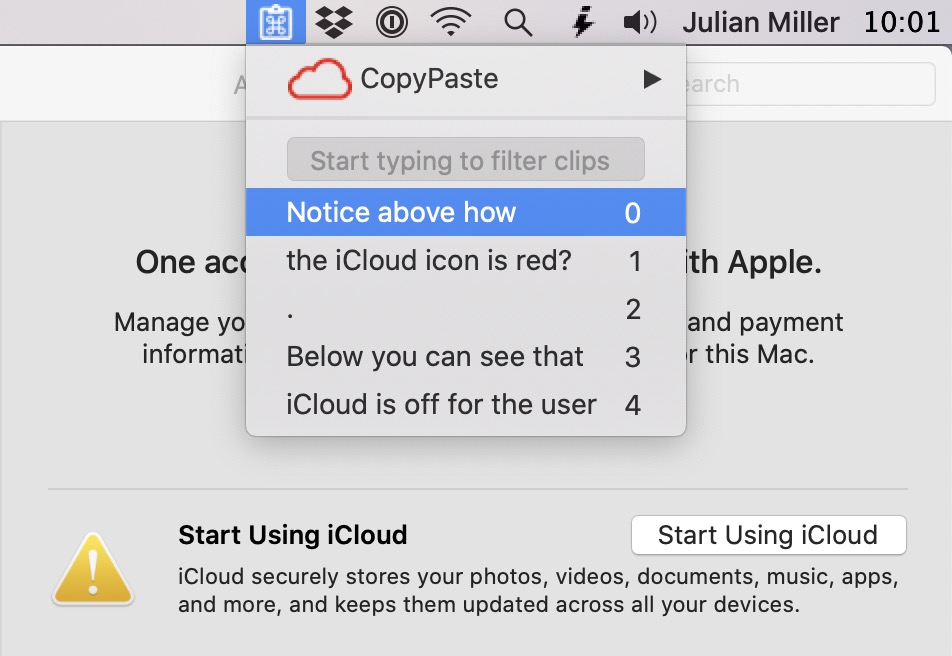
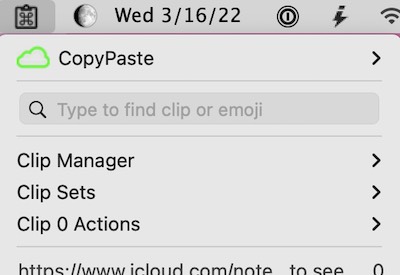
1) iCloud also needs to be turned on in the Mac System Preferences. To use iCloud with CopyPaste, go to the CopyPaste menu at top right in your menubar. It looks like this:
Notice above that the red cloud icon indicates iCloud is off. Tap the red cloud icon and you will be taken to the Apple system preferences. Tap on ‘Start Using iCloud’ sign-in, then it looks green (like below) in a few minutes. Make sure that iCloud Drive is checked on like this:
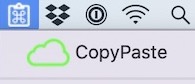
Tap here for Apple’s problem solving instructions for turning on iCloud. When iCloud is on you see this green cloud (above) in the CopyPaste menu.
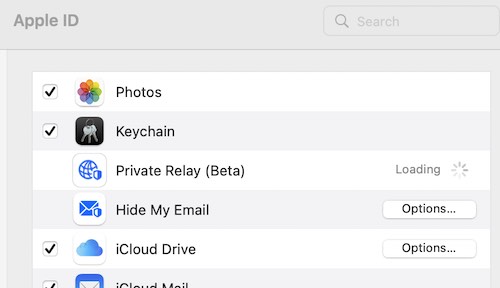
2) Make sure iCloud is on and iCloud Drive is checked on.
Then in CopyPaste 2 things are needed to hook up CopyPaste and iCloud.
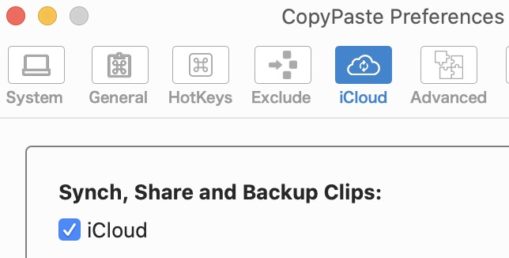
3) iCloud setting needs to be checked on (screenshot below) in the CopyPaste preferences.
Hotkeys
Some Hotkeys can be seen in the table of contents as a handy reference.
Hotkeys are handy shortcuts to perform an action from the keyboard. Command C to copy to the clipboard is a hotkey. Just like command c, knowing hotkeys can increase productivity but if you don’t you can still click around to achieve the same actions.
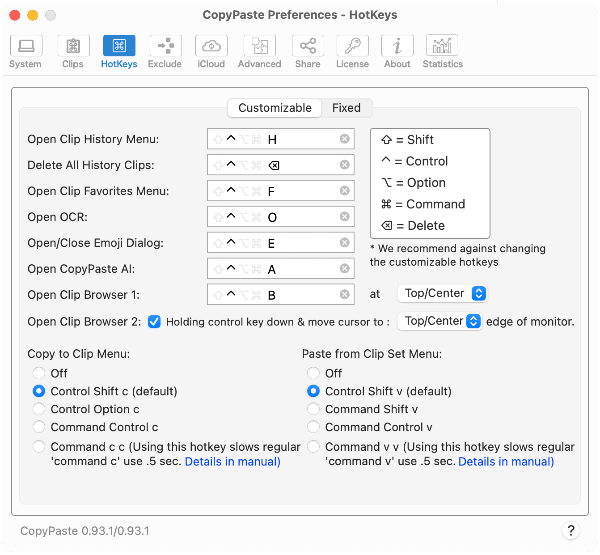
IMPORTANT: There are 4 command keys, control ⌃, command ⌘, option ⌥ and shift ⇧. At the right top corner of the screenshot below there is a legend that shows the symbol for each key.
These act as modifiers to regular keys. When we say, control ‘a,’ we mean, hold down the control key and tap the letter ‘a’. Shift ‘a’ might perform some totally different action. Most people find command c, to copy and command v, to paste, very handy. CopyPaste takes it a step further and gives more hotkeys for common (and really useful) actions.
To change a hotkey you can tap the little x at the right side of the field, they current hotkey will disappear then hold down they key you would like to use. Be aware if you use something already used by another app or by Apple’s apps there may be a conflict. Test your new key to make sure it works the way you want.

There are hotkeys that can be changed seen above in the prefs and hotkeys that can’t be changed.
Fixed (Non-Editable) Hotkeys
These hotkeys can’t be changed, they’re hardwired. If you learn these at the outset it is handy like knowing command c saves you time.
Customizable (Editable) Hotkeys
Editable hotkeys pref can be seen above. Editable hotkeys have a default setting. When we mention hotkeys are control h or command e, etc., in the manual we are referring to the default setting for the hotkey. We recommend sticking with the default hotkeys, for now, to get comfortable with how the app works. If you change it and don’t remember the default, go to the Advanced Setting where you can reset everything to default (Important: do not reset if you have data, clips, clip sets, settings you want to keep)
Hotkeys
| Command Key (⌘) | Key or Clip | Result | Action |
|---|---|---|---|
| Command (down) | tap clip | Pastes plain text no style | |
| Command (down) | delete | Deletes all text in search field at top of CopyPaste menu. | |
| Command Key (down) Option (down) | c | Appends selected text to Clip 0. More ‘Append’ details. | **(1x) Appended clip ** Shows the above in the CopyPaste menu for first append. |
| Command Key (down) Option (down) | v | Pastes clip 0 as plain text | |
| Control Key (⌃) | Key or Clip | Result | Action |
| Control Shift (down) | c | First, select text then command shift c | Opens the, ‘copy to clip set’ menu, select a clip to copy to. |
| Control Shift (down) | v | Opens the Paste Clip Set Menu | Tap to select the clip set then the clip you want to paste. |
| Control (down) | h (by default) | Opens History Clip Set Menu | Paste any clip with a tap. Or hold cursor over clip and right click to bring up action menu. |
| Control (down) | f | Opens Favorites Clip Set Menu | Paste any clip with a tap. Or hold cursor over clip and right click to bring up action menu. |
| Control (down) | o | Cursor becomes crosshair. | Drag cursor over region to OCR. Text automatically put in clip 0 and opened in Clip Manager for any editing, if needed. |
| Control (down) | e | Opens Emoji Window | Tap an icon to put it in clip 0 |
| Control (down) | type clip number (i.e. 27, etc) | Pastes that clip* | |
| Control (down) | type clip number x, dash, clip number y (i.e., 7-16) | Pastes the sequence of clips | |
| Control (down) | move cursor over clips | Shows the actions menu | Select a menu item to act on clip. The result is put in clip 0 |
| Option Key (⌥) | Key or Clip | Result | Action |
| Option (down) | tap clip | Opens clip in Clip Manager | |
| Option (down) | tap on clipboard icon in menu bar displays favorites clip set | ||
| Option (down) Command Key (down) | v | Pastes clip 0 as plain text | |
| Shift Key (⇧) | Key or Clip | Result | Action |
| Shift (down) | move over clips | Previews linked site or text | |
| Shift (down) | tap clip that has a link as content | Opens link in the default browser | |
| Handy Keys | Key or Clip | Result | Action |
| The ↑ ↓ keys | when tapped | Moves up/down the CopyPaste menu selecting each clip in turn | |
| Delete Clip(s) | |||
| Hold cursor over clip in CopyPaste menu to highlight it then tap backspace key | Deletes selected clip | ||
| Control (down) | Hold cursor over clip. Action menu appears. Chose ‘Delete’ action at the bottom of the menu. | Deletes selected clip | |
| Control Command Option (down) | delete key (by default) | Asks first if you agree then deletes the whole clip history. | Ponder first before doing this. |
CopyPaste Menu
⌃ h open&close
 Hotkeys:
- To open the CopyPaste Menu tap and release on the icon or control h
Once the CopyPaste Menu is open, the hotkeys below apply. Try them.
- The arrow keys to move up and down the list.
- Tap a clip once to paste it wherever your mouse cursor was last.
- Hold down Control and hold mouse over a clip to show the Action Menu.
- Hold down Shift then put the mouse over any clip to Preview Clips contents.
- Hold down Shift then tap on clip containing a url/link to open that link in your default browser.
- Just type to enter keywords at the top of the menu. Filter/Search Clips
- Highlight a clip and control delete key to delete that clip
- Hold down Option and tap a clip to open the clip in the Clip Manager
The most important thing to understand is that CopyPaste now has your back. It remembers ALL your copies. On the Mac (without CopyPaste) there is only one clipboard. The moment you make another copy that clipboard is lost forever. You have to remember what you typed and type it all over again. Besides being an incredibly boring waste of time that failure of the clipboard is also incredibly frustrating.
CopyPaste augments the infrastructure of the clipboard. CopyPaste is especially great for writers and who is not a writer?
It’s like as a human being you could only remember one thing at a time and the moment you thought something else your previous memory was gone forever. Viva la Evolution! CopyPaste imparts clipboard memory superpowers and eliminates the failure of the constantly forgetting ordinary clipboard.
 Clip 0
⌘ c, ⌘ v, ⌃ ø
Select some text here in the manual and copy it. Now open the CopyPaste Menu and look at it. The text you just copied will be to the left of the 0 like in the screenshot below.
We call this location of the most recent copy, ‘Clip 0’ (zero). It is the regular system clipboard. It contains the most recent info (text, image, PDF, spreadsheet, etc.) as usual. CopyPaste makes the system clipboard visible and editable. Now, make a few copies and each time check this menu to get more experience and understanding.
Clip History
⌃ h open&close
All those copies you just made are now in the Clip History. CopyPaste keeps a timeline or database of copies and cuts which we call clips. All together they are the Clip History. The screenshot below shows how each new copy made is added at clip 0 pushing the stack of previous copies down to the next slot. In the screenshot below clip 0 is newest and clip 7 is oldest. The copied text was made to help you grok the process.
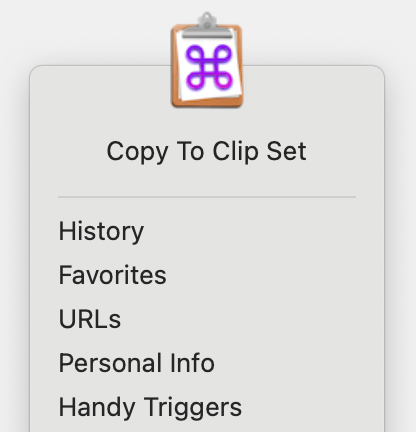 Copy To Clip Set
Control Shift c
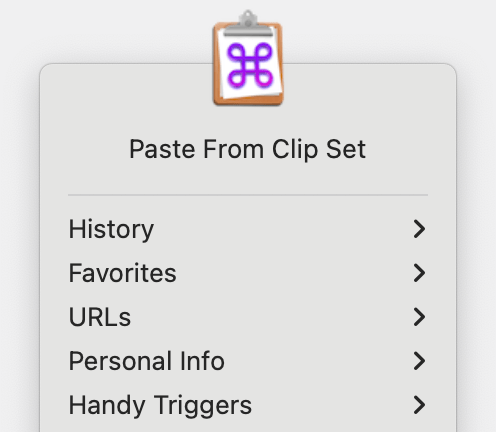 Paste From Clip Set
Control Shift v
To paste from any clip set first hold down, ‘control shift v’. That is, hold down the control and shift keys then tap v. A dialog of all clip sets appears. From the list of clip sets that appears, select the clip set and then the clip you want to paste. Or to cancel click outside the dialog. Try it out a few times to get used to it and start remembering it.
The screenshot on the right shows the hierarchical menu that appears when you do control shift v. The menu will show your clip sets. Select a clip set to show its clips. Then select a clip to paste it.
Control Shift v is the default and recommended hotkey but if necessary it can be changed at this location or by tapping preferences:hotkey:customizable
Clip Search/Filter
How To Filter
Open Clip History (Control h). Once menu is open start typing any search term. In the above screenshot I typed ‘clip’ and it filtered the clips seen in the previous screenshot to show only the lines with the word ‘clip’. Close Clip History (Control h). Now you try it.
⌫ text in filter
- Backspace – to delete all characters from the search field
Filtering happens in real time. With each letter you type it filters clips instantly. If what you type is found anywhere in a clip it will continue to be visible. To make all clips visible again tap the ‘delete’ key or click on the CopyPaste icon in the menubar.
7 Ways To Paste
1. Regular Paste
Command v
This is the usual built in Mac way to paste what’s in the systems single clipboard which we call clip 0.
2. Paste from Clip Set Menu
Control Shift v
To paste from any clip set first hold down, ‘control shift v’. That is, hold down the control and shift key and tap v. A dialog of all clip sets appears. From the list of clip sets that appears, select a clip set and then the clip you want to paste. Or to cancel click outside the dialog. Try it out a few times to get used to it and start remembering it.
3. Tap To Paste
How? Open the menu, tap a clip in the menu and it will paste wherever the cursor was placed last. Or use the arrow down key to down thru the clips in the menu then tap the return key to paste the selected clip. Both are simple. Try that a few times both ways to see what you like best.
With CopyPaste you can paste the last item copied as usual and but also paste any of the copies you can see in this ‘clip history’ menu. To paste first place the
cursor in any field or document where you want the clip to appear. Then open the CopyPaste menu, single-click on any clip to paste it. Let say you copied 10 email address in the CopyPaste menu, now just single click on the ones you want to paste, one after another. Try it a couple of times. Handy!
4. Paste by Clip Numbers
⌃ 4 etc. in History
How? For a clip in Clip History. Hold down the control key and type a clip number, e.g. control 6. So, Control 0 pastes clip 0. Control 1 pastes clip 1, etc. In the older CopyPaste Pro this was done with the command key and it worked for 10 clips. In the new CopyPaste control and the number of any clip will paste that clip
Lets say you want to paste the clip 1 below. First put your cursor in the document you want to paste in then tap control 1.
Just control key and the number of the clip. Simple, handy and unique!
⌃ 4.3 etc. in Clip Sets
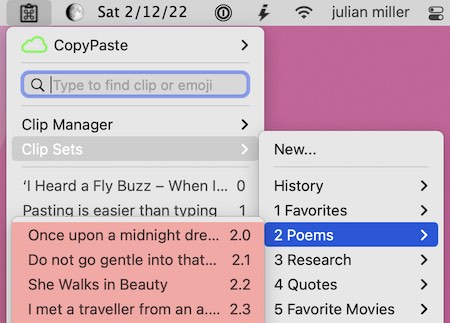
Each Clip Set has a number like 2 that you can see in the menu below. In the screenshot each Clip Set has number, always 1 for Favorites, 2 for Poems, 3 for Research, etc… On the left of each Clip Set you see the number 2.0, 2.1, 2.2 etc… The first is the clip set number and the second is the clip in the clip set. So, to paste from Clip Set 2 and the 3rd clip, hold down control and tap 2.3 to paste the poem Ozymandias. Or control 2.0 if you prefer Poe over Shelley
5. Paste Sequence
⌃ 1-4 etc.
Hotkey – hold down the control key and type 1-4 to paste those 4 clips.
Take this a step further. This time hold down control and type 1-4 then release the control key and you’ll see and hear (if you have that sound turned on in the prefs) clip 1 through 4 pasted all together and at once. Surprisingly handy? Actually that feat is impossible to do with the ordinary clipboard.
6. Paste from Clip Browser
Tap a clip in the Clip Browser to paste. See Clip Browser in the the next item below for details.
7. Paste from Clip Browser
Drag & drop a clip from the Clip Browser to paste. See Clip Browser in the the next item below for details.
Clip Browser
Control b or Cursor touches side
The Clip Browser is a visual aid for finding, accessing and pasting clips from the History and Clip Sets. Control b opens the Clip Browser. Try opening it now as you read along. These are items you copied to the History. You can tap on them to paste or drag and drop them to any field. In it’s default settings it can look like this (below).

Or depending on adjustments and settings you turn on/off the browser can have more info and look like this:
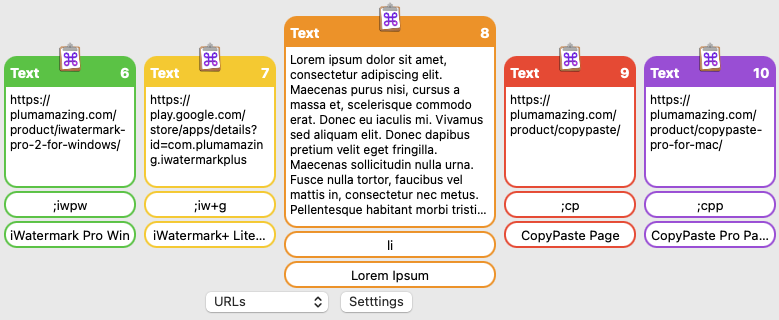
In that screenshot above, each differently colored object is a clip. The parts of a single clip are explained more below. If you don’t see the icon, trigger or title, seen below, then they can be turned on by turning on TriggerClip here in the Clips prefs. Also by adjusting in the Clip Browser prefs at this link where you can checkmark on the TriggerClip settings to show title, icon and trigger.
The Clip Browser preferences are essential to understand and using it. You will want to refer to that section for details and to customize the setting for your particular use. Tap the link below to go to the: Clip Browser Prefs.

Starting To Use The Clip Browser
- The preference settings (screenshot below) control the opening of the Clip Browser.
- The hotkey control b opens and closes the browser. Try opening and closing the Clip Browser . Change it if you want.
- ‘On Side’ allows you to choose the side of the monitor the Clip Browser will appear on. Please try that.
- ‘Cursor touches side’ opens the Clip Browser ‘On side’ of the monitor you’ve selected. Try it. Put the cusor against that side and it opens, move the cursor away and it stays open. To close the Clip Browser push the cursor against that same side and the Clip Browser will close. You can turn this feature off, by unchecking it, but it can be quite useful. Try open/closing using this technique. Switch sides and try again to find the side that’s best for you.

Continue to adjust the settings in the pref and immediately see the changes reflected in the Clip Browser.
- Experiment opening and closing the browser,
- click on clip and drag and drop it into a document,
- adjusting the size of clips in the clip browser,
- change the focus size,
- turn on/off the display of the trigger,
- title and app icon to see how they look,
- right click on a clip to see and use the ‘Actions’ menu.
Doing this will begin to familiarize you with some of the possibilities available in the Clip Browser.
Check the pref to find what you need: Clip Browser Prefs
TriggerClip
This screencast tutorial on youtube.com gives a quick overview. Use TriggerClip to type a few characters to instantly paste a line of text, pages of text, image, spreadsheet, screenshot, URL/link, PDF, file, etc., anything you have in a clip. Everyone has items they type over and over for years and years. Like their name, address, email, the ending of messages, descriptions of products, etc. Boilerplate text should be automated. We’re not caveman. Typing takes time and it’s time to be liberated. TriggerClip also saves you from constantly finding the same photos, files, documents, spreadsheets, etc. which can also be evoked immediately.
For example in a clip set titled, Personal Info, I have this trigger, jj, which, after you tap the spacebar, immediately types ‘Julian’ and also, jm and space, which is replaced with ‘Julian Miller’. It’s important to remember that triggers are letter combinations not usually typed, so, jj and jm, fit the bill perfectly since both are very unlikely to be typed typically. Please try it out. Create a clip set for Personal Info and add some clips to it. Then type the trigger you made up and then a space (the space is called the Trigger Key). If you want to use a different or more ‘Trigger Keys’ that is controlled in the Preferences:Clips:General panel.

Use TriggerClip anytime you need to type your address, you can type, for example use, mya, which is a kind of memorable abbreviation (mneumonic) for, my address. Typing, mya and a space, causes those chars to be replaced with your address. For example, President Biden could save time typing his address with CopyPaste by typing, ‘mya’ and then a space, to have those chars replaced with, ‘President Biden, The White House, 1600 Pennsylvania Ave, Washington, DC 20500’. Typing 4 characters would save him typing 79 characters but address could be a clip containing, pages of text or an image or whatever.
‘mya’ in the above example is what we call a trigger. When typed with a trigger key (space, return, tab or enter key), it causes the clip it’s associated with, to be instantly pasted. The clip can be text, image, spreadsheet, url, sound, file, pdf or whatever you need to paste often. TriggerClip is mainly for enhancing productivity but it’s also fun.
‘Vaðlaheiðarvegavinnuverkfærageymsluskúraútidyralyklakippuhringur’, is the longest word in Icelandic. You could save a LOT of typing using TriggerClip to type that. In Hawaii there is a famous and beautiful fish called, humuhumunukunukuapua, which is another example where typing just ‘humu’ and space, would save a lot of typing. Scientific names is another area where you can avoid typing and reduce spelling mistakes. So many long names could be typed more quickly with TriggerClip.
TriggerClip QuickStart
There are 2 places where TriggerClip preferences are kept 1. universal which control how TriggerClip works throughout the app and 2. individual TriggerClip settings for each clip. These are both explained below.
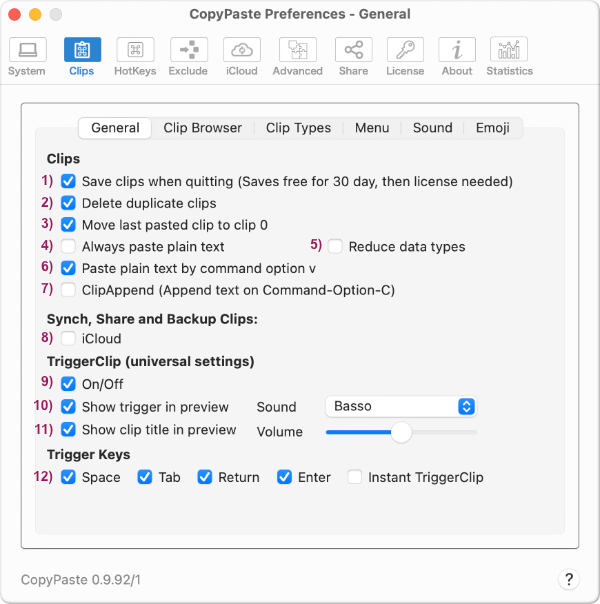
1) Universal settings for TriggerClip are kept in the preferences for CopyPaste. Universal means these settings apply to all TriggerClip clips
TriggerClip – is off by default. When you are ready to try it out set your prefs the same to start. Checkmark the On/Off pref to turn it on. If you want to turn TriggerClip off for all clips just uncheck it here.
Show trigger in preview – when this pref is on then the trigger is displayed in red as the second item in a clip preview. The title of a clip is the first in blue. The trigger in red. The 3rd item is the usual preview showing the first characters in a clip in black (seen in the screenshot below). Examples: Typing the red trigger dt and tapping the spacebar will trigger the current date and time to be pasted instantly. Typing ga (the trigger below in red) will paste the entire Gettysburg address (the Title below in blue). The black chars are just the first characters as before.
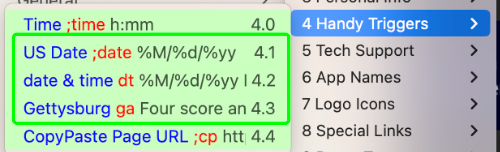
Show title in preview – turns on the display of the clips title in menu preview. The title of a clip is in blue above. The trigger in red. The first characters in a file in black in the screenshot above.
Sound – allows you to set a sound or none when you trigger a clip with TriggerClip.
Volume – sets the volume for the TriggerClip sound universally.
Trigger Keys – the selected keys in this pref (seen at the bottom of the last screenshot) will activate the trigger you give a clip. After you type a trigger tapping one of the selected keys will paste that clip. InstaClip means TriggerClip doesn’t wait but instantly pastes your clip. With instaclip it helps to have a totally unique trigger or you will go crazy. Select one or more if you want. You’ll find selecting InstaClip turns off all other keys. We believe it’s an ego issue.
Here is a picture of InstaClip as a superhero done by Bing/Chatgpt when we got distracted.
2) Individual clip settings for TriggerClip are kept for each clip in the Clip Manager.
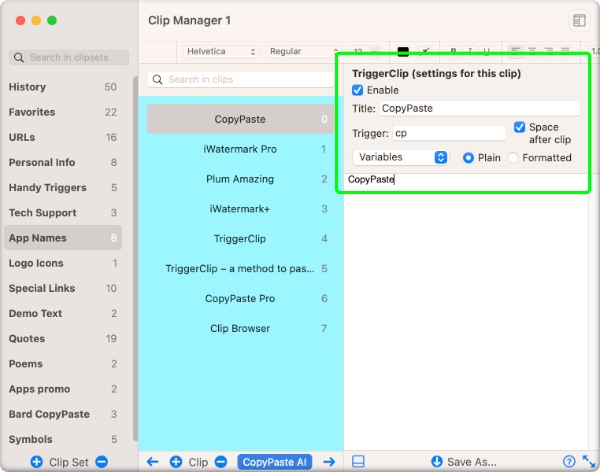
Above in the green square is what you will see in the Clip Manager when you turn on TriggerClip (above).
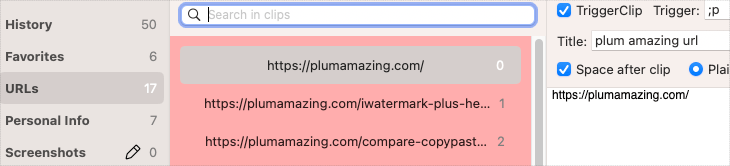
Enable – above is how you turn TriggerClip, on or off, for this clip.
Trigger – is the unique 2 or more letters that trigger key (space, return, etc.) which, when typed, evoke the clip.
IMPORTANT: the trigger should be memorable so you remember the chars to type for the clip. The trigger should also be unique set of letters/punctuation/symbols. Unique is important because you don’t want to type a trigger by accident and suddenly pop a clip into what you are doing. So, for example ‘and’ would be an awful trigger because when you are just doing regular typing everytime you typed ‘and’ you might get a picture or a 2 page docoment pasted at that point. To help make a trigger memorable and unique for URLs/link I start some with ‘;’ because it’s easy to type. I then start every url trigger with a semicolon like this, ‘;p’ which evokes, ‘https://plumamazing.com’. That saves me from typing freakin difficult url’s all the time.
Space after clip – when checked on puts a space after the pasted clip.
Plain or Formatted – controls how, this clip, is output, plain or formatted. Content which is formatted bold or whatever when plain is selected here is pasted as plain text. Content which is formatted bold when formatted is selected is pasted with all formatting.
Clip Actions
There are 4 ways to use ‘Actions’ on a clip to transform it’s content.
- To act only on clip 0. Tap on the ‘Clip 0 Actions’ Menu (screenshot below) to show the action menu and from it select an action to act on the content in clip 0.
- To act on any clip in the CopyPaste menu. Hold down control, tap to select any clip in any clip set, the drop down action menu appears, select an action to act on that clip.
- In the Clip Manager to use actions on a clip, hold the control key down and tap a clip (center column) to show and select an action to act on that clip. The result goes to clip 0 as usual.
- In the Clip Browser to use actions on a clip, do a right click on a clip or hold down the control key and tap a clip to show and select an action to act on that clip. The result goes to clip 0 as usual.
Results in clip 0 can be pasted with command v as usual.
1. Actions on Clip 0 in the Menu
Tap on the ‘Clip 0 Actions’ (see below), select an action and let go, the result is always put in clip 0.
Clip 0 Actions can be used anytime. To try it out, first copy a sentence. Then select, ‘Clip 0 Actions’, from the CopyPaste menu. Choose any Action in the menu like, ‘UPPERCASE’. Now look and you’ll see Clip 0 is now uppercased and the original copied sentence was automatically moved from clip 0 to clip 1. Do command v to paste the uppercased sentence where the cursor is. Try some of the other actions to see how they work, experiment, to get used to it.
2. Actions on any clip
Hold ⌃ tap clip or right click on clip
The second way to use Clip Actions which works on any clip in any clip set, not just on Clip 0.
Hotkey:
Hold down the Control key and hold the cursor over a clip in the CopyPaste
How? Hold down the control key and then move the cursor over a clip to see the ‘Actions’ menu appear like above. Tap an action like ‘UPPERCASE’ and that clip is uppercased and that result copied to clip 0 which you can then paste.
Actions Summary
Clip Actions transform the data in clips in a variety (see screenshot below) of useful ways.
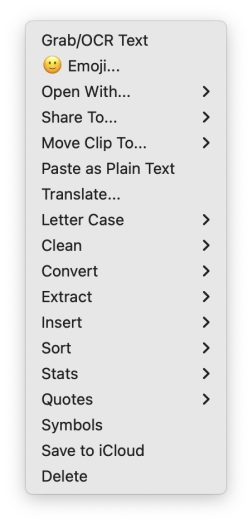
Here’s the menu of built in clip actions currently available for text clip.
As important as the original clipboard was, CopyPaste makes it 10x or a 1000x more powerful. A clip history is incredible handy. Clip Actions act on clips, saving time. CopyPaste is a hub for content. Never lose and have to retype a copy ever again.
Actions enhance productivity by allowing you to immediately transform clips in a variety of ways. Long ago when we first added this to CopyPaste, Actions (then called Tools) started with performing UPPERCASE and lowercase.
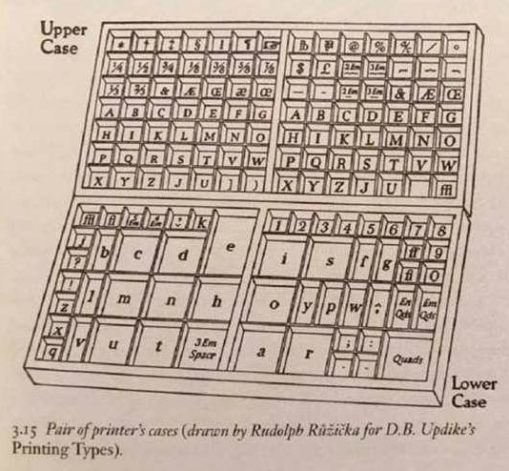
FUN FACT: The terms “uppercase” and “lowercase” come from the way in which print shops were organized hundreds of years ago. Individual pieces of metal type were kept in boxes called cases. The smaller letters, which were used most often, were kept in a lower case that was easier to reach.
List of Actions
TEXT – Example: select UPPERCASE below to covert text in Clip 0.
- Letter Case – changes the case of all letters/words in a doument
- UPPERCASE
- lowercase
- Word Case
- Sentence case
- Title case
- NUTcaSe
- Clean
- Clean & Unwrap
- Remove Duplicate Lines
- Remove Empty Lines
- Remove Line Numbers
- Remove Quote Prefixes
- Remove Spaces & Tabs
- Remove Lines Containing
- Remove Numbers
- Remove Non-Numeric
- Remove 2 Or More Space
- Convert
- Emojify
- Numbers To Words
- Words To Numbers
- Upside down Text
- Reversed
- Summarize
- Extract – makes a list of all the items from selected text
- Email address
- Dates
- Phone numbers
- URLs/Links
- Insert – select an item below to insert at cursor location
- Date
- Time
- Date & Time
- #Hashtagged @Words
- Start.Line/End Line
- Sort – sorts line of text in these ways
- Sort Line Ascending
- Sort Lines Descending
- Stats
- Word Count & Frequency
- Quotes
- Single > Double
- Double > Single
- Translate…
- Letter Case – changes the case of all letters/words in a doument
IMAGES
- Resize Image (200×200)
GENERAL
- Open With…
- Share To…
- Move Clip To…
- Save to iCloud – save the item to iCloud
- Delete – deletes the contents of clip 0
This Is NUTcaSe. iT Was INVenTED as An acTiON For the latesT CopyPastE For maC. JUst for fun. No nUTS wErE hURt iN tHis gRaNOLa. it’s similar to UPPERCASE, lowercase and Title case.
Simply control click on selected text to show a menu choose ‘Translate’. In dialog that appears select a language then ‘Replace’ the text in the clip or ‘Copy’ to put the translation into clip 0 and leave current clip the same. This is thanks to Apple Translation which currently translates into 12 languages and made handy in CopyPaste. There’s also an action you can use to translate items in clips for more languages.
Preview Clips
⇧ hold over clip
Preview clips at any time. Preview displays a visual of a graphic, text, the web page of a url, etc.
- Hold down the shift key and hold cursor over a clip in the CopyPaste menu.
Try it. Click on the CopyPaste icon in the menubar. Then hold down the shift key and as your cursor is over a clip it will swing out with a preview (see screenshot below) of text, image, link, etc. In this case holding the cursor over the thumbnail of the Perseverance rover shows a large preview of the image. A link will show a preview of a web page. A clip with text will show a large amount of the text. Preview is a quick way to get a larger view of whats in a clip. Below the shift key is held down as the cursor is over a clip with an images which then shows the preview.
IMPORTANT: The shift key has to be held down before your cursor is over the clip you want to preview. The bigger the file the longer it takes to render the preview.
- Hold down Shift then tap on clip containing a url/link to open that link in your default browser.
Find Emoji
⌃ e
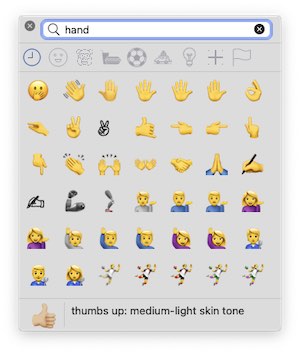
- Hold down control key and tap e to open the emoji palette (seen below).
- Hold down control key and tap e to open the emoji palette (seen below).
With the clip menu closed hold control and tap e to open the emoji palette. Type the word ‘hand‘ which will display the palette like the one below.
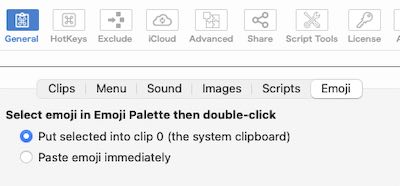
Tap on the emoji you want and it will be put that emoji into clip 0 (or will paste direct to cursor location depending on pref setting) which you can then easily paste in any application when you’re ready to use it.
Grab/OCR
How? In the CopyPaste menu first select the ‘Clip 0 Actions’ menu then the ‘Grab/OCR’ menu. Hotkey is hold down control o to display the cross cursor for drawing across the area to be scanned.
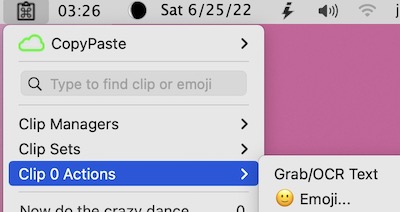
The ‘Grab/OCR’ tool allows you to wave wand any part of the screen to save you from having to type in the text. What it does is Optical Character Recognition (OCR) text in a picture or editable text. It’s handy because it saves you from having to type in text. For example memes are graphics that often contain a quote or text. Grab/OCR allows you to move it from an image to text which you can then use to search if it’s true, translate it from the original language or use it to create your own better meme.
To use, select ‘Grab OCR Text’ from the CopyPaste Actions menu (above). Or hold down control o (for ocr). The cursor will change to a crosshair icon (seen below). Drag the cross across a picture or any combination of windows that has text to grab and input all the text in that picture, page(s) or website. The crosshair icon looks like this:
![]()
How long would it take to type the words in the screenshot above? Try it now with the Grab/OCR tool. First, select the Grab/OCR menu item then drag the bullseye cursor![]() over the screenshot. The text will be OCR’d and open up in Clip 0 in the Clipboard Manager for editing. Paste it with command v. Try it out anywhere there is text you need to type in, like from screenshots, pictures and on websites. Test and see how fast it appears and how accurate the OCR is. Now do the crazy dance because you no longer need to type everything, there’s massive amounts of text you can OCR any time you want for free and no one can stop you.
over the screenshot. The text will be OCR’d and open up in Clip 0 in the Clipboard Manager for editing. Paste it with command v. Try it out anywhere there is text you need to type in, like from screenshots, pictures and on websites. Test and see how fast it appears and how accurate the OCR is. Now do the crazy dance because you no longer need to type everything, there’s massive amounts of text you can OCR any time you want for free and no one can stop you.
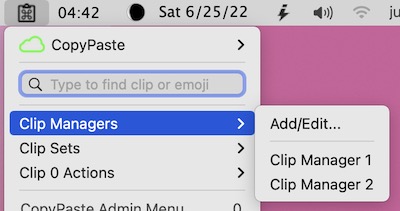
Clip Manager
hold ⌥ tap clip
The Clip Manager lets you edit, display, modify, sort and manage your clips. It gives you a whole new level of power & organization far beyond the humble single clipboard.
As you can see you can create new Clip Managers by selecting the ‘Add/Edit’ menu item see in the screenshot below. Each Clip Manager gets a new number. Usually you would create just one to create or edit Clip Sets or Clips. But you could open 2 Clip Managers and drag clips to other clips sets.
The Clip Manager will appear on screen and will look like this.
Hotkeys:
- To open a Clip Manager window from the CP Menu. Hold down the option key and tap a clip in the CopyPaste menu.
- In clip manager’s clip set column, control single click can display drop down menu with menu items to create and delete clips.
- In Clip Manager’s clip set column, control single click can display drop down menu with menu items to create new clip set and delete existing clip set.
The first column contains Clip Sets. The topmost item is History. It’s a Clip Set of the history of all copies. The Clip History changes over time as you copy new items. The default Clip Set is History which is created the first time you copy some text.
The Clip History is dynamic all other sets are static. You can add things to a normal Clip Set and it stays put till you delete it. To start create a Clip Set named ‘Favorites’. It is a good idea because this is where you can start saving clips you want to keep. Also just like there is a default hotkey to open Clip History (control h) there is a default hotkey to open ‘Favorites’ (you guessed it, control f).
Other possibilities are Clip Sets for Screenshots, Quotes, Reviews, Boilerplate Text (often used replies to people), Favorite Pictures, Icons, Book Info, Audible Book Info, Research, References, Links, etc. Any kind of database of items you want to keep and integrate with copy and paste on your Mac. Then just drag & drop clips using the Clip Manager from one Clip Set to another.
Q: What’s the Clip Manager good for?
A: It gives you a window which allows you to:
- Create new clips and new clip sets
- Edit or format any clip in any clip set.
- Sort clips by date, dragging or alphabetically in any clip set (sorting not available in the clip history).
- Arranging, naming and moving clips between clip sets.
- Creating clip sets of clips on one topic.
- Use actions to act on/change clips. Control click on a clip (in the middle column) to perform actions on its contents.
Q: How do I move clips from the Clip History to my new Clip Set?
A: In the Clip Manager, select the Clip History on the left most column. In the center column you will see all the clips. Click hold and drag a clip to your new Clip Set in the left column. You can even have 2 Clip Managers open and drag from one to the other. Try both ways to see how it works for you.
CopyPaste AI


Summary:
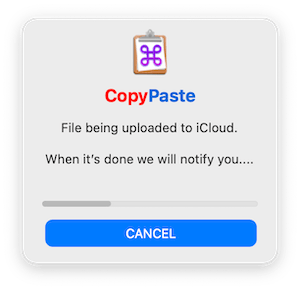
An incredibly useful feature that lets you put a file or files, of any size, easily into your iCloud account. A link to that files is placed on your clipboard that you can share with friends. They can then tap the link to download that file. In 3 days the file is deleted from iCloud and the link becomes inactive.
Solves this Problem: Sometimes you have a file(s) that you want to share immediately with a friend, family or collegue that is larger than you can send by email or other methods.
How to use:
3. A dialog will appear that looks like this.

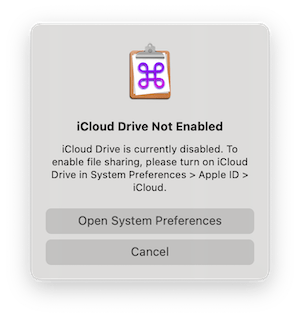 This dialog means that iCloud is not turned on in your System Preferences.
Advanced details
– Your original dragged file is not altered at all, only duplicated.
– The file or files are zipped (compressed into a zip file with the same name) before uploading.
Basic Details
– If you don’t have iCloud set up yet. Use Apple’s guide at this link.
– If you have a problem make sure you have enough space in your iCloud account.
Menus
CopyPaste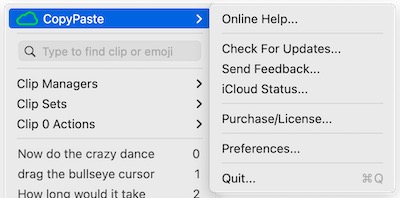
This is the CopyPaste Menu.
Preferences – this menu item opens the preferences window, the place to control the settings.
- Online Help… – goes to this manual
- Check for Updates… – allows checking for a newer version. We recommend always using the latest version of CopyPaste.
- Send Feedback… – takes you to a contact form where you can pass on your suggestions and let us know if you experienced an issue. Spelling/grammar mistakes in the manual and ways you think we can make anything/everything mo’beta are also very useful. Details and screenshots help.
- iCloud Status – is handy if you are having a connection problem with iCloud, it presents the status on Apple’s iCloud services, whether up or down.
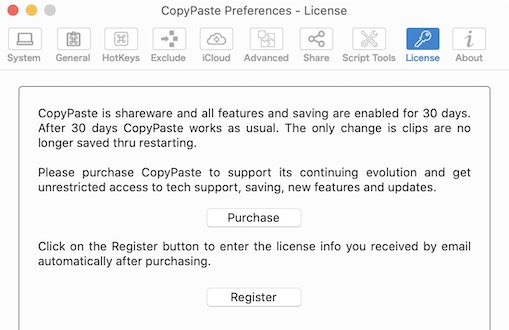
Purchase/License – shows how to pay for the app and install the license.
_________ - Grab/OCR Text – select this handy tool, it will change the cursor to crosshairs. Then, like you’re taking a screenshot, drag across any text anywhere on your monitor. The text can be in a picture, website, receipt, pdf, document, whatever, and it will Optical Character Read (OCR) that text and push it to clip 0 and open the clip editor for you to view that text. This saves having to type in text.
_________ - Emoji – you can open the emoji palette from here but…it is much more handy to use the command to open the CopyPaste Menu (the default is control spacebar) then just start typing the name of the emoji you are looking for, like ‘hand’ or ‘tree’, etc. It also allows find the skin color you want to use by typing tone1 = light skin to tone5 = dark skin. So type ‘waving hand tone4’ to show/select the waving hand in medium-dark tone.
_________ - Clip Manager – is new way to organize, display, edit and transform your clips. Create new Clip Sets and add new Clips to Clip Sets. You can open multiple Clip Manager windows to view different Clip Sets simultaneously, drag & drop between windows and switch between Clip Sets.
Clip Sets
A Clip Set is a collection of clips. It is like a mini flat file database. The main Clip Set is the Clip History. It is a collection of temporary clips while all other Clip Sets contains clips that are permanent till you decide to delete them. From the Clip History you can move a clip you want to keep and reuse in the future to the Clip Favorites which is permanent and stays around as long as you need it.
You can create your own Clip Sets. For example you could create a famous quotes set of clips called ‘Famous Quotes’. To do that, in the CP Menu, just select ‘Clip Sets’ menu item then ‘New’.

This will open a ‘Clip Manager’ window that looks like this: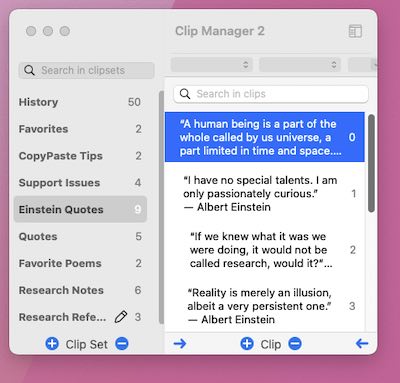
At the bottom left nav area there is + Clip Set –. Select the + to create a new Clip Set. Make sure to name it something descriptive.
Drag quotes from copies you made in Clip History or drag them from Apple Mail or Safari or any other app. CopyPaste Clip Sets are like small databases for anything you want to keep around, keep handy, refer to and use again.
Clip Actions
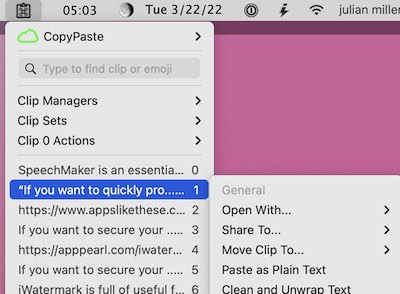
This menu has menu items that when selected can act on a clip or clips. For example if, from a clip you chose ‘UPPERCASE’ that clip will be all transformed into uppercase letters and put into clip 0. The original clip is unchanged. The ‘lowercase’ action menu item above would transform a clip to lowercase.
To use Clip Actions on clips in the Clip Manager hold down the control key and click on a clip to see the drop-down menu of all Actions. When a clip is acted upon it puts the result in clip 0 and pushes all other clips down a stop. Try it. Control click on a clip and in the drop-down menu select ‘lowercase’ then look at clip 0 to see and/or paste the now lowercased text.
At the top under the ‘General’ heading are actions that can act on any clip whether it’s text or image or some other object type.
- Open With... – shows all your apps that can open the contents of the selected clip
- Share To… – gives you a variety of ways to share your clips
- Copy to Favorites – moves the clip from the History to the Favorites.
- Paste as Plain Text – removes all formatting and pastes that clip. This can also be done by a hotkey and prefs.
We created these actions to be handy and do useful things. We hope you will join us in thinking of new kinds of actions that could be useful for everyone.
Most of actions are pretty obvious. Here are some explanations for some that are not so obvious.
- Extract Email Addresses – this grabs all email addresses in the clip and puts the entire list into clip 0.
- Extract URL’s – grabs all URL’s in the clip no matter how big it is and puts the entire list into clip 0.
- Shorten URL – makes any long boring, un-rememberable and hard to type URL into a very compact URL which is easy to type and pops it into clip 0
- Word Count & Frequency – makes a report of every word in the selected clip and the number of times it appears along with total word count, unique words, total sentences and total letters.
- Date & Time – this put’s the current date & time in long format into clip 0
- Sort Text by Line – takes a text clip sorts all the lines alphabetically.
Preferences
One last very important item is the Preferences. They are found in the menu here.
The preferences for CopyPaste allow customizing it for your use. Here you can turn settings on or off, add features, reset the app, backup the app and enter your license info in the registration area.
At the bottom of each pref page are 2 items. On the left tap the version number to go to the changelog. Onn the right tap the ‘?’ icon for more details on that pref page.

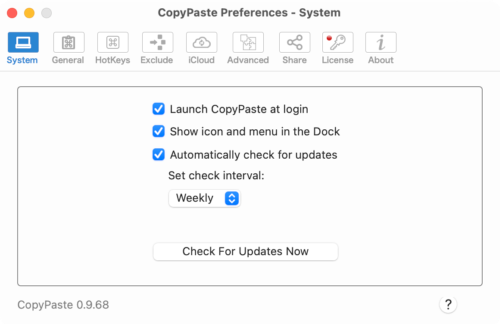
System Prefs
We recommend these settings.
Here you can set a few items and check one.
- Launch CopyPaste at login – starts the app automatically at startup.
- Check for updates once a week – does that automatically. Or set to different interval.
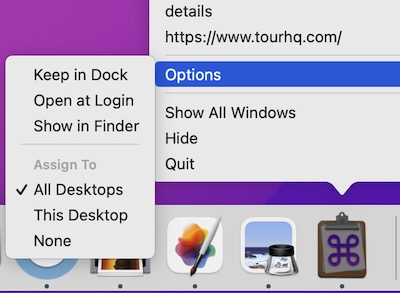
- Show icon and CopyPaste menu in the Dock – has the icon and menu accessible from the dock. Here you can see and start from bottom of the CopyPaste History menu beginning with the oldest clip. In addition to the CopyPaste menu in the dock all the usual options are available that all dock items have.
- Check for Updates Now – when tapped lets you know if there is a new version.
General Prefs
Clips Prefs
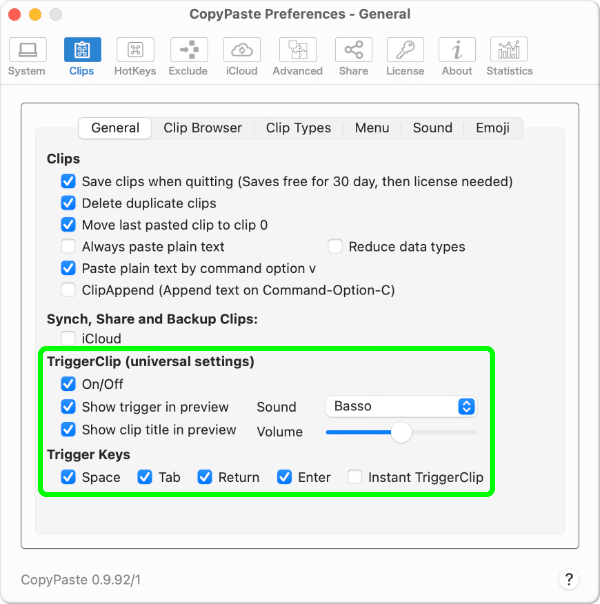
- Save clips when quitting – When this is checked on, then all the clips and settings are saved thru restart free for the first 30 days. After 30 days you can continue to use the app free but it won’t save clips till you purchase and license the app.
- Delete duplicate clips – if you copy and item twice only the most recent remains.
- Move last pasted clip to clip 0 –
- Always paste plain text – some people turn this on to only paste plain text. That means no formatting and no images.
- Reduce data types – the option to reduce the data set in the clipboard means that some private types of data and commonly unknown types are removed. Several programs put their own data types into the clipboard which are only valid as long as the document is open and the program is the front program. CopyPaste would store all data types and restores them when you paste. These restored private data types are invalid and cause problems in the program which first put these data types into the clipboard. So this option to remove these data types can help in those cases. This does not apply to most people and most apps.
- Paste plain text by command option v – instead of using point 4 above. This allows you to paste plain text when you want by using command option v. Apple and other apps use different commands for this like command option shift v. Our command is short and worked in all the places we tested it. This command is also useful for when you copy a link and a regular paste, command v, shows the title as a link, like this:Clip Types Prefs
or to just paste the link/url use command option v to get:https://plumamazing.com/copypaste-for-mac-manual-page/#Clip-Types-Prefs - Clip Append (Append text on Command-Option-c) – check this item on to be able to append with a hotkey. This allow you to concatenate (add) text to whatever is already in clip 0. You can append text as many times as you want to clip 0. The first append will show in the menu. **(1x) Appended clip **. A second append: **(2x) Appended clip ** More details link.
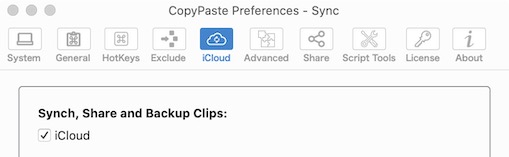
- iCloud – this turns on the use of iCloud within the app. This will be more important when the iOS app becomes available.
- TriggerClip On/Off – is off by default. When you are ready to try it out, you can turn it on. Click here to learn more about how to use TriggerClip.
- Trigger Keys – the key or keys you want to use to trigger insertion of a clip. If you have ‘Space’ checked then when you type a trigger and hit space it will insert the clip.
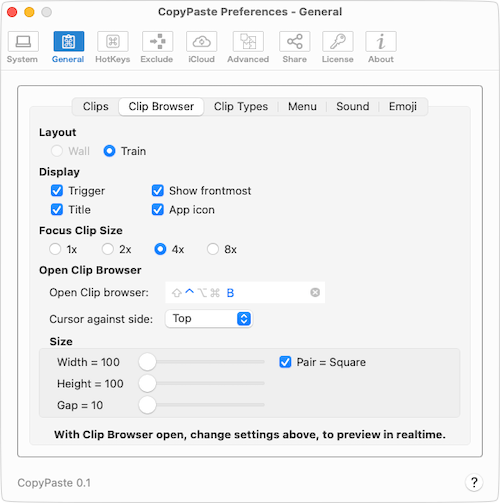
Clip Browser Prefs
The Clip Browser is a visual aid to finding and using clips.
- The settings (screenshot below) control the opening of the Clip Browser.
The hotkey, control b, opens and closes the browser. Best to use that but you can change it if you want. - ‘On Side’ allows you to choose the side of the monitor the Clip Browser will appear on.
- ‘Cursor touches side’ opens the Clip Browser ‘On side’ of the monitor you’ve selected. Put the cusor against that side and it opens, move the cursor away and it stays open. To close the Clip Browser push the cursor against that same side and the Clip Browser will close. You can turn this feature off, by unchecking it, but it can be quite useful.
The best way to understand the clip browser is to start using it. To see and learn how to use the Clip Browser open the open the CopyPaste preferences to the pref panel (screenshot below). Hold down the control key and tap the b key to open the Clip Browser. Now you can adjust the settings in the pref and see the changes in the Clip Browser immediately. Experiment opening and closing the browser, click on clip and drag and drop it into a document, adjusting the size of clips in the clip browser, change the focus size, turn on/off the display of the trigger, title and app icon to see how they look. Also, with your cursor in a field or document, try tapping a clip to paste that clip in where the cursor is. Doing this will begin to help you understand some of the possibilities available in the Clip Browser.
Layout
Currently Train is the only layout. The layout is called train because it’s clips move, when you use the right and left arrow keys or scroll, along together like railroad cars in a train. This allows you to see clips all at once and clips contents visually at a larger size than in the Clip Menu.
Display
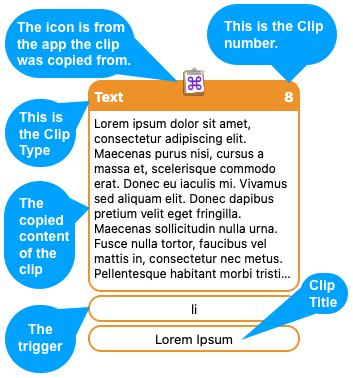
Trigger – checking this checkbox on shows the Trigger field. This field contains the trigger characters that when typed are automatically replaced with the contents of that clip. In the screenshot below, the example is the large one in the center. Here the trigger is, ‘li’. Typing the characters li (the initials of lorem ipsum) will cause those 2 characters to be instantly replaced with entire the Loren Ipsum text. Tapping on the Trigger field will open the Clip Manager so you can see or edit the Trigger.
Title – with checkbox checked on title is displayed. this is the title you can give any clip set (other than the History Clip Set). Having the title is an easier way to remember and find a clip. In the screenshot below, the example is the large one in the center. Here the title is, ‘Lorem Ipsum’. Tapping on the Title field will open the Clip Manager so you can see or edit the Title.
Show Frontmost – when checked on (the default) this makes the Clip Browser stay as the frontmost window all the time. If checked off, clicking on a window in another app or the desktop, makes that window frontmost.
App Icon – when checked on (the default) the icon of the app where the clip was copied is shown at the top of the clip like a crown (screenshot below).
Clip Content – this is the copied content. Tapping on the content will paste in the field where the cursor is. Click and drag the content to any document.
Clip Type – at the top left of each clip is the Clip Type, e.g. Text, URL, Image, CSV, etc. The Clip Type is the category of data that you have copied or cut. Each is like a different format of data.
Clip Number – this in number is the order in which the clip was copied. 0 is the most recent copy, often called the clipboard. 1 is the previous copy, 2 is the clip copied prior to that, etc.
Focus Clip Size
This central clip can be blown up from 8x in size compared to the other clips by setting the radio button for this here.

Open Clip Browser
This shows 2 ways to open the Clip Browser.
Customizable hotkey – to open the Clip Browser by default control b but can be changed.
Cursor touches side – when a side is selected, e.g. top or right, then touching the cursor to that side will open the Clip Browser. Touching anywhere on the Right, Bottom and Left sides. But on the Top side, because using the app menus on the Left and menubar apps on the Right would cause spurious opening of the Clip Browser, those areas won’t open the Clip Browser but the empty center area between those 2 will open the Clip Browser. In other words, if you have it set to Top then push the cursor close to the center, top and not over the app menus on the left or menubar apps on the right.
Size
This is where you can adjust the size of the Clip Browser to your liking.
Width – controls the width of the clips
Height – controls the height of the clips
Gap – controls the size of the gap between clips
Pair = Square – when checked allow height and width to move as one, creating a square. Unchecking it can create a rectangle of different size sides.
More to come…
Clip Types Prefs
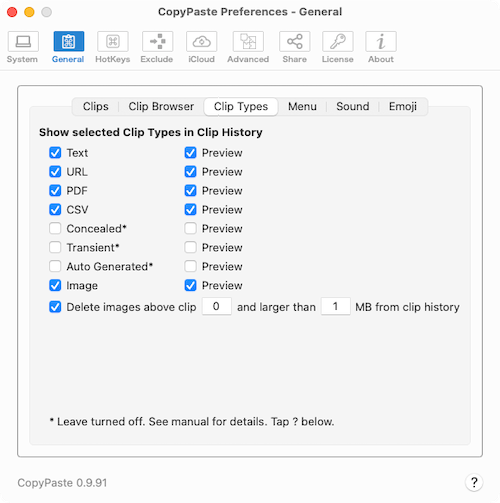
It’s best to leave these items alone unless you’ve read and understand details below.
The items in the left column above are ‘clip types’ when checked on will go from clip 0 in the main system clipboard and then into the clip history (clip 1, clip 2, etc.). If unchecked then these, ‘clip types’ won’t go into the clip history (clip 1, clip 2, etc.).
The preview items in the right column (above) means those clip types can be previewed by holding down the shift key, clicking on the CopyPaste menu and holding the cursor over a clip. That will show a preview of text, image or url, etc. if you have them checked in above right column.
Clip Types called by Apple pasteboard types are the different types of data that can be shared.
Show selected Clip Types in Clip History – The object types checked in this pref, when copied, go into the Clip History. If you uncheck ‘Text’ then that will be seen in the (system clipboard) Clip 0 but NOT in the clip history like, clip 1, clip 2, etc.
Text – all types of text, formatted and plain.
URL – any string like https://plumamazing.com, https://plumamazing.com, ftp://plumamazing.com
PDF – adobe’s PDF format files.
CSV – (c)omma (s)eparated (v)alues file is a delimited text file that uses a comma to separate values. These files are often used for exchanging data between different applications, like spreadsheets, databases and contact managers.
Concealed – this clip type and the next 2 are turned off for Password Managers and other apps that conceal data that are meant to restrict the visibility of passwords,
Transient –
Auto Generated –
Image – all types of images, jpeg, gif, tiff, png, etc.
Delete images above clip [ 0 ] and larger than [ 1 ] MB from clip history – if you copy and paste a lot of images, photos, graphics that are 1, 10, 20 megabytes or more and you don’t want to have them appear in the CopyPaste history. Make sure this is checked on to indicate that images above a certain size won’t be saved into the clip history and so won’t take up memory. This means they won’t appear in the backup either. But you will be able to copy and paste them normally.
Preview – if Preview is checked on for a object type like, ‘Images’, then they can be previewed in the CopyPaste Menu by holding down the shift key and moving the cursor over that clip.
Each ‘object type’ can be turned if for instance you don’t want an object type to go into the history. Or by turning off preview then that object type will not be able to be previewed. We would like to offer more ‘object type’ in the future.
If you still wonder what the last feature is and how it works, fill your clip history with, text, urls, csv, screenshots, photos, etc., then go and uncheck ‘images’ and look at the menu. Try turning off ‘text’ and look at the menu. Turn them back on. Feel free to experiment.
Menu Prefs

This pref controls options related to the CopyPaste menu and it’s appearance.
- ‘Open menu at cursor location’ – checking will make the top left corner of the menu appear wherever your cursor is when you tap the hotkey, control h. If the checkbox is off then, control h, will make the menu appear the same way as tapping the CopyPaste icon in the menu bar. Try it by checking that pref and hold down control h.
- ‘Pixel width of clip menu’ – lets you increase/decrease of the main CopyPaste menu either by typing in a number or using the dragger to the right.
- ‘In search field type, ;e to open Emoji palette’ – does exactly that. Type ;e and return key, to make the Emoji palette appear. The same can be done with, control e.
- ‘Colorize each differently’ – it gives all clip sets different background colors in the menu and in the clip manager, like in this screenshot below.
Sound Prefs
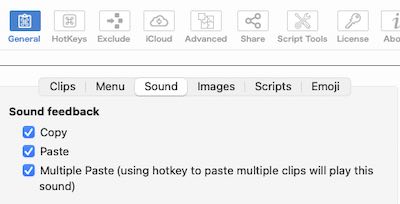
Here you can turn off/on sound feedback from each copy, paste or multiple paste. Even if you’re a sound hater like ‘Lewis Walch’ I recommend you try it for a little while before turning it off because it is good feedback on the completion of a copy or cut. Also, make sure to try pasting multiple items from the CopyPaste menu with the ‘Multiple Paste’ sound on just to feel the flow of power.
Paste Sequence of Clips
Emoji Prefs
;;lHotKeys
Hotkeys can be see in the table of contents for items that use it.
In the below Hotkeys preference page you can set new Hotkeys for various functions. We recommend you don’t if at all possible. At least in the beginning days of the app which is now. If you have compatibility issues with another app using that then we recommend changing in that app first. The reason is we can’t predict all the variables at this time. If you have to then go ahead.
Exclude
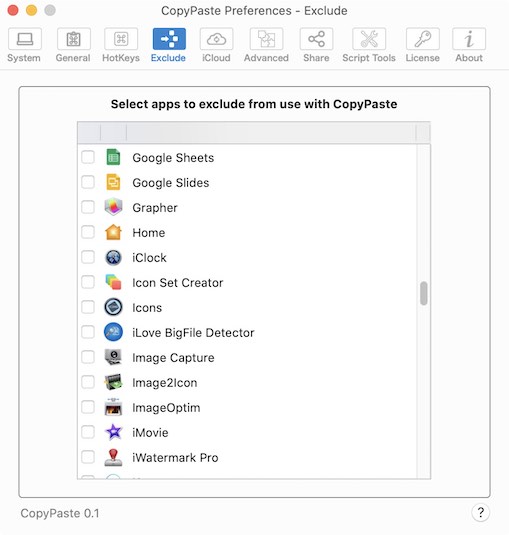
Exclude allows you to turn off the use of CopyPaste in an app. It shows all the apps in your application folder. If you don’t want CopyPaste to work with that app then tap to checkmark that app. Now that app will only use the system clipboard.
iCloud
Advanced
Advanced has 3 tabs Backup, Reset & Limits
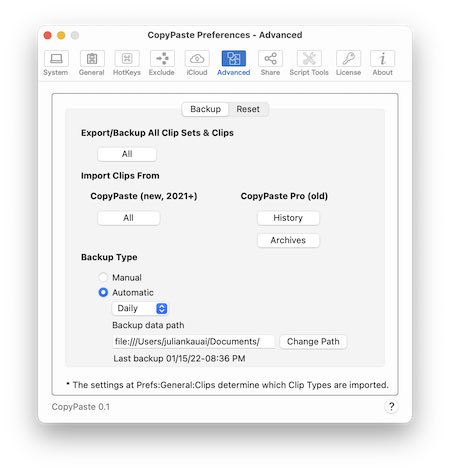
Backup
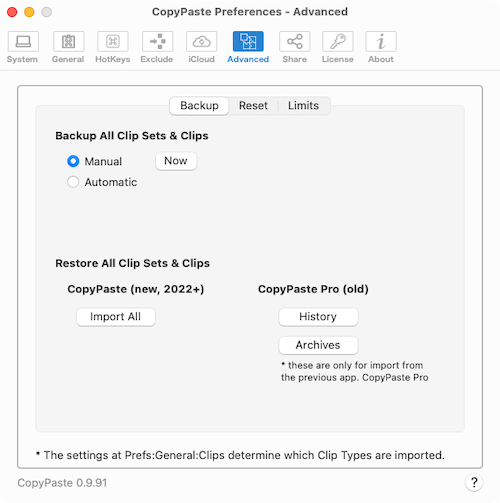
This page (above) is focused on importing archives and clips from the old CopyPaste Pro to the new CopyPaste. Also on importing and exporting in the new CopyPaste.
- Backup All Clip Sets & Clips (top half of the screenshot above)
- Manual – select ‘Now’ button and a backup is made immediately. You can set where it’s put. The default is to the ‘Documents’ folder. It looks like the above screenshot.
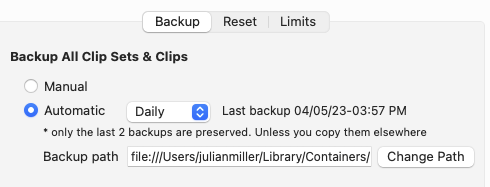
- Automatic – when selected backs up automatically and ooks like the above .
- ‘Daily’, ‘Weekly’ or ‘Monthly’. Your choice in the drop down menu. Default is daily
- ‘Last backup’ – is the last backup date and time.
- ‘Backup data path’, is the place where your backups are stored. Default is your Documents folder into the ‘CopyPasteBackup’ Folder
- Manual – select ‘Now’ button and a backup is made immediately. You can set where it’s put. The default is to the ‘Documents’ folder. It looks like the above screenshot.
If you’ve left the path to the default then the CopyPasteBackup folder is in your Documents folder. It could look something like this:
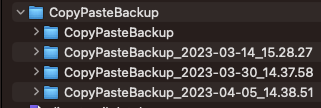
Above you can see the folder name contains the date_time of backup.
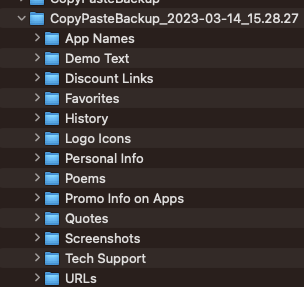
Inside the CopyPasteBackup folder we be all of your clip sets seen below.
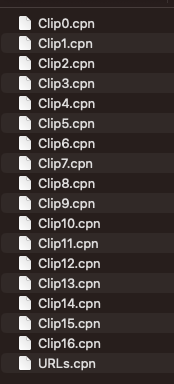
Inside the History and the clip sets folder would be something that looks like this set of clips
- Restore All Clips Sets & Clips (Bottom half of the screenshot above)
- CopyPaste (new, 2022+) (on the left side)
- CopyPaste Pro (old) (on the right side)
- History – this imports the clip history from the older CopyPaste Pro.
- Archives – this imports the clip archives from the older CopyPaste Pro. These are imported and put in new clip sets
- CopyPaste Pro (old) (on the right side)
Reset
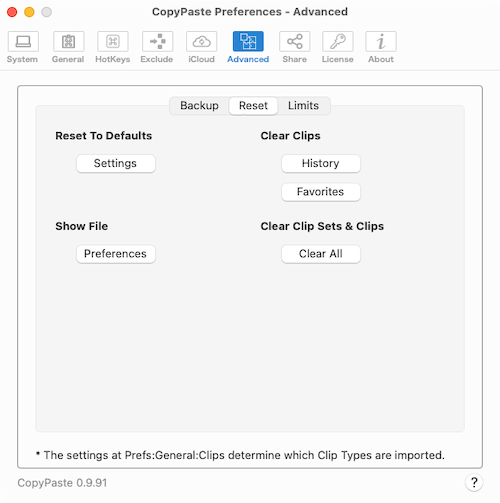
Here you can click one of the buttons to:
- Reset to Defaults – WARNING: it might be good to backup first unless you are sure you want to delete all clips and settings. It will return the app to the way it was when you first downloaded it.
- Settings – resets the settings in the prefs to the defaults.
- Clear Clips
- History – this clears all the clip history list
- Favorites – this clears the clip favorite list
- Show File
- Preferences – opens the folder the CopyPaste pref file is in.
Location of preference file is: ~/Library/Preferences/com.plumamazing.copypaste.plist
- Preferences – opens the folder the CopyPaste pref file is in.
- Clear Clips Sets & Clips
- Clear All – clears all clip set and all clips. This is undoable so you may want to make a backup first because it deletes everything.
- Reset to Defaults – WARNING: it might be good to backup first unless you are sure you want to delete all clips and settings. It will return the app to the way it was when you first downloaded it.
Limits
This area is for setting the number of possible clips and clip sets. Don’t just set higher unless you need it since it uses more memory.
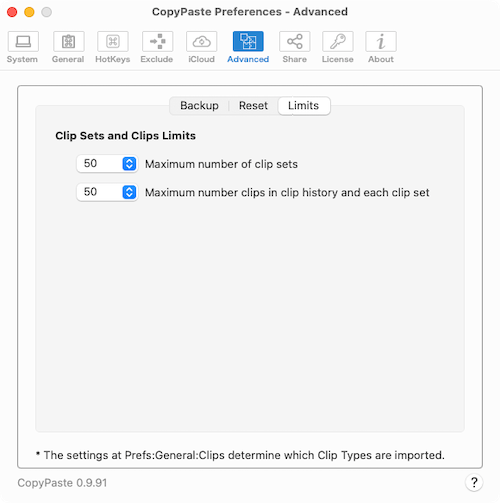
You can set it higher and lower at any time. Backup first then you can feel free to experiment. If you actually have in the clip history 400 clips with content. And you then switch to 50 for maximum number of clips. It will delete all clips above 50 in the history and in the clip sets.
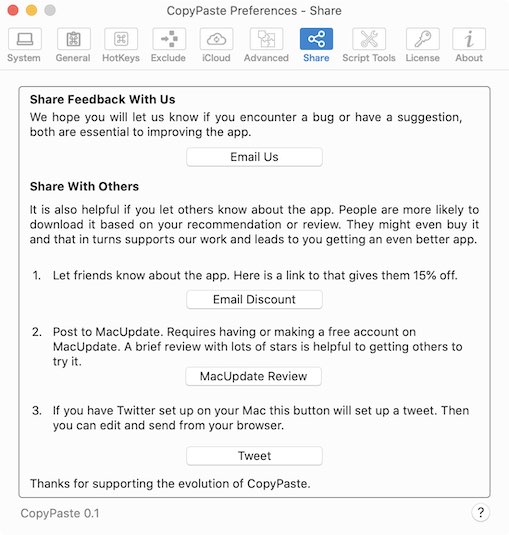
From this share page you can click a button to:
- email us questions, problems and suggestions.
- send a tweet out into the twitterverse with info about and link to get CopyPaste
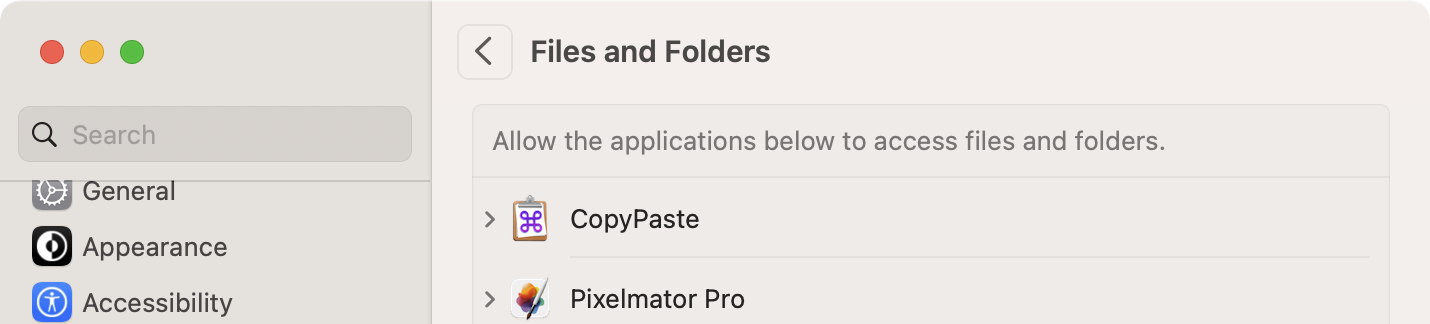
Permissions
IMPORTANT: CopyPaste has a few features that require permissions. They are explained below.
Smartphones are way more personal than computers ever were. Users take their phones with them wherever they go and store masses of information on them. With iOS there were a LOT more users and a LOT more apps and since this was a phone that had cameras, gps, sensors, was in constant cellular communication with data and voice and stored financial info, etc., its access became more of an issue. Apple looked ahead and forsaw potential issues and decided to make iOS, watch OS, tvOS and Mac OS very private and very secure. Permissions is a part of that. It’s a relatively new and still evolving project.
Requesting permission is a normal part of each app’s initial interaction with a user. The app adds them for you. But, sometimes it helps to add it your self if you have an issue.
There are CopyPaste features that require permissions before that feature can be used. When you try to use that features, CopyPaste will post a dialog which requests your permission to allow using that ability.
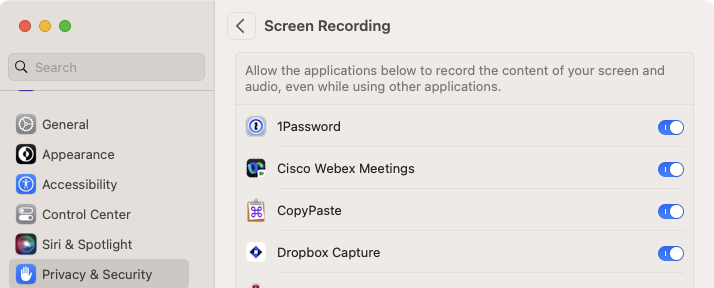
There are 3 permissions. Below we show what each looks like with the permission on.
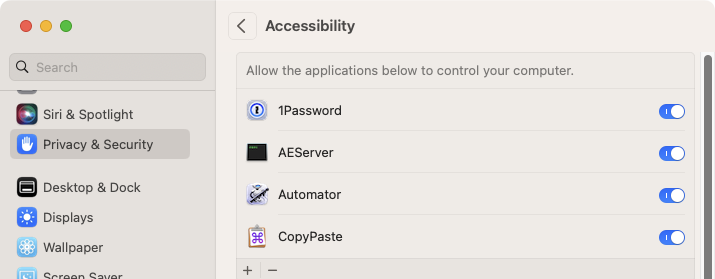
- Accessibility. To copy, paste, modify the clipboard in an app requires this permission. Also this permission is needed for TriggerClip. This is what allows CopyPaste and the older CopyPaste Pro to work with and augment the clipboards abilities. Below CopyPaste has ‘accessibility’ turned on in the, Security & Privacy:Accessibility preferences. If you see a second CopyPaste icon then that could be the old CopyPaste Pro. Having 2 doesn’t interfere but it could be confusing to you since the icons look alike. The names are different CopyPaste and the older one is CopyPaste Pro.
Why doesn't it paste?
If CopyPaste doesn’t paste it’s probably because the permission is not set. Do this, go to the system settings:privacy&security:accessibility. Delete the new CopyPaste icon if it’s in that panel. Drag into that panel the icon of CopyPaste (make sure it’s the new and not the old CopyPaste Pro) that you have in your application folder.
This only happens the first time after opening the app. The length of the wait depends on the number of items in your clip history, clip sets and clips. After you build up a clip history, clip sets and lots of clips it takes a few secs the first time it loads all that info (all history clips and clip sets) into a cache. It loads all that info into RAM memory to make all subsequent taps fast. We are working on ways to make this unnoticeable.
Why does it paste the same clip twice?
A: That only happens when you run the older CopyPaste Pro and the new CopyPaste running at the same time. Only run one at a time. Only run one app that edits the clipboard at a time. Make sure you are not running the old CopyPaste Pro by accident by going to it’s prefs and unchecking the, ‘Launch CopyPaste Pro at login’.
A: Go to this link to see the current and previous icons.
A: To test this. Open up some space in the menu bar. Try quitting all other apps especially all the 3rd party (non Apple) apps in the menu bar. Launch CopyPaste and try again. It’s mostly a question of having enough space in the menubar to support all the menu bar app and not have some disappear under the notch.
Is the CopyPaste app sold in the Apple Mac App Store different from the app sold in the PlumAmazing.com store?
A: The 2 apps are very slightly different. They are the same app in features from the users point of view but the 2 apps are different in a few ways. Each uses a different store, this means links and methods for sales are different, licensing the app is different and a variety of other small technical differences.
IMPORTANT: if you have clip sets and clips in the CopyPaste app that uses the PlumAmazing store and you download and launch the Apple Mac Store version then it will start in an empty default state, you won’t see your previous library of clip sets and clips. If you have to switch from one to the other you will need to do a backup of clip sets and clips first and restore in the other version.
How do I make a CopyPaste PDF Manual?
Open the manual in a browser. Go to the “File” menu and select print you will see this dialog: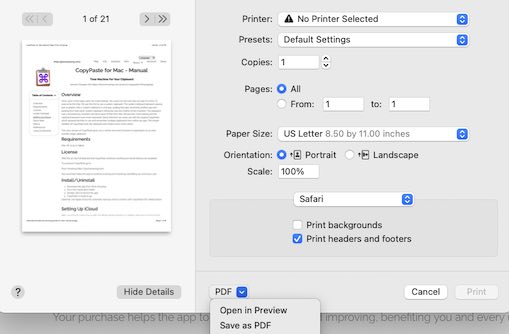
Turn off the ‘Print headers and footers’. Then choose in the drop down menu at the bottom ‘Save as PDF’. That way you get the freshest version of the manual. Manuals change most in the beginning
This link for the manual is from 5/24/21. Because manuals can change everyday you may want create your own more up to date version. Option click on the link to download the file:
CopyPaste for Mac Manual Page | Plum Amazing
What Mac OS does CopyPaste require?
A: Mac OS 10.15 or higher is fine for most things. 10.15 does not allow the iCloud abilities. The Clip Browser requires Mac OS 13 or higher because it uses newer elements of SwiftUI. Generally, the more up-to-date the Mac OS the better.
How many clips should I set it to use?
The default is 50. We recommend stick to that for now till we have more experience with it. You can experiment, it doesn’t hurt. But if you experience an is issue move back to 50. This can be changed in the prefs advanced:limitations
How do I conserve memory?
1) CopyPaste keeps many items in RAM which is a faster access memory. When you click on the CopyPaste menu it might take a second or two before it responds because it reads in all the clips from disk/ssd to RAM making it much faster the next time you tap on the menu. So, keeping the number of menu items/clips smaller means less info is placed in RAM. In the ‘Limits’ panel seen below, keeping it at 50 means lowest RAM usage. Using higher amounts is a trade-off between maximum speed vs maximum utility, response time vs more clips in RAM. It’s going to depend on your computer and it’s memory and what you want, hardware vs desires.

2) Photos/screenshots/graphics use more memory. Limiting images that enter the clip history or in the clip sets will mean less memory usage. Again, it’s handy to have images on hand if you have the memory available. The last item (below) allows you to prevent images or images over a certain size or images being saved into the history.
Are unlimited, clip sets and clips possible?
We are working toward that unbounded goal. Because, like you, we want this too. But it’s not the top priority for most people. At least not yet.
The reason the clip history is not unlimited is because memory on the Mac is limited. RAM and SSD are the main impediments to the desire for an infinite history, clip sets and clips. The main limitation, in a word, is ‘Memory.’
The first issue is in the CopyPaste menu. The CopyPaste menus opening response will become slower and slower as the number of history clips increases. Users expect menus to snap open so a slowly opening menu is not wanted. Therefore the menu itself has to be limited to what a user’s computer can sustain.
User interface is also an issue when trying to access, in a reasonable amount of time and space, an infinite number of clips. The menu can only hold so many items before it becomes unwieldy, slow and memory intensive. Using filter or search is the way to access clips that are deep in the history. Browsing back in time requires database tricks that will be employed as we have time.
A suitable user interface (UI) to access an unlimited number of clips is a challenge.
Most people copy just text (which uses little RAM) and others copy 20 megabyte pictures (which uses lots of RAM).
The UI to limit both text and graphics is currently found at: Settings:Advanced:Limits
The person who copies bunches of 20+ megabyte pictures will want to limit the number of clips with graphics remembered in the clip history because otherwise it can eat up to much of their available RAM. The setting to limit the size of images that get allowed into the clip history can be found in Settings:Clips:Clip Types

We are actively working on the infinite clipboard from all angles and as time allows.
What are the limitations in numbers of clips and clip sets in CopyPaste?
A: Currently, CopyPaste can create up to 250 Clip sets and 500 clips for each clip set. Which totals 125000 records in database. Don’t set higher than you need. The setting can be updated any time in the prefs:advanced:limitations
I’m having an issue. What do I do?
0) Make sure you have the latest version.
1) Restart the app. Try it again.
2) Don’t run CopyPaste at the same time as CopyPaste Pro or any other clipboard tool. Only one at a time.
3) If a hotkey doesn’t work, you have another app competing to use that hotkey. Change the hotkey in the other app if you can.
4) Take note of the steps that cause the issue. Take screenshot(s) or screenvid if that will help us understand. Email us. If you can give us the steps to reproduce an issue here then we can see the problem and that helps us fix it.
5) If you have a crash email us the console log.
6) In the CopyPaste menu there is a menu item called, ‘Send feedback‘. Always use that to send us feedback and details, it goes to our helpdesk.
Q: On launch the CopyPaste icon does not show up in the menu bar.
A: Mac OS hides menu bar apps when there is no space left in the menu bar. This is a common problem on MacBooks with a notch. Quit all menu bar apps to free up horizontal menu bar space then launch CopyPaste.
How do I prevent my passwords saved in 1Password from appearing in CopyPaste.
There are a number of ways. First, go back and read about ‘Clipboard Types‘ by tapping here, Settings there will prevent items passing from Password Managers into the Clipboard History.
In addition (optional) this applies to 1Password and other major password managers. Go to the preferences and set ‘Clear clipboard contents after x secs’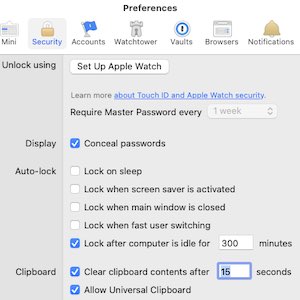
Why are some of the command keys or hotkeys an issue?
A: It’s possible you are using those hotkeys already in the Mac OS. We recommend changing those but if you can’t then CopyPaste has pref panel that allows changing some. The key commands work unless blocked by something else. Let us know if you have any issue with a command.
In your first 2 weeks it’s best to stick to the default settings if you can. It will avoid problems and make learning the app much easier. If some other app is using one of the control key settings that CopyPaste uses it’s better to change the other app. At least for now.
Can conflicts happen with other clipboard apps?
A: It’s possible, so, it’s best to just use CopyPaste for now. If you have the older CopyPaste Pro, the same thing applies, only have one running at a time and quit it if you use another.
How do I move clips to a clip set?w
A: There are 3 ways to do that.
1. Hold down control then hold the mouse over the clip you want to move and you get the drop down ‘Action’ menu. Select the, ‘Move clip to…’ item to move them to a different clip set.
2. Open 1 Clip Manager windows. Then drag clips to another clip set. Tap and hold down on a clip in history and drag to the different clip set.
3. Open 2 Clip Manager windows. Then drag clips in one clip set in one ‘Clip Manager’ window to another clip set in another window.
How do I import my old clips and archive from the old CopyPaste Pro into the new CopyPaste?
A: Go here.
Do I need to remove the old CopyPaste Pro in order to use this beta?
A: Keep it around as you transition. Only run one of the apps at a time and quit the other.
Is CopyPaste built on the now older CopyPaste Pro?
A: The older CopyPaste Pro was written in Apple’s older language Object-C. The new CopyPaste was created with Swift which is Apple’s latest language. CopyPaste is rewritten using totally new code using Apple’s latest API’s to recreate many ideas in the old CopyPaste Pro and many ideas & features we’ve always wanted to implement to take CopyPaste to a whole new level. Networking was not important in the old CopyPaste Pro. The new uses networking and iCloud and to connect with other devices like iPhones, iPad and other Macs. This was more challenging than anything we’ve done before but we hope it adds a new dimension to CopyPaste’s usefulness.
Is the new CopyPaste finished?
Not even close! It’s just a baby. But even so it’s really useful and many have switched to it already. That’s why we hope you will test and perhaps even purchase, even though it’s not yet version 1.0. Support is needed for continued development. The old CopyPaste was developed strongly for a decade then slowly over the next dec. That was a fun time for you all and for us. It’s going to be like that, but we hope even better.
There is an enormous amount of design and coding needed to fulfill our dreams for clipboard infrastructure with attendant ui and new features. There is a LOT of challenging work to implement all the things we want to do. For example 1 coder could work full time just on the ocr menu item, 1 coder could work full time improving the emoji item in Copypaste, 2 coders could easily work full time on iCloud integration on Mac and iOS, we could easily use 1 ui designer full time, clipboard features and actions could easily absorb the talents of 3 coders for Mac and iOS. We don’t have anywhere near those kind of resources. So, development could easily go on for years. Buy the app and that supports 20 mins of a coders time. If you want to speed it up from taking years to taking months then buy more copies of CopyPaste and give them away as presents and that all goes into the app and speeding up the coding.
Can I buy a license now?
A: Yes, you can. First log in if you have an account. Then use this link to put one copy in your cart, ready for checkout.
https://plumamazing.com/product-category/mac/?add-to-cart=101091
Every purchase is important and every contribution is appreciated but better than that, because, it comes back to us all as a better app that augments our creativity and productivity.
For years CopyPaste Pro users had a taste of the incredible power of more than one clipboard. There is still much more to discover and uncover. Now is the time. We understand the clipboard so much better now and Apple has given us these incredible foundational tools to build with. The clipboard is central like a hub to everything we do on the Mac. This version of CopyPaste is a GIANT ongoing project to reveal that vast untapped potential. Thanks for your support.
If you have feedback about CopyPaste reply thru the apps, ‘Send Feedback‘ CopyPaste menu item, to let me know. All feedback is welcome, bugs, ideas, spelling errors, questions, etc.
The new CopyPaste always appears in:
- the menubar
If the preference, ‘Show icon and menu in the Dock’, is checked on then:
– it shows in the app switcher (command tab)
- it shows in the dock (bottom nav bar).
Screenshot to Clipboard
You can capture the entire screen, a window, or just a portion of the screen to the clipboard by adding the control key to screenshot commands as seen below.
Action | Shortcut | ||||||||||
|---|---|---|---|---|---|---|---|---|---|---|---|
Capture the entire screen | Press Control-Shift-Command-3. | ||||||||||
Capture a portion of the screen | Press Shift-Command-4, the cross hair appears, release all keys. Move the crosshair pointer to where you want to start the screenshot. Hold down the control key to put screenshot on clipboard. Press the mouse or trackpad button, drag over the area you want to capture, then release the mouse or trackpad button. | ||||||||||
Capture a window or the menu bar | Press Shift-Command-4, then press the Space bar. Hold down the control key to put screenshot on clipboard. Move the camera pointer over the window or the menu bar to highlight it, then click. | ||||||||||
Capture a menu and menu items | Open the menu, press Shift-Command-4, then drag the pointer over the menu items you want to capture. Hold down the control key to put screenshot on clipboard. Release mouse button. | ||||||||||
Open Screenshot | Press Shift-Command 5. Details below. | ||||||||||
Capture the Touch Bar | Press Shift-Command-6. | ||||||||||
Screenshot or Video to File
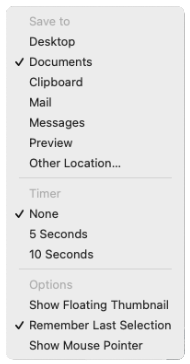
- Press Shift-Command 5 and let go. The palette (below) appears at the bottom left of your screen. The icons on left side of the palette below are for screenshots and the right side for video.
- Screenshot files by default are saved to your desktop with the name ”Screen Shot [date] at [time].png.”
- Close or cancel Screenshots by tapping the x icon on the left side of the palette.
- Select ‘Options v‘ (see screenshot below), to display drop-up menu (right screenshot). Options vary based on whether you’re taking a screenshot or a screen recording. For example, you can choose to set a timed delay or show the mouse pointer or clicks, and specify where to save the file.
- Show Floating Thumbnail option helps you work more easily with a completed shot or recording—it floats in the bottom-right corner of the screen for a few seconds so you have time to drag it into a document, mark it up, or share it before it’s saved to the location you specified.
- Remember Last Selection is very handy. Say you want to make a video that’s exactly the same size in pixels on a certain area on the screen. Having to select that exactly area each time would be incredibly boring. Remember last selection does exactly that, the selection is the same as the last. Making it incredibly easy to make a sequence of similar screenvideos.
- Show Mouse Pointer shows the mouse cursor in screenshots and screenvideos.

- Close or cancel Screenshots by tapping the x icon on the left side of the palette and the Esc key cancels selections.