
Overview
iWatermark Pro is the latest version of iWatermark for the Mac and Windows. iWatermark is the world’s No. 1 watermarking application for Mac, Windows, iPhone/iPad, and Android. Stylishly copyright all your images with a visible digital watermark within minutes. iWatermark Pro is an essential tool for photographers and anyone with a digital camera, professionals or beginners.
iWatermark is a specialized tool to watermark photographs. More efficient, faster, simpler and far less expensive to use than PhotoShop. iWatermark is exclusively designed for watermarking.
iWatermark Pro was created by Mark Fleming and Julian Miller. Artwork by Michel Zamparo.
Would you like to translate iWatermark Pro into your native language? Contact us.
Table of All iWatermark Software
OS Name & More Info Required Download Version Manual
iOS iWatermark+
iWatermarkiOS
iOSDownload
Download7.2
6.9.4Link
Link
Mac iWatermark Mac 10.9-15.3+ Download 2.6.3 Link
Android
AndroidiWatermark+
iWatermarkAndroid
AndroidDownload
Download5.2.4
1.5.4Link
Link
Windows
WindowsiWatermark Pro (previous)
iWatermark Pro 2Windows 7, 8.1
Windows 10, 11 (64 bit)Download
Download2.5.30
4.0.32Link
Link
Older Versions of iWatermark Pro for Mac & Win
With download links and system requirements
OS & Info Link Download Requirements
Mac Older Versions
iWatermark Pro 2.56
iWatermark Pro 1.72
iWatermark Pro 1.20
iWatermark 3.2
Intel Mac OS X 10.8-10.14
Intel Mac OS X 10.6-10.11
PPC/Intel Mac OX 10.5
Mac 10.4, 10.5 or 10.
Windows Older Version iWatermark 3.1.6
iWatermark 2.0.6WIN XP or higher
Acknowledgments
Drawer icons used under license from Bare Bones Software, Inc. They make great software.
MAAttachedWindow code by Matt Gemmell.
How to Purchase
iWatermark Pro costs $30. After trying it out please go to our store to purchase. To import your previous watermarks from iWatermark into iWatermark Pro go to the advanced tab use the import button to load the old watermarks and settings.
Tech Support
For questions first, check the manual and if that doesn’t answer it then visit the support page.
Registration Question
If you have a registration issue click here for info. If that doesn’t help go to the support page.
List of Some of the Features
iWatermark Pro is the successor to iWatermark and a complete rewrite that uses Cocoa, Xcode, and the latest Apple technologies. iWatermark Pro is the most sophisticated watermarking app available.
Features iWatermark Pro
Number of Watermark Types 8 Each Useful for a Different Purpose.
Use 1 or Multiple Watermarks Simultaneously Unlimited (based on memory)
Watermark 1 or Batch an Unlimited Number of Photos Unlimited (based on memory)
Watermark Types Text, Bitmap, Logo, Signature, Vector, Lines, QR, Text on Arc, Text Banner, Border, Metadata and Stegomark
Speed 4x or more faster, 64 bit
Parallel Processing Aware Multi-threaded use multiple CPU/GPU’s
Input Action Filter input photos on size, resolution, name, format, etc…
Output Actions watermark, resize, rename, create thumbnails, add or remove metadata.
AppleScriptable (Mac Only) Yes, includes scripts and script menu
Shell Extension for Win Explorer Right click to apply watermarks direct.
Color Profiles Uses existing and selectable profiles
Output 10 different types of output settings
Input File Types RAW, JPG, PNG, TIFF, GIF, DNG, PSD
Output File Types jpg, png, tiff, psd, bmp, jpeg 2000, clipb
Live Preview Yes, and share from preview window
Resizing Photos 6 major options
Import Watermarks Yes, from Mac or Win version
Export Watermarks Archive or share to Mac or Win version
Edit Watermarks Create custom watermarks, duplicate, delete, display and edit the settings anytime.
Watermark Drawer The place to keep all your watermarks to, organize, edit, lock, preview, share and use at a tap.
Metadata XMP, EXIF, IPTC and Google Search metadata
Add/Remove Metadata IPTC/XMP/GPS
Embed Metadata in Watermark IPTC/XMP/GPS
Metadata Tags as Watermarks Add IPTC, Tiff, File Attributes, Exif, GPS, tags to text watermarks to see that info on photos
Effects Emboss, engrave, inverse, outlined, black shadow, white shadow, etc…
Watermark Location Set by dragging or xy
Scale Watermark Actual (relative), horizontal and vertical (absolute percentage)
Text Watermark Formatting font, size, color, rotation, transparency, shadow, border, etc…
Background color, opacity, scale, border, shadow, rotation
Help Online, contextual and detailed
QR Codes as Watermarks Create QR codes use as watermarks
Creative Commons Watermarks Easily adds any CC watermark
Quick Look Plugin Displays exported watermark info
Works with all Photo Browsers yes
Export and Share Backup, share watermarks to your other devices and friends.
Easy to use Seriously, easy to use
Duplicates original files and watermarks those. Never touches your original files. And backs up your original files by default. Or you can turn that off in the Advanced:Prefs
Why use iWatermark Pro Over Other Programs
- iWatermark is less expensive, faster and easier for watermarking than Photoshop because it was designed exclusively for watermarking and the workflow of professional photographers.
- iWatermark is made for Mac, Windows, iOS, and Android. iWatermark Pro. Sharing watermarks between these apps will be possible by the beginning of 2017
- 11 watermark types. Other apps have only 1 or 2.
- iWatermark can rename batches of files, filter input files, and resize photo files.
- iWatermark processes RAW images which most don’t.
- iWatermark can add or remove IPTC/XMP info during batch processing of photos.
- IMPORTANT – with iWatermark you can use photos of different resolutions and orientations in a batch and still keep the watermark on each photo looking the same because of the Scaling tool. Scale means a watermark can take an exact percentage of the width no matter the resolution or orientation of each photo.
- iWatermark has a sophisticated watermark editor that can create text, text arc, text banner, graphic, vector, line, QR, metadata and resize watermarks.
- iWatermark can create a watermark that embeds IPTC/XMP data each time it’s used with or without a visible watermark. Great for news organizations.
- iWatermark is extremely fast which is important as file sizes and processing of batches continues to grow.
- iWatermark keeps a database of all watermarks that can be used with a click.
- There are applications like Photoshop that can watermark an image but iWatermark has a watermark manager which can track hundreds of watermarks. The manager also allows locking/unlocking, embedding IPTC/XMP, searching, renaming, deleting, previewing, merging, exporting, batch processing and sharing of watermarks.
IMPORTANT: Never delete your original files. Watermarking copies your original file and adds a visible watermark to it. iWatermark does not alter the original it only creates a copy. So, always keep your original unwatermarked files for safe keeping. This is probably totally obvious to you but has to be said for beginners.
Installation
Mac: Download from our site and drag to the application folder. To also install the fonts used on iOS download this and install the fonts you want to use:
Windows: Download and install using the installer.
Fonts: To install the fonts used on Android and iOS download this file and unzip it and install the fonts you want to use.
IMPORTANT: Windows Users with High-Resolution Displays. For the best user interface experience change the Windows OS settings for the iWatermark Pro App. Follow these 2 simple instructions.
1. Right, click on iWatermark Pro’s icon and select compatibility and select change high DPI settings button then select “Override High DPI Scaling” and set to System (Enhanced). Seen in the screenshot below.
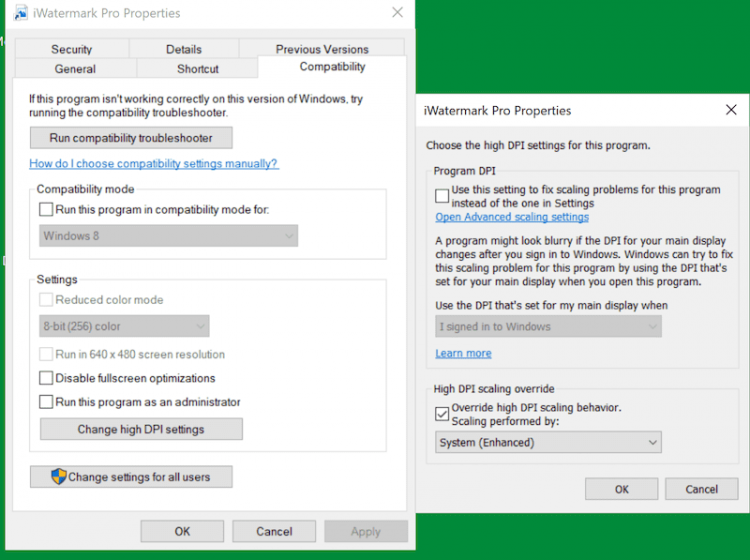
2. Right click on the desktop to see this dialog. Tap the Display settings seen in the screenshot below.
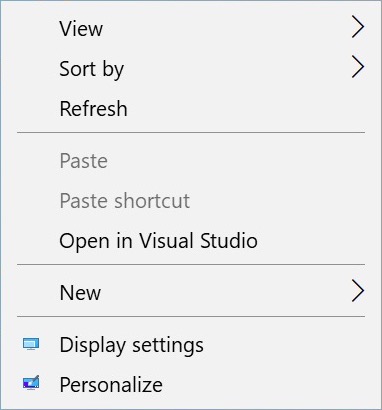
Change the ‘Display Settings’ (optional) seen in the screenshot below, to your taste and depending on your eyes. If you find the iWatermark windows is too small, adjusting Display setting to 150% or 200% and adjust the iWatermark’s app’s ‘Compatibility’ settings (in step 1 above) to scale the windows up. Then you are set. These settings for iWatermark are remembered across upgrades.

At the bottom left of the ‘Watermark Manager’ click the blue + button (see above video/an
imation) at the bottom of the drawer.
Another way is to go to the File menu and choose New Watermark or command N.
- A dropdown menu appears, select ‘Text…’ to create a new text watermark.
- You will see this watermark editor (below) which allows changing settings for the text watermark.
- Add text. Change the font, size, color, and alignment, etc. as you wish. Give the watermark a good recognisable name, hit the ‘Done’ button and it will be saved in the ‘Watermark Manager’ where you can select it anytime you want to use it again to watermark a photo.
Watermark Types
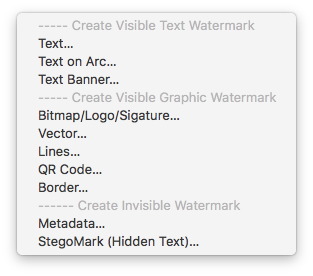
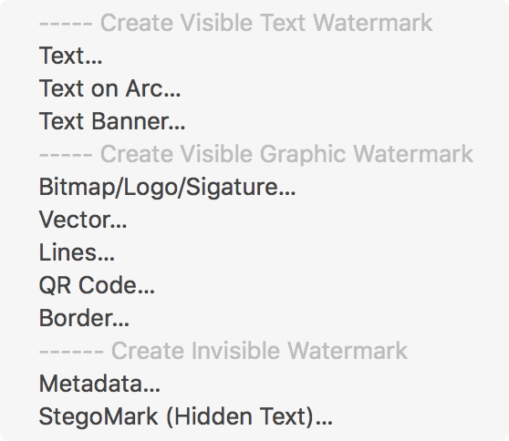
Currently, there are 10 watermark types. 8 Visible watermark which are watermarks that are seen on photos. Text, Text on Arc, Text Banner, Bitmap Graphic, Vector Graphic, Lines, QR-Code and Border. Plus 2 Invisible wagtermark types, Metadata and Stegomark. More are coming.
Below we discuss the settings for each watermark type in detail.
Visible Watermarks
Text Watermark
Text watermarks are easy to create. Text is sharp at any size and depends on the available fonts. iWatermark+ gives access to 292 beautiful fonts (many are Google fonts) in addition to the system fonts.
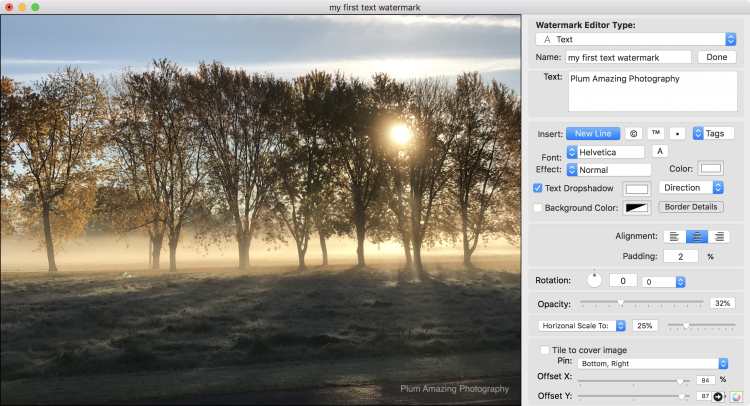
The above screenshot shows all the settings you see when creating a text watermark.
1) Type– Set the dropdown menu to one of the watermark types.
2) Name– Set the name you want for the watermark
3) Content-Set the content for the text watermark.
4) Insert – Insert into the content special characters like the © symbol for copyright or ™ for trademark, etc. Also you can insert Tags which are variables for IPTC or EXIF info in the photo. More info is here.
![]()
5) Font– Set the Font and to it’s right the Font Size.
6) Effect– Sets the effect like engrave, emboss, inverse, etc. To the right of Effects, set Color of the font, text dropshadow, and the direction of the light creating that shadow.
7) Background Color– Set the Background color and Border details
8) Alignment– Set Alignment (left, center, right) of text and padding which puts more padding/space around the text.
9) Rotation– Change the rotation of the text.
10) Opacity– Set the Opacity/Transparency.
11) Scaling– This sets iWatermark apart because it give the options of relative and absolute scaling.
Relative (%) – the default setting, simplest to understand and use. Does exactly what most people want. In relative mode position is set by % from edges. No matter size of photo you will get the visually same results. Watermark size/position are affected by photo dimensions. On the photo page this setting allows you to set the relative position of the watermark (by %) irrespective of the size and orientation of each photo in a batch. Example: in a batch of 2 photos, one low and the other high resolution, a border watermark set to be approx 10 pixels wide on one low resolution photo might when measured be 20 pixels wide on the high resolution photo. In the past we only had a “Relative” mode, but some users requested an “Absolute” one.
Absolute (pixels) – set everything, position, fonts, borders, graphics and everything is in changed to work in pixels. “Absolute” metrics mode makes sizes/positions of everything independent of photo size. Watermark size and position will remain the same (in pixels) for all photos. Example: in a batch of 2 photos, one low and the other high resolution, a border watermark set to 10 pixels wide would on both photos be exactly 10 pixels wide.
Relative is for setting the watermark location by percentages. This becomes essential when you want a watermark to appear the same size and in the same place in a batch of photos that may all be different resolutions, sizes and orientations.
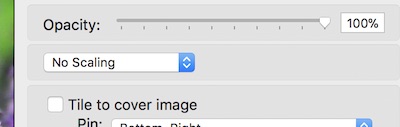
In the screenshot you can see the scaling dropdown menu is set to ‘No Scaling’ by default. That means you are working not in % but in pixels.
All the options for Scaling are seen in the dropdown menu above ‘No Scaling’, ‘Horizontal Scale To:’ and ‘Vertical Scale To:’
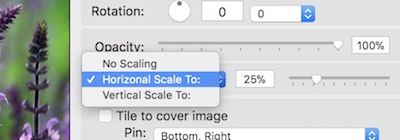
No Scaling – sets scaling to work in pixels.
Horizontal Scale To: – sets the scale to work horizontally in %.
Vertical Scale To: – sets the scale to work vertically in %.
12) Tile to cover image – repeats the text multiple times across the photo. This is important for those people who want to insure no part of the photo is taken.
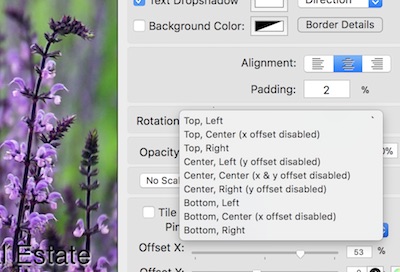 13) Pin – allows you to set the location of a watermark in such a way that it is the same on all photos, no matter their resolution or orientation (portrait or landscape). Pin allows setting the location in a general way to top,left or bottom,right, etc.
14) Location– Once you have set the general location with Pin you can fine tune that like this. Below you see ‘Offset X’ and ‘Offset Y’. Depending on which Pin you chose you can change X and Y, X or Y. X is the horizontal direction and Y is the vertical direction.

If you are are watermarking one photo there are easier ways to set the location but the reason it’s like this is too allow watermarks to appear in the same spot whether you’re watermarking one or a thousand photos of different sizes and orientations.
The Text Watermark has the most settings so we started with it. For each of the following watermark type we only add the description of settings not included in the Text Watermark.
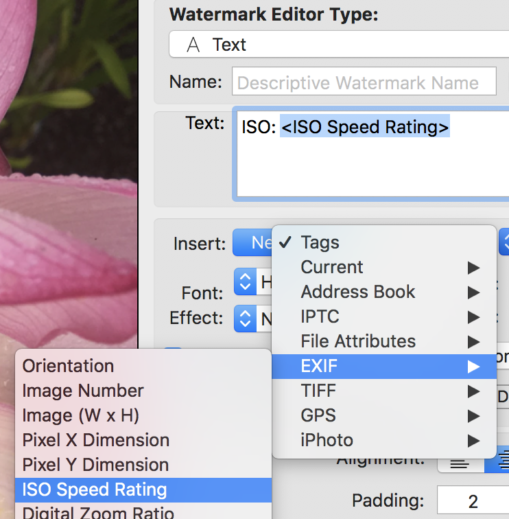
Tags in Text Watermarks
![]()
Tags are extremely useful. Use ‘Insert Tag(s)’ in all text watermark settings (seen above) to put Metadata (like camera model, creation date, sequential numbering, file name, location, etc.) from that photo or video into a visible watermark on that photo or video. Use these to create your own customized watermark to display a variety of info on your photos that will be different depending on the metadata in that photo.
This can be used in a variety of ways. Here is an example.
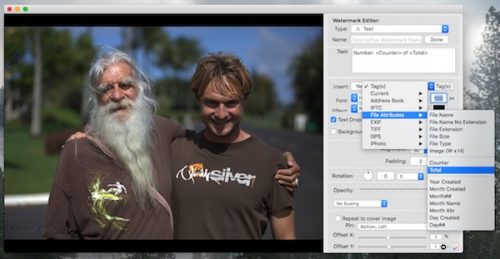
Example 1: Let’s say you want to put a unique number, like a serial number on each photo in a batch of 119. In the above screenshot you can see how the and tags are added to a text watermark and placed on the photo. Now each photo in the batch will have a unique Counter and Total. It can be seen in action at the bottom left of the photo above in the zoomed in photo below. This shows the photos are each numbered correctly in this case, Number 021 of 119. Very handy!

Example 2: Add the Latitude and Longitude to 1 or 10,000 photos using tags. Seen at the right while making the watermark with preview.
Example 3: Let say you are a reviewer of cameras for a magazine or website and want to test the photos from a particular camera. To do this you need to show the different specs for hundreds of photos taken in a variety of different ways. A daunting organizational task. iWatermark Tags make this task much easier because now you can put the specs of a camera’s settings, at any particular moment a photo is taken, on each photo.

Text On Arc Watermark
An Arc Text Watermark produces a watermark of text on a curved path.
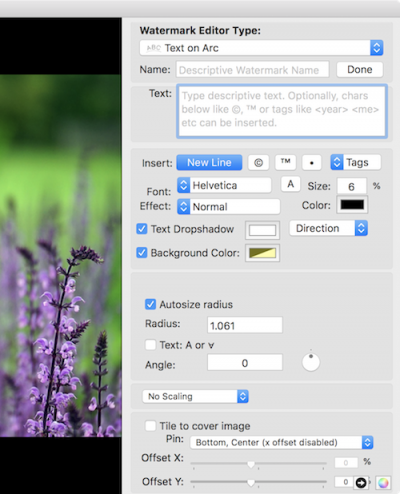
On the right are all the Text Arc settings. It has the settings seen in the Text watermark and more. Those additional settings are described below.
Autosize Radius – automatically sets the radius needed to fit the text so ends meet. This overrides Radius below.
Radius – text on the outside of the arc
Text A or ∀ – render the text right side up or upside down.
Angle – rotates the text around the arc.
Angle – change the angle of the text on the arc. Or rotate the angle with the circle with dot icon.
Other settings not mentioned here will be found in the Text Watermark settings above.
Text On Banner Watermark
A banner is text with an adjustable background.
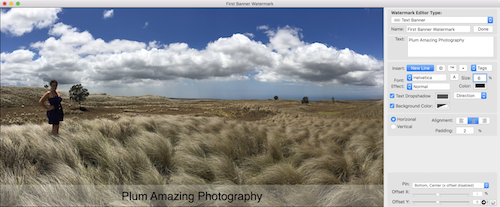
Above is the settings dialog for the Banner watermark. As you can see it puts an adjustable banner on any side of a photo. The settings are very familiar, most of them are the same as the Text watermark. The only difference is a radio button that allows choosing vertical or horizontal.
Bitmap/Logo/Graphic Watermark
Graphic Watermarks are good for logos, art, and signatures. Use your logo or any graphic but they need to be a special graphic format called .png with a transparent background. The sample signatures, symbols and other graphics we include have transparent backgrounds and are .png files. That means that even though the graphic is square only the signature itself shows and that which is not the signature is transparent allowing the background photo to show through. The file format to do this is called .png with transparency and it allows the background of the watermark to be transparent (a .jpg does not allow this transparency, .png must be used).
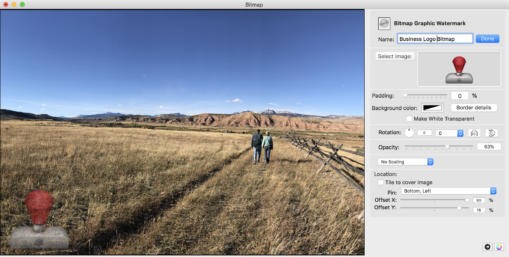
This is for logos and other graphic art.
1. In the watermark editor click ‘Add New Graphic’. You can choose any graphic file like your logo to act as a watermark. Graphics are best when they are .png files with transparency so the background does not show. See the FAQ for more details.
2. Click on any of the Tools to change the rotation, transparency, etc. Give it a name and hit save.
3. Your new watermark is added to the dropdown menu (seen above). Choose it or any other to watermark a photo. Use the – button to delete the displayed watermark
Signatures – adding your signature as a watermark using a Bitmap Watermark.
You need a .png file of your signature. This can be created in a variety of ways.
The easiest way is to ask for it from your graphic designer.
Do it yourself. First, sign your name with a black pen or marker on white paper.
Next, use your phone to take a snapshot of your signature on the paper or use a desktop scanner.
Use photoshop or use the Preview app that comes on all Macs.
Vector Watermark
Lines Watermark
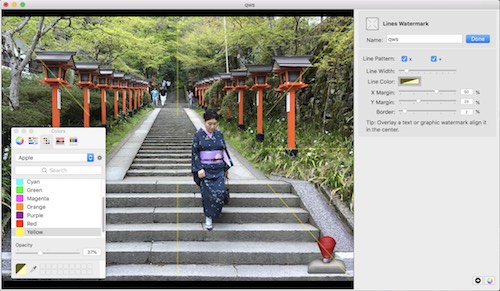 Lines watermarks are most often seen in use by stock photo companies. The Lines watermark draws that radiate out from the center of a photo. The main idea is that this is a strong method to prevent people from copying the photos as it would create a lot of work to make those lines disappear as they cover most areas of the photo.
The settings for Line watermark are shown in the example screenshot. The settings are pretty obvious. It is worth testing them all out to see exactly what they do. The setting that is not obvious is opacity which is found after you click on line color. The dialog is seen at the bottom right of the screenshot above. At the bottom of that dialog is the drag bar for opacity.
QR Watermark
A QR Code (it stands for “Quick Response”) is a cell phone readable bar code that can store website URL’s, plain text, phone numbers, email addresses and pretty much any other alphanumeric data up to 4296 characters. A QR can make a great watermark.
The QR example image below holds our website URL, https://plumamazing.com. Both the camera apps on iOS (in iOS 11) and the pure Android Camera app can scan and act on the info in a QR code. Chrome also can read QR codes on both Android and iOS. There are also many other QR scanner apps available in the app stores. Scan the QR code below and you get the choice to go to our site automatically. You can make one for your site or to any page with any info you want to display.

Usage examples. QR’s can be handy as a watermark on photos and other graphics that can hold the name, email, URL to take people to your site or other info depending on your creativity.
1. Someone might have QR watermarks for a bunch of photos and each QR could lead to its own web page with information on location, conditions, pricing, etc.
2. Watermark your photos with a QR that contains your URL, email, copyright, and other info. Good for maintaining your connection with a photo for Facebook, Twitter, and other social media. When you upload a photo to social media sites they often remove metadata. Social sites do not remove visible watermarks like text, signature, graphics or QRs.
3. Make an instructional video to Vimeo, YouTube, etc. or your site. Put the direct link to your video into a QR. Get some of the paper for printing out stickers and print out a bunch of these QR codes. Now slap this QR code onto a manual. When the user needs more visual help they can scan the QR to go directly to the video.
Border Watermark
Another useful type is the Border Watermark. It uses SVG (perfect rendition at all sizes) art to draw borders around a whole photo and also scrollwork at the corners.
Invisible Watermarks
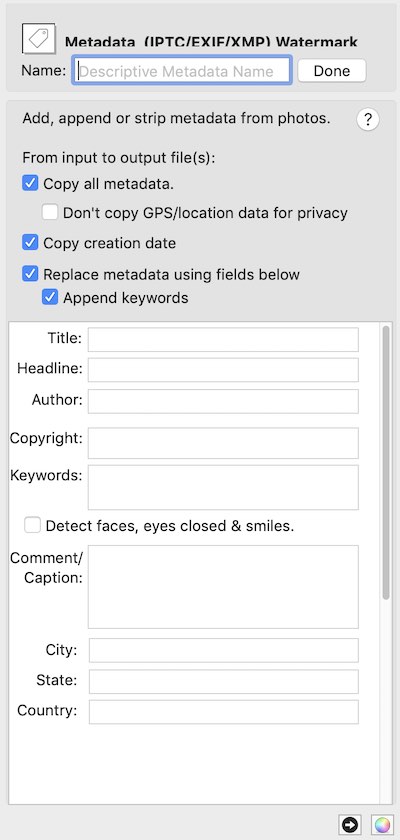
Metadata Watermark
Metadata is a number of different types of information about the photo. Metadata watermarks are very simple to create.
StegoMark Watermark
StegoMark is the iWatermark steganographic watermark. This is a watermark that hides information in the color info of the photo itself. A color photo is actually lots of numbers. Numbers that describe the color and location. In this vast quantity of numbers, there is space to hide a few more numbers. That is what StegoMark does is encrypt the info you want into the photo data and unencrypt that same data. StegoMark was created and is unique to iWatermark.
Someone could crop out your visible watermarks from your photo but a StegoMark is much more likely to remain embedded in a photo because it is invisible and more resilient to jpg compression, cropping and other changes than a visible watermark.
IMPORTANT: Only 1 StegoMark can be used at a time. Whereas you can select multiple visible (text, graphic, qr, etc.) watermarks simultaneously to watermark a photo. There is no limit on the number of photos that be processed with a StegoMark at once.
IMPORTANT: 25 characters or less (recommended) in a StegoMark allows it to be most resilient when resaving/recompressing a watermarked .JPG photo. Up to 80 can be used but it will impact the resilience of the message. Remember you can use a URL shortener to make a URL smaller for embedding.
IMPORTANT: StegoMark is best used on photos that are:Higher resolution images. Photos with different patterns, colors, textures can hold more info from a Stegomark.
Example 1: A low resolution image with a large expanse of clear blue sky may show artifacts. The numbers making up this image are similar and very orderly. There is less entropy and therefore less room available for StegoMark info.
Example 2: A high-resolution image of a forest, trees, grass, or sky has more entropy (in terms of all the numbers making it up) and therefore more room for StegoMark information.
StegoMark is the first-ever implementation of a steganographic watermark for photography and is only available in iWatermark. Steganography refers to any process of embedding some data invisibly into the actual photo image data.
StegoMark because it combines Steganography, often called Stego for short and Mark from the word Watermark. StegoMarks uses a special algorithm designed at Plum Amazing. This specialized encoding makes that data almost impossible to decipher without iWatermark. If there is no password then any copy of iWatermark can reveal hidden text hidden in a photo by iWatermark. If there is a password then only a person with the password and iWatermark can reveal the hidden text.
One way to use StegoMark is to embed your email or business URL into a photo. This along with a Metadata and a visible watermark gives different layers of protection to your credentials in and attached to a photo. Each separate watermark layer will resist in different ways things that can be done to a photo like cropping, resaving, renaming, etc. to maintain your ownership information.
Create A StegoMark
To begin open the ‘Watermark Manager’ page and select the blue ‘+’ icon and you will see this dropdown menu:
Select the last item StegoMark…
For ‘Name’ put a good descriptive name for this StegoMar.
When you drop in the input a batch of photos and have a stegomark selected, hit process and a dialog pops up asking for the password or no password.
In ‘Text’ put the text you want to embed in the image data.
Using no password anyone with iWatermark Pro can read the message but no one else. For even more privacy, enter a password, then only someone with the password and iWatermark Pro can read that text message buried in the photos image data.
Once this is done, export the StegoMark’ed photo. Check out the next section ‘Reading A StegoMark’ to see how to see your hidden info.
2 Ways to Reveal a StegoMark
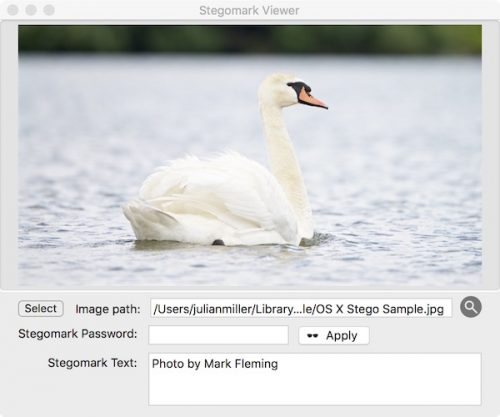
The first and easiest way to read a StegoMark is to go to the file menu, select the item called ‘StegoMark Viewer’. Drag your photo in, or use the select button. If there is no password it will immediately reveal the content. If there is a password then type in the password and hit ‘Apply’. Here the revealed text says ‘Photo by Mark Fleming’.
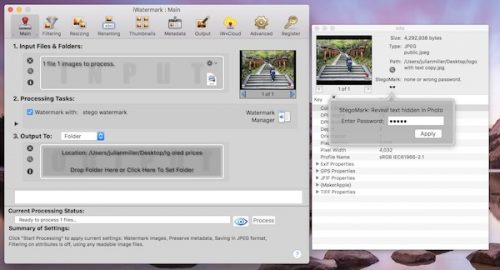
The 2nd way to read a StegoMark, open the exported StegoMark watermarked photo by dropping it into the input tray of iWatermark Pro or using the open from the file menu.
Then on the left edge of the input tray tap the the i with a circle around it icon. That will open the info window. Click on the StegoMark icon in this info window as seen in the screenshot below. Enter the password if you have one.
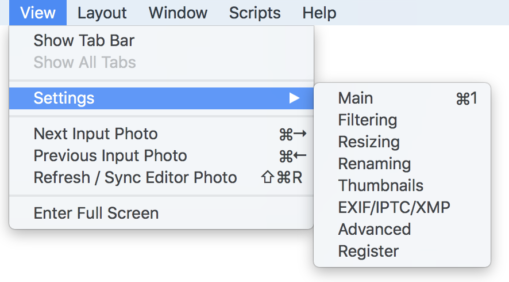
Main Settings Panel
In this section we will go through each tab at the top of the main window and provide more details.

Each tab in the toolbar above corresponds to an area which deals with particular types of actions.
- Main
- Watermark Manager
- Watermark Editor
- Filtering
- Resizing
- Renaming
- Thumbnails
- EXIF/IPTC/XMP
- Advanced
- Register
1. Main
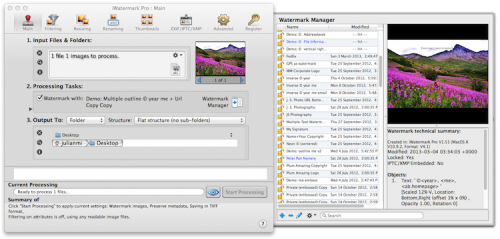
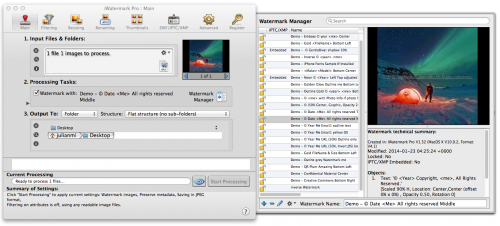
The main window in iWatermark Pro. The place where you will do your watermarking.
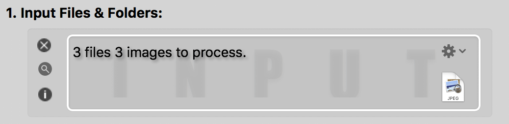
Input – where you select photos for input. Click in this area to select a file or folder or just drag in the file or files you want to process. The input area displays icons of what file types are dragged in (JPEG, PNG, RAW, etc.) and displays when a folder(s) too.
Click the X to remove selected files/folders.
Click the Magnifying glass to see the location of files.
Click the ‘i’ to get the info/preview window. Clicking the preview does the same.
Processing– this area overview of the settings for watermarking, resizing, renaming etc. Here you can quickly set which watermark is to be used from the dropdown menu. Also you can turn on/off resizing, thumbnails, EXIF/IPTC/XMP, and you can set the output format and quality (if jpeg).
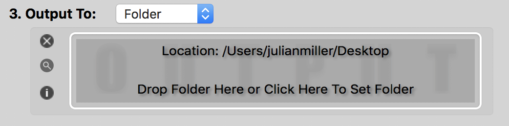
Output – click and select or drag in a folder where your newly processed files will go.
Click the X to remove selected files/folders.
Watermark Manager– the window on the right. This is where you select one or more watermarks to be used to watermark a photo or photos.
You can set the structure of the output folder. Changing the folder structure to Portrait / Landscape sub-folders will the separate out all your input photos into two folders one containing the Portrait and the other the Landscape orientation photos.
To the left of the ‘Process’ button is the preview button which looks like this.
![]()
This preview window gives an idea of the way the watermark will look on the selected photo. It is also possible to Share directly from here to social media. Click the button at top right to share a single image previewed to Facebook, Email, Messages Twitter, and other social media you have to choose in the Mac OS System Preferences. Click the More… to turn on more available social media.
a. Watermark Manager
The Watermark Manager is unique to iWatermark. Here is where watermarks can be:
- kept and previewed.
- selected to watermark an image.
- double clicked to edit.
- renamed using the field at the bottom right.
- searched for using the search field at top right.
- deleted.
- locked/unlocked which they are protected when locked you can’t edit or delete them.
- embed IPTC/XMP
- exported and shared via email or social media.
Watermark Manager Window (it is on the right below)
Create– create a new watermark. Click the + and see this numerous watermark types you can create (screenshot below).
Delete– select one or more watermarks to delete them.
![]()
Edit – select a watermark and click this button or double click to edit in the watermark editor.
![]()
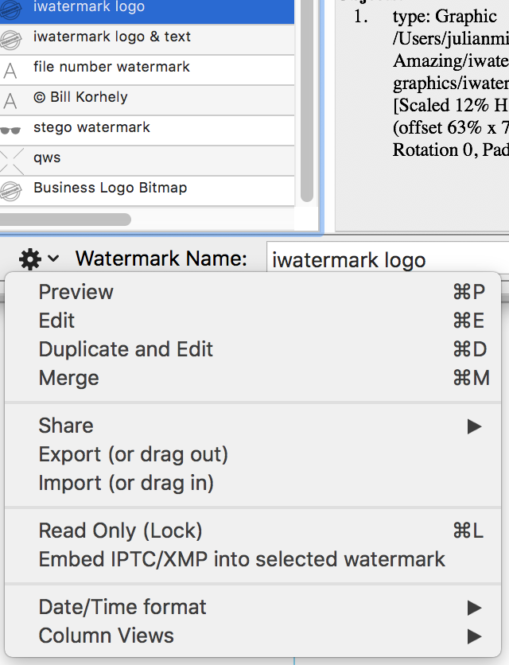
Click on the Options Menu under this gear icon ![]() and see this menu:
and see this menu:
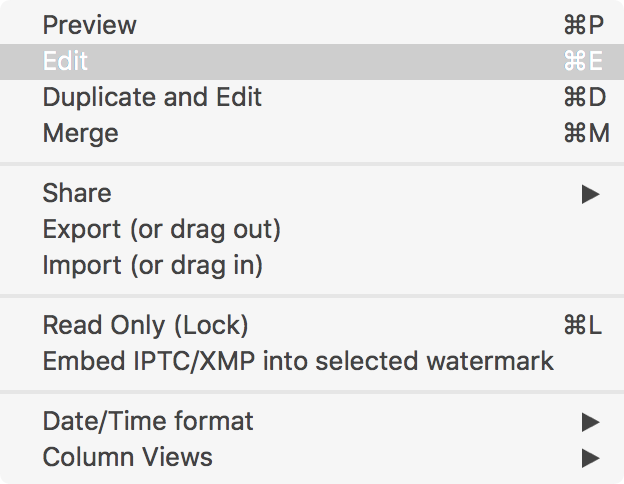
Preview – gives a preview using the selected photo and watermark.
Edit – select a watermark and click edit or double-click a watermark to edit.
Duplicate and Edit -create a new watermark with a new name based on previous work.
Merge– combines 2 or more watermarks into one.
Share –watermarks via iW*Cloud, airdrop, email, messages and/or dropbox.
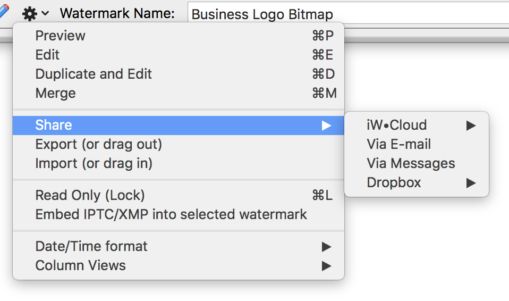
Export– use this or even easier just drag a watermark to the desktop to share or for backup. Exported watermarks have this icon:
Import– use this command or drag in exported watermarks, with the above icon, to have them in the Watermark Manager.
![]() Lock – Click on the little lock to lock/unlock a watermark. Locking makes it read-only and not editable or deletable.
Lock – Click on the little lock to lock/unlock a watermark. Locking makes it read-only and not editable or deletable.
![]() Unlock – Click on the little lock to lock/unlock a watermark. Locking makes it read only and not editable or deletable.
Unlock – Click on the little lock to lock/unlock a watermark. Locking makes it read only and not editable or deletable.
Embed or Remove IPTC/XMP from watermark– embed or remove the info that is in the IPTC/XMP area into a watermark. Then when this watermark is used in addition to any other activities it also embeds that metadata.
Date/Time Format– change the date/time formats displayed in the Watermark Manager.
Column Views– shows and hides the different column items in the Watermark Manager.
b. Watermark Editor
To create a new watermark click new watermark in the File menu or click the + button and you will see this.
Clicking any of the above items will open the Watermark Editor to create that watermark type. There is a different editor for each watermark type. Here is what the Text Watermark editor looks like:
ix. Effects
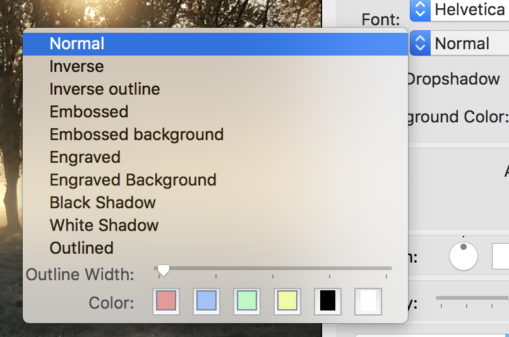
Normal – means no effect.
Inverse– Subtracts either the source image sample color from the background image sample color, or the reverse, depending on which sample has the greater brightness value. Source image sample values that are black produce no change; white inverts the background color values.
Inverse is a useful one that can be used because it keeps even fine text legible on images with variable tone backgrounds. The more white used with inverse the better. This is true for text and graphics. Black won’t do anything. It’s best to use white in either text or graphics for inverse mode.

Emboss and Engrave

Using the Effect Engraved on Text from the Text Watermark Settings

Using the Effect Engraved with Background on Text from the Text Watermark Settings

Using the Effect Embossed on Text from the Text Watermark Settings
Emboss Background and Engrave Background are semi-transparent showing the photo below. Emboss and Engrave use text color to fill embossing. Both are useful for subtle watermarking.
Currently, you only have control of one of two drop shadows in the emboss/engrave effect.
Outside shadow color is controlled. Inside shadow is fixed to black for Emboss and white for Engraved.
NOTE: Currently only works in Text watermark — not in Banner or Arc text or Graphic yet.
Black Shadow – exactly what you would think.
White Shadow – ditto
Outline – outlines the text.
2. Filtering
Set the filter to allow certain types of files to be processed.
![]() Filtering
Filtering
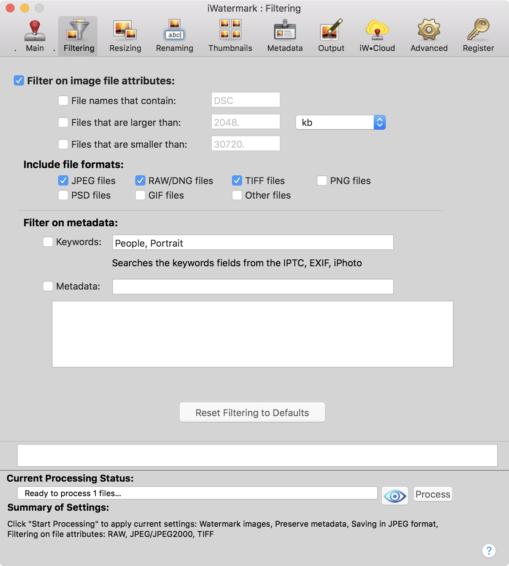
Filtering can be turned on here on or on the main page. If you drop a folder in the input filled with all kind of different format photos but you only want to watermark the .jpg files then filtering can help you. Filter the input files on attributes, keywords and/or metadata.
3. Resizing
Change the size and sampling of the processed photos.
![]() Resizing
Resizing

Resizing
Turn on resizing on this or the main page to resize or watermark and resize. Resizing takes the original and produces a copy that is a particular size. It reads resize within width and within height and that means it will resize the photo within those dimensions. You can also use the handy presets which are commonly used sizes to resize to.
Resampling
Is used to change the sampled resolution. What does this mean? Here is a good explanation.
4. Renaming
Rename all the processed photos automatically.
![]() Renaming
Renaming
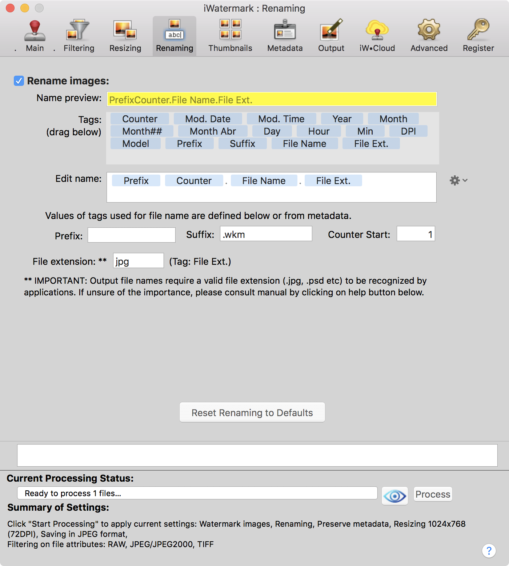
Turn on rename here or on the main page. Renaming makes copies of the input files and renames them whatever you decided based on your selection above. Select the tag you want to add to the name of the file(s) or type in your own prefix/suffix. The tags are variables that stand for that info in the photo. Model will put in the model of the camera in the name of the new file. Counter will increment by 1 for each photo processed.
TIP: Set the Time and Date format on the Macgo to Language & Regions in System Preferences then hit the Advanced button. On Windows click Start menu, and then click Control Panel then click Date or Time.
TIP: Drag in/out the various tags (date, time, camera, model, etc.) and look at the preview to get a taste of what a file name will look like.
5. Output Settings
![]()

Here you can change the file format, quality and JPEG progressive. Many export settings are available here too.
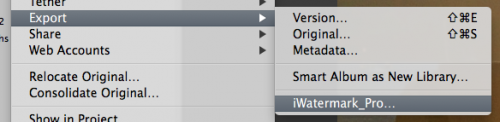
Image format: change the output format from jpeg, TIFF, Photoshop PSD, PNG, BMP and JPEG 2000.
File extension:don’t change this unless you know what you are doing and have a specific reason. Some people asked for this ability but it means that double clicking the icon will not open up apps that rely on that extension.
Quality: changing the quality slider means that you change the JPEG compression. It can go from 100 which means that the quality is exactly the same or lossless. Unfortunately, setting to 100 increases the file size, this is true of all applications. We recommend a setting of 85 which is by default. 85 gives great quality and slightly smaller sizes than the original file. More detail about the quality are described in this online article:
http://blog.phaseone.com/tag/jpeg/
Another excellent article on this:
http://regex.info/blog/lightroom-goodies/jpeg-quality
Both should help you understand why we recommend 85 but leave it to you to change as you wish.
Lowercase Extension: makes the extension lowercase. Turn it off to have it have it retain case.
Use JPEG Progressive (recommended): This is recommended. Progressive JPEGs (p-JPEGs) are typically slightly smaller than baseline JPEGs, but their main advantage is that they appear in stages, giving the effect of the image fading in, similar to interlaced GIFs, as opposed to painting from the top down.
7. Thumbnails
Create thumbnails of the processed photos.
![]() Thumbnails
Thumbnails
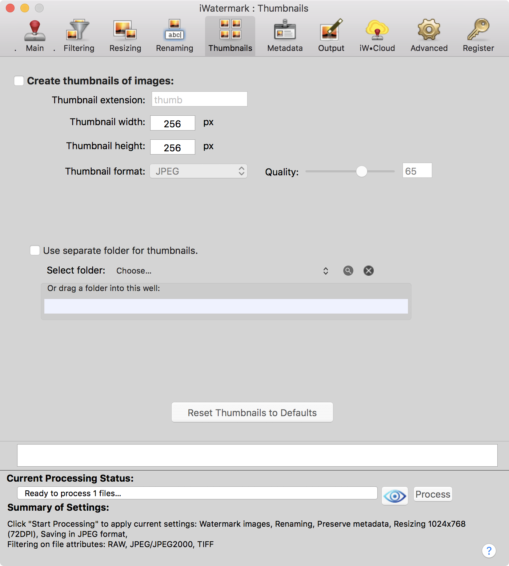
Turn on thumbnails here or on the main page to get a thumbnail of certain dimensions for each processed file. The thumbnails are processed directly into the output folder with any other photos but with the extension thumb to differentiate them from the regular photos.
Select the “Use separate folder for thumbnails” if you want to have all the new thumbnails in a new folder in the output folder.
8. EXIF/IPTC/XMP
All the above EXIF, IPTC, and XMP are types of Metadata. iWatermark can do 3 things with metadata.
1. It can add and remove metadata from a photo or photos.
2. It can add and remove metadata from a watermark.
3. Metadata can be displayed in a visible watermark.
First we will talk about point 1.
1. Adding and removing metadata from a photo or photos.
iWatermark Pro can preserve, remove and embed meta tag info. Also this metatag info can be used to watermark photos. More details on EXIF, IPTC, and XMP here.
![]() EXIF/IPTC/XMP
EXIF/IPTC/XMP
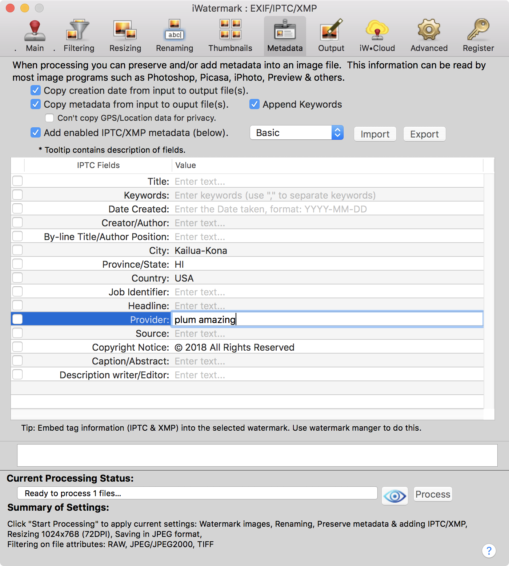
Preserve existing metadata – Turned on by default. This duplicates all the metatag info in the original file into the copied file.
Add enabled IPTC/XMP metadata – When this is selected all the checked metatags (user customized) in the dialog above are added to the copy of the original file.
The drop-down menu which says Basic, Professional and Corporate allows you to select the number of metatags you want to edit and use. All the items you check off will overwrite existing info in the file.
TIP: Under TIFF ‘iWatermark Pro’ is added under Software (seen below).
If you need to search using metadata for all watermarked images then this will work.
2. Adding and removing metadata from a watermark.
The usefulness of adding metadata to a watermark is that then each time you watermark a photo it adds a particular set of metadata at the same time.
iWatermark is the only program we know of that can do this. Why is this useful? As a photographer, you can have a watermark that puts a visible watermark with your logo on top of the photo and simultaneously adds metadata you selected like your copyright, your company name, URL, email and/or any other text data you want.
How to embed metadata into a watermark.
- First, select a watermark.
- Next, go to the EXIF/IPTC/XMP panel and enter the data you want to embed into the watermark.
- Then to the Watermark Manager and select the settings dropdown menu and choose the Embed item.
This info will show up in the column for IPTC/XMP in the Watermark Manager and look like this.
3. Metadata can be displayed in a visible watermark. This is called a Tag.
To do this create a new text watermark select EXIF, IPTC and XMP metadata variables like Camera Model as text for a watermark which will when processed display that info as a visible watermark on the photo(s). Select the tag info from this menu when making a watermark:
9. Advanced
Setting that don’t normally need to be changed.
![]() Advanced
Advanced
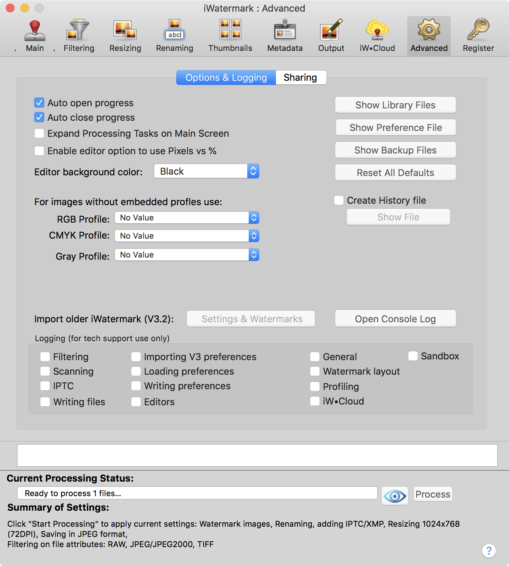
Auto Open Progress– after start processing is hit then opens the progress dialog automatically.
Auto Close Progress– after processing if this is checked the progress dialog closes automatically.
Expand Processing Window– when on the processing area on the main tab is always open.
Show Library Files open in Finder the library where examples and your stock Watermark graphics can be added.
Settings & Watermarks – click this button to import prefs from the old iWatermark (not pro).
Show Library Files – this is the location of the files that you create.
Show Preference File – opens the finder to the location of the preference file and highlights it.
Show Backup Files– we make copies of your originals to make sure there is a second copy. This button will open that folder in the Finder.
Reset All Defaults – resets the application to the original default settings. This is very useful to use if you encounter a problem.
Editor Background Color – this is the background color of the editor. It can also be set from a drop-down in the editor at the top right corner.
Expand Processing Tasks on Main Tab – having this checked will make it so every time you open iWatermark it will open to the Main Tab with the middle section (processing tasks) expanded.
Use JPEG Progressive – uncheck to use baseline JPEG. Don’t change this unless you know what you are doing.
For Images Without Embedded Profile – lets you choose various profiles that come on the Mac or Windows or that are loaded from Nikon, Canon or other software. More about ICC color profiles are here.
Create History File– only needed if we ask you to turn it on for tech support or you want a log of all operations.
Show History File – this shows that log file.
Import Older iWatermarks – will import the older iWatermark watermarks. Each time the button is hit it will import all older watermarks so its best to hit it only once unless you want to have duplicates of all old watermarks.
Logging– only needed when requested by our tech support. This info helps our programmers.
Sharing
Dropbox is used to backup and share watermarks.
Dropbox Icon – Click here to go to the Dropbox site and create a free 2 GB online storage area.
Dropbox Upload– Once you have a Dropbox account click this button to upload. It’s good to backup your watermarks online. It also allows you to sync your watermarks and settings with other computers.
Dropbox Download – download your watermarks and settings from Dropbox to your computer.
Dropbox Delete– deletes your watermarks and settings in Dropbox.
PhotoNotary– this was a service we created to back up watermarks. It was a cloud service. It is no longer available. To replace it we allow users to export watermarks and use their own cloud services.
8. Register
![]() Register
Register
This tab is the place to enter your registration info if you bought iWatermark Pro from us and not the Apple App Store. Here is where you place the registration info we sent automatically when you purchased iWatermark Pro. Once you enter the info and hit the apply button you get a dialog that says you are now registered.
Using Apple’s Photo’s app with iWatermark Pro Mac
The Photo’s works with iWatermark Pro as standalone apps. iWatermark will work within Photos as a plugin soon.
Applying Watermark from Windows Explorer
Since release 2.0.1 of windows version, you can apply a watermark from within the windows explorer. This feature is called shell extension. Right click on an image file (JPEG, PNG, TIFF, BMP, PSD) then select ‘Watermark with iWatermark Pro’ and in the hierarchical menu, one of the watermarks listed.
The image is now watermarked. Quick and simple.
Note: the file format will remain the same but you can control the image quality from the application’s main panel. Limitations of the shell extension:
1. One watermark at a time can be applied.
2. A thumbnail won’t be generated.
3. If the image file is locked by another application it won’t work.
4. A read-only file will be watermarked but then it will no longer be read-only but writable.
Menus
iWatermark Pro Menu
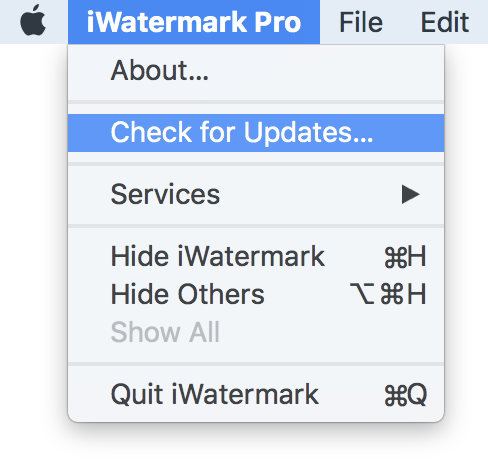
Check for Updates
Allows you check for new versions of iWatermark Pro. We recommend always having the latest version because we are busy fixing bugs and adding new features.
Fonts
Use the installer to install all the fonts used in the iPhone/iPad and Android versions of iWatermark and also many Google fonts. Having the same fonts on different computers and different OS’s means that exported watermarks can be shared and look the same. These additional fonts help with watermark compatibility because we now offer sharing of watermarking between Mac, Windows and soon iOS and Android versions of iWatermark. They are also an excellent collection of fonts to use in watermarks.
The font and plugin installer is here. Plugins are no longer recommend but are in the installer for people who wish to continue using Aperture and iPhoto on older versions of Mac OS.
If you have many exported watermarks files in a folder you can click on one and hit the quick look hotkey command space to show the above dialog with info on the watermark.
File Menu
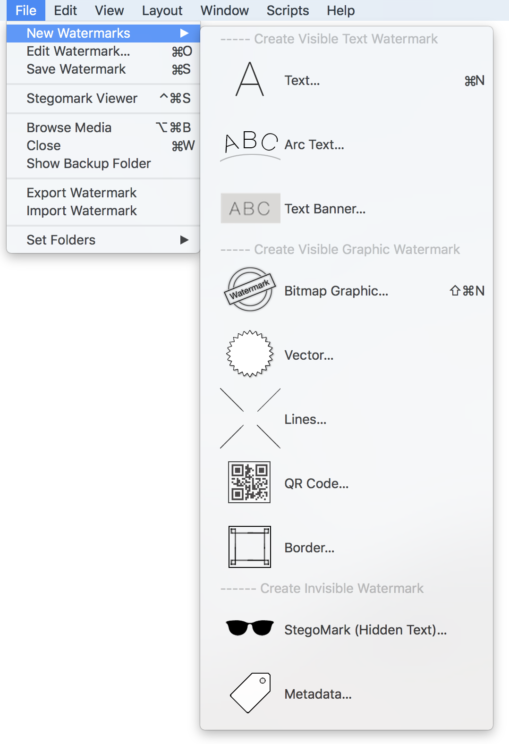
New Watermark– Create a new watermark in the editor. Does the same as hitting the + button.
Edit Watermark– Does the same thing as hitting the Edit button on the Main panel.
Save Watermark – Does the same thing as hitting the Save button in the Watermark Editor.
—
Browse Media– Downloads the optional and free iMedia Browser (Mac only) which allows you to easily grab photos from various locations. Once its downloaded then it works instantly to allow selection of photos.
Show Backup Folder – displays the location in the finder of the backup folder for original input files.
—
Export Watermark – Exports the current watermark file with the icon below.
The exported watermark contains the text and graphics but not the fonts. You can then import this too iWatermark Pro on another computer. Very handy for sharing your watermark with others.
Export icon
Import Watermark – Imports those exported watermark files.
—
Set Folders– This does the same setting of input/output/thumbnails that you can do in the Main panel.
View Menu
Settings–Show Object Handles–
—
Next Input Photo –
Previous Input Photo –
—
Next Watermark Object –
Previous Watermark Object –
Layout Menu
Window Menu
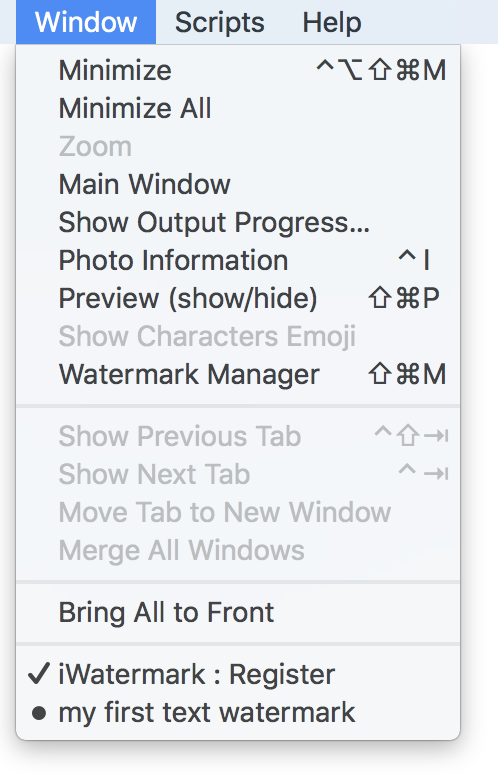
Minimize– Search thru the menu and Apple resources. Does not search the manual.
Zoom – Opens the online manual you are in right now 🙂
Show Output Progress – If you have suggestions/bugs you can report them here. We look at Photo Information – Opens the info dialog for
—-
Bring All to Front – All iWatermark Pro windows are brought to the front.
—-
Windows – Displays the open windows of iWatermark Pro.
Help Menu
 Search– Search thru the menu and Apple resources. Does not search the manual.
iWatermark Pro Help – Opens the online manual you are in right now 🙂
Send Feedback– If you have suggestions/bugs you can report them here. We look at these but may not respond.
Frequently Asked Questions
Q: I am having a problem.
A: No matter what the problem is please follow these steps:
FIRST: Go the advanced tab and hit the ‘Reset all defaults’ button. This usually takes care of the problem which is that people forget that they made changes to various settings. Then try again.
SECOND: Open the program and under the iWatermark Pro menu in the About menu item select that to see what version you are running and that it is the latest. Make sure you have iWatermark Pro in your Application folder and not the old iWatermark. Delete all old versions. If needed download the latest version of iWatermark Pro from our site.
THIRD: Make sure you are registered. See above.
FOURTH: Start simple. Try a simple watermark. Drag one photo into the input tray and an empty folder into the output tray. Select one of our demo watermarks in the drop-down menu. Hit process then checks the output folder to check the photo is watermarked.
If you still have a problem then email us and send us this info:
1. Let us know if you followed the procedure above.
2. Send us the photo you are using. Also, export and send the watermark you are using.
3. Send us the console log after causing the problem in iWatermark. To do this open the console log hit the button on the advanced tab that says ‘open console log’. Clear the console log then run iWatermark again to cause the problem then copy the resulting info in the console log and email it to us.
Q: How do I import my old iWatermark watermarks?
A: Go to the advanced tab and hit the import button. Only hit it once or you will get duplicates.
Q: How do I rename a Watermark?
A: In the watermark manager, click on a watermark name to change it. You can also select a watermark and open it in the editor. At the bottom right change the name and hit save.
Q: Your example watermarks are very good how do I edit them for myself?
A: Just select them and click on the edit button. It will create a new one with the same title with the addition of the word copy at the end. Be aware of the fact that some may have white text which on a white background may not be obvious. Just drag over the text to select it and change it to whatever you want. Often in our demo watermarks, we use the tag which pulls the main contact (usually you) from the address book.
Q: Can I add more than one watermark at a time to a photo?
A: Yes, just select the watermarks in the watermark manager before pressing the process button.
Q: How do I create a signature watermark with my real signature?
A: On a Mac you can follow these instructions then copy that signature.png into a new Graphic watermark to use anytime you need it.
https://support.apple.com/guide/preview/fill-out-and-sign-pdf-forms-prvw35725/mac
Q: How do I create a watermark with a transparent background like the demo signatures you include?
A: Its very simple and any intermediate graphics pro will know how but anyone can do it. Here are a couple of tutorials, Tutorial 1 and Tutorial 2.
Q: I am having a problem registering. What should I do?
A: If you have any problem registering follow these steps:
1. Check the Mac or Windows app page on our site to make sure you have the latest version and make sure it is in your Application folder.
2. Delete all old versions.
3. Registering the app using the license key. Make sure to follow the directions in the email you were sent after purchasing the app.
4. If you get a dialog that says you are ‘Not registered’ then make sure to copy and paste your registration data from the registration email we sent.
5. After a click on the Apply Registration button you should see this (below). Otherwise contact us if you have any question.
Q: Is there a way to output the full-size photos with a watermark and also output thumbnails but with NO watermark?
A: Yes, by using AppleScript.Tap this link to go to the Apple Script chapter of this manual and learn the answer to the above question. AppleScript is your friend when you want to automate and use iWatermark Pro in novel ways.
Q: Isn’t Digimarc the serious way for real photographers to do watermarks on photos?
A: Many thousands of serious professional photographers use iWatermark. The reason we developed iWatermark is because we had a need for watermarking our photos (several of us are photographers) and we wanted something that worked easily, cheaply and effectively. We investigated Digimarc and many other methods that embed a watermark in the image. We found Digimarc to cost hundreds of dollars a year (and they charge based on the number of images) and the Digimarc technique is not foolproof or really that practical. If you embed your data in some invisible fashion like Digimarc then people don’t see it. There is software that does visible watermarking, like iWatermark, and software that does hidden watermarking, like Digimarc. Say you have an iPhone and you lose it in a park, you are much more likely to get it back if it is engraved with your name and phone (iWatermark) then if some info is hidden/encrypted on its flash drive (Digimarc).
Considering these facts we decided from the start that iWatermark should be straightforward, inexpensive, use visible as well as hidden watermarking. The most effective approach we decided was to make software that can batch process hundreds of images and put on a beautiful watermark (logo, signature, copyright, whatever). This notifies people right up front and out in the open of your ownership.
Can they remove it? Yes, but the same is true of Digimarc. When you save an image in jpg it is recompressed (jpg is a compressed format) the pixels all get shuffled around and rearranged thus losing the embedded Digimarc info. Unfortunately we are still early in the digital age and copyrighting intellectual property is not perfect. This is a problem for musicians, movie makers, photographers and software developers. I just did a google on the subject and found this interesting link by a photographer that states the case quite well.
http://www.kenrockwell.com/tech/digimark.htm
Digimarc is like thinking you are protecting your land by burying a no trespassing sign under it. No one will see it and they will think its public land and that they can do what they want. Not very effective. The reality is that making it perfectly clear some property is yours is still the best means of protection and the first defense. that is why we created iWatermark. iWatermark was a conscious choice to use visible watermarking not hidden watermarking. We also wanted to provide a method that is easy to use, practical and inexpensive that everyone can use and understand.
Finally, even when iWatermark becomes your first line of defense (for digital rights management) there is no reason why you can’t also use other methods like Digimarc.
Q: Why should I watermark the photos I put on Facebook, Twitter, Instagram, Tumblr, etc.
A: Excellent question! Because all those services remove your metadata and there is nothing tying that photo to you. People can just drag your picture to their desktop and share to others till there is no connection to you and no info in the file that says you created or own it. A watermark makes sure that everyone is clear on the fact that the photo is your IP (intellectual property). You never know when a photo you took will go viral.
Q: How do I use the fonts you have in the iOS version of iWatermark?
A: Now, the easy way is to just go to the installer of iPhoto and Aperture plugins and install those plugins and fonts at the same time.
Also, these are the fonts available in the iOS system versions like iOS 5, iOS 6 and iOS 7:
http://iosfonts.com
Q: I got a watermark from a friend. When I imported it, it did not look exactly like theirs?
A: We worked hard to make sure that you can export and share watermarks to other computers and have it look the same but a difference can be caused by these factors:
1. Different operating systems do things slightly differently with graphics, color, display, etc.
2. Different fonts. If you don’t have the same exact font as they do then there will be a difference in the look. It might even be the same font but a different version.
Font Solution:
1. get your friend to send you the exact font.
2. find free or buy the same font online.
3. make sure you downloaded the font and plugin installer, installed the fonts from that because that is many of the extra fonts used on iOS and Android.
Q: When I rotate my watermark text 90 or 270 degrees, it becomes very, very small. It is like the width/height-percentages doesn’t follow the rotation angle.
A: This is a result of the method you choose for scaling. When you create a watermark in the watermark editor by default it is set to Horizontal. If you choose Horizontal or Vertical it will do that jumping around, getting smaller and larger, but if you choose unscaled then it will behave normally. It is important to understand the tradeoffs of using Unscaled, Horizontal and Vertical scaling. Those tradeoffs and why iWatermark works the way it does is explained here.
Q: When I use a tag within a watermark I am not seeing any watermark show up?
A: You need to have photos that have that tag embedded in them or nothing will show on the photo. Another way that would work is to pushing tag into that you entered into the EXIF/IPTC/XMP area of iWatermark.
Q: How do I use my Photo Browser with iWatermark?
A: iPhoto, Aperture, Lightroom, Xee, iMedia, ACDSee, iView, Picasa, QPict and other image browsers can all be used with iWatermark Pro.
Drag or select a photo or folder into iWatermark Pro and then watermark as usual.
Q: Does iWatermark Pro work with Aperture, iPhoto, Lightroom and other photo browsers?
A: Yes, it does. For all these apps and others, iMedia browser allows quick access for drag and drop from the photo browser, iPhoto or Aperture’s library to iWatermark Pro. Just download iMedia browser and install. Then use iWatermark Pro File menu to access iMedia browser.
Q: iWatermark Pro is so much faster than iWatermark but I have to process thousands of photos. Do you have any tips for optimizing the speed?
A: Close the info window if open. Close the preview pane if open. Input on one drive and output on another. More and faster processors, more memory and faster drives like flash drives or RAID drives all help.
Windows
Q: Is there an iWatermark Pro for Windows?
A: Yes, there is an iiWatermark Pro for Windows. There is also one for Mac. There is an iWatermark+ for iOS and Android.
Q: Watermarks are kept in the following location on Windows
A: This is the path to the watermark data:
C:\Users\UserProfileName\AppData\Roaming\iWatermark Pro\watermarks
Q: Where are all the preference files kept?
A: Easiest way to find them is to tap the Advanced tab on the main window then the Library button to see all the settings saved from iWatermark Pro.
or go here:
C:\Users\[user]\AppData\Roaming\iWatermark Pro\
– Show Library show this folder:
It contains:
ColorProfiles/
Images/
Text/
watermarks/
Tapping the ‘Show Backup’ button takes you here:
C:\Users\[user]\AppData\Local\iWatermark Pro\
This folder contains the Backup files –
Log files – Show Console Log button open this folder.
Color Profiles
Q: Why are items in the watermarked photo colored differently than items in the original photo?
A: This can be caused by an issue with Color Profiles. Color Profiles are quite complicated. On the Mac, Color Profiles are usually an issue unless you are trying to get what you see on a monitor to be the same as what you print. On Windows, the issue can arise more often.
Windows
- Close Lightroom.
- Go to Start menu > Control Panel > Color Management.
- Click the Devices tab if it’s not already selected.
- From the Device pop-up, select your monitor. If you have more than 1 monitor connected, pressing the Identify monitors button will display a large number on screen for identification.
- Check the ‘Use my settings for this device’ checkbox.
- Make a note of the currently selected profile, which is marked as (default). If there isn’t an existing profile, you can skip this step.
- Click the Add button.
- In the Associate Color Profile dialog, select sRGB IE61966-2.1 (sRGB Color Space Profile.icm) and press OK.
- Back in the Color Management dialog, select the sRGB profile and click Set as Default Profile, and then close the dialog.
Mac OS X
- Close Lightroom.
- Go to System Preferences > Display.
- Select the Color tab.
- Press the Calibrate button and follow the instructions.
- Turn on the Expert Options and calibrate to gamma
Here is more info on Color Profiles.
Q: If a CMYK image is in the process batch, will it change the color mode to RGB?
A: Yes it will, iWatermark currently only deals with RGB, so it will open a CMYK image, but converts it in the process.
Q: Which RAW file formats does iWatermark Pro read?
A: Apple continues to release updates in the Mac OS to better support the various RAW formats, When the Mac OS is updated iWatermark takes immediate advantage of these upgrades. More info is in this Apple Tech Note : http://support.apple.com/kb/HT4757
Windows users can get Microsoft’s Camera Codec Pack and install it.
http://www.microsoft.com/en-us/download/details.aspx?id=26829
Q: Can I use some of the metadata to watermark the file?
A: Yes, we recommend trying it out because it can be very useful. Go to the ‘Add a text watermark’ drop down menu choose ‘Metadata’ select from one of the EXIF, IPTC or other choices and it will drop in a text variable that will insert the right data when processing.
Q: What is XMP? What is IPTC? What is EXIF?
A: See the terminology section.
Q: Can I use iWatermark on 2 computers?
A: Yes, if you are the only user. If you and someone else will be using iWatermark on both machines for that the license requires buying another copy.
Q: How big a file can iWatermark Pro watermark?
A: We use Apple’s API (their code) for working with TIFF, JPEG, etc. What size is possible depends on the file type. A max size would also depend on the amount of RAM in the machine.
For TIFF it would also depend on whether the TIFF file is regular or compressed. TIFF limit is 4GB in size when saved to disk. Compression options may help. IF file size > 4 GB and TIF it will fail. JPEG/JFIF supports a maximum image size of 65,535×65,535 pixels, hence up to 4 gigapixels for an aspect ratio of 1:1. Apple’s Preview app has a limit for exporting JPEG’s of 30,000×30,000.
With very large files these are good tips for speeding up iWatermark
1. Do not show progress dialog.
2. Close the Preview window if open.
3. Turn off Preview in Watermark manager by dragging the divider to top.
Q: I use Lightroom. Why should I use iWatermark?
A: iWatermark provides watermarking tools not available in Lightroom. For example, a text watermark in Lightroom is one fixed size in pixels so that watermark will vary depending on the resolution of the photos being watermarked. Whereas iWatermark has text watermarks that optionally scale proportionally depending on resolution or portrait/lanscape. Lightroom uses pixels to determine watermark location whereas iWatermark position the watermark proportionally based again on esolution or portrait/lanscape. That means if you watermark a batch of photos of different resolutions and/or landscape or portrait orientations that iWatermark can have a watermark that maintains the same look/identitiy on all these kinds of photos. iWatermark also has options not to scale. These are 2 big differences.
Q: On the Mac where are the plugins, preferences files and folder that contains the watermarks located?
A: Locations of all iWatermark files.
Watermarks location:
Click on the Advanced tab then click the button ‘Show library files’ which will show the watermark and other graphics files in the finder.
Preferences location:
Click on the Advanced tab then click either button ‘Show preference file’ which will show the preference file in the finder. If you want to find the library below yourself then remember to option-click in the Go Finder menu reveal Library. Apple hides the Library folder from general use.
MacHD:Users:YourNameHere:Library:Containers:com.plumamazing.iwatermarkpro:Data:Library:Preferences:com.plumamazing.iwatermarkpro.plist
For older version of iWatermark Pro <1.72
Plugin locations:
Photo Plugin is installed in:
~/Library/Application Support/iPhoto/Plugins/
QuickLook plugin is installed in:
/Library/QuickLook (ie. for all users — this requires Admin account).
Aperture plugins are installed in:
~/Library/Application Support/Aperture/Plug-Ins/Export/
~/Library/Application Support/Aperture/Plug-Ins/Editor/
To download the installer of the plugins from the iWatermark Pro’s menu choose, ‘Download Installer to Install iPhoto & Aperture Plugins and Fonts’. Or you can download the installer here:
https://plumamazing.com/bin/iwatermarkpro/iWatermarkPluginInstaller.pkg.zip
The following folders should exist already but they must exist for the installer to place the iPhoto and Aperture plugins:
~/Library/Application Support/Aperture/Plug-Ins/Editor
~/Library/Application Support/Aperture/Plug-Ins/Export
~/Library/Application Support/iPhoto/Plugins
If the installer has a problem check to see if they are there. Hold the option key down and select the Go menu to access the library folder. Then check the Application Support folder and if they are not there you can create them manually. Or if you are familiar with the Terminal then copy and paste the following into the Terminal:
mkdir -p ~/Library/Application Support/Aperture/Plug-Ins/Editor
mkdir -p ~/Library/Application Support/Aperture/Plug-Ins/Export
mkdir -p ~/Library/Application Support/iPhoto/Plugins
For the record these are the plugins that go in those folders:
iWatermarkAperture Export.ApertureExport goes in the Export folder
iWatermarkAperture Stomper.ApertureEdit goes into Editor folder
iWaterMarkFileExporter.iPhotoExporter goes into iPhoto/Plugins folder
Q: How do I uninstall the plugins.
A: To uninstall the iWatermark plugins in iPhoto and Aperture
iPhoto
========
1. Quit the iPhoto application if it is running.
2. In the Finder select the Go Menu -> Go To Folder type in:
~/Library/Application Support/iPhoto/Plugins
A new Finder window will open showing you the plugin folder.
3. Delete “iWaterMarkFileExporter.iPhotoExporter” in the iPhoto plugin folder.
4. Launch iPhoto. To test select photo to export. Then select:
File->export
the iWatermark plugin should be gone so you can no longer select the plugin.
Aperture
========
1. Quit the Aperture application if it is running.
2. In the Finder select the Go Menu -> Go To Folder type in: ~/Library/Application Support/Aperture/Plug-Ins/Editor
3. Delete “iWatermark Stomper.ApertureEdit”
4. In the Finder select the Go Menu -> Go To Folder type in: ~/Library/Application Support/Aperture/Plug-Ins/Export
5. delete “iWatermarkApertures.ApertureExport”
Sharing Watermarks
Export watermarks and email or place them in PhotoNotary, Dropbox, Google Drive or SkyDrive folders for use on other computers. Can be used between Macs now to other computers and mobile devices.
Dropbox – Get a free account with 2 GB of space by clicking here.
Google Drive – Get an account here 5 GB free. Overview of Google Drive here.
OneDrive – Get an account here and 7 GB free.
On the Mac once someone sends (via email or one of the above services) you an exported watermark just double click it to open/install in your version of iWatermark Pro for Mac.
An exported watermark has an icon that looks like this.
Terminology
Digital Watermarking – the process of embedding information onto or into a media file which may be used to verify its authenticity or the identity of its owners.
Watermark – a visible and/or invisible digital watermark that identifies the owner of a particular piece of digital media.
Visible digital watermark-info visible on a photo. Typically, the information is text or a logo, which identifies the owner of the photo. That info is merged into the image info but still visible.
Invisible digital watermark– info embedded within the image data of the photo but is designed to be imperceptible to human vision so it is hidden info. Steganography uses the same technique but for a different purpose.
Metadata– is the descriptive information embedded inside any type of file. All the items below EXIF, XMP, and IPTC are metadata that is added to a photo. Metadata does not change the actual image data but piggybacks on the file. Facebook, Flickr and other online social platforms remove all this metadata (EXIF, XMP and IPTC).
EXIF– Exif – Exchangeable image file format (Exif) A type of metadata that almost all digital cameras store within photos. EXIF stores fixed info like date & time taken, camera settings, thumbnail, descriptions, GPS, and copyright. This info is not meant to be changed but it can optionally be removed from photos. The specification uses the existing JPEG, TIFF Rev. 6.0, and RIFF WAV file formats, with the addition of specific metadata tags. It is not supported in JPEG 2000, PNG, or GIF.
http://en.wikipedia.org/wiki/Exif
IPTC– is a file structure and set of metadata attributes that can be applied to text, images, and other media types. It was developed by the International Press Telecommunications Council (IPTC) to expedite the international exchange of news among newspapers and news agencies.
http://en.wikipedia.org/wiki/IPTC_(image_meta-data)
XMP– Extensible Metadata Platform (XMP) is a specific type of extensible markup language used to store metadata in digital photos. XMP has subsumed IPTC. XMP was introduced by Adobe in 2001. Adobe, IPTC, and IDEAlliance collaborated to introduce in 2004 the IPTC Core Schema for XMP, which transfers metadata values from IPTC headers to the more modern and flexible XMP.
http://www.adobe.com/products/xmp/
Tag– is one piece of metadata. Each item within EXIF, IPTC, and XMP is a tag.
Miscellaneous Links and Info
=========================
OS X Lion: Supported digital camera RAW formats
Mac OS X v10.6: Supported digital camera RAW formats
Aperture 3: Updated RAW Processing
Aperture 1, 2, 3: RAW support (seem to be same as OS X Lion list above)
Applescript Info
iWatermark Pro for Mac is scriptable and has an Applescript dictionary. This means you can automate the way iWatermark works. Now that iWatermark has this ability users (you) can make scripts to make iWatermark work with other apps that you use. Below is a simple Applescript that may not be useful in day to day work but does show how to script iWatermark.
Please understand that we can’t help you make AppleScripts.We can be hired by the hour if you have something you want to do and don’t want to do it yourself. Contact us. But AppleScript is relatively easy to learn and fun. Start with something simple and build from there.
Example Applescripts for iWatermark Pro
Applescript Language Guide at Apple
Please send us scripts you create even if they are very simple so we can share with others.
Q: Is there a way to output the full-size photos with a watermark and also output thumbnails but with NO watermark?
A: Yes. Tap above on the Example Applescripts to download then select the AppleScript large+thumbnails.applescript. More details on what the script does and how it works below.
Creates resized image in two sizes larger image 1024 x 768 with metadata and thumbnail 256 x 256 (with no metadata) prefixed with “thumb_” Assume you have set up other settings in iWatermark Pro as you desire (i.e.):- Renaming format for output name has to uses “Prefix” tag. We set the prefix to “thumb_”- selected input files,- watermark to use,- the output format- and an option not listed below: The script changes the JPG quality to 85 for large images. The script changes the JPG quality to 65 for thumbnail imagesOutput structure set to Flat folders. Renames prefix to “Thumb_” The script can turn on/off watermarking based on large or thumbnail and also… Turn on Save Metadata and remove GPS data (GEO location) for large images. Turn off Save Metadata and remove GPS data is still on for thumbnail images. Set DPI for large images to 300 depict dpi for the thumbnail to 72 dpi
Special Info for Windows Version
To do a silent install the command line for 1.1.3 installer is:
iWatermarkPro.win.x86x64.1.1.2.exe [/install | /uninstall] [/quiet] [/log ]
To See help of command line arguments
iWatermarkPro.win.x86x64.1.1.2.exe /?
There are many options in command line arguments help but the following arguments are supported and tested:
/install
/uninstall
/quiet
/log
iWatermark Support
Please see below for support options on iWatermark.
The serial number for iWatermark and iWatermark Pro are different. If you are an owner of iWatermark and want to upgrade please contact us and let us know the email and name you ordered under.
We enjoy hearing from you.
The folks at Plum Amazing