The worlds No. 1 and best digital watermarking application for Android. Stylishly watermark a Copyright on a photo in seconds. iWatermark is made by and for photographers. Check out the reviews on the Google Play Store.
“iWatermark does not contain any ads or in-app purchases, which is certainly a rare advantage for these kinds of apps. iWatermark is full of useful functions.
If you want to secure your pictures and preserve copyright, then we advise you to download iWatermark developed by Plum Amazing.” Daria for AppEarl, 3/21/22
Localizations: 


iWatermark for Android
iWatermark is the most popular multi-platform tool for watermarking photos. It is available on Mac as iWatermark Pro, Win as iWatermark, iPhone/iPad and Android too. iWatermark lets you add your personal or business watermark to any photo or graphic. Once added this visible watermark displays your creation and ownership of this photograph or artwork. iWatermark lets you create a graphic, QR or text watermark then edit them to change opacity, rotation, color, size, etc via touch then easily share via email, Facebook, and Twitter. Share to Flickr via email.
IMPORTANT: To share watermarked photos to Facebook, Twitter and Instagram, those apps must be installed/configured on your device prior to opening iWatermark.
There are now two versions for iPhone/iPad/Android: iWatermark Free and iWatermark. The only difference between the two is that iWatermark Free puts a small watermark that says ‘iWatermark Free – Upgrade to remove this watermark’ at the bottom of a picture. In the Free version a button to upgrade to the regular version is on the main page. Many will find that fine, otherwise there is an inexpensive upgrade to remove that watermark. Upgrading supports the evolution of iWatermark, its a small price for such a sophisticated program.
iWatermark comes with examples of text (names, dates, etc) and graphic (signatures, logos, etc.) watermarks which you can use immediately to test out iWatermark. But soon you will want to create your own watermarks, text or graphics. Text watermarks you can make directly in iWatermark and saved for reuse. Graphic watermarks, like signatures or logos, can be imported:
Digitally sign your photos/artwork with iWatermark to claim, secure and maintain your intellectual property and reputation. Build your company brand, by having your company logo on all your images. Avoid the surprise of seeing your photos and/or artwork elsewhere on the web or in an ad. Avoid the conflicts and headaches with plagiarists who claim they didn’t know that you created it. Avoid the costly litigation that can be involved in these cases of misuse of ip. Avoid intellectual property squabbles.
1. Create a watermark. Take or use a picture to use as a backdrop to create a watermark either from text or a graphic. Create a Text or Graphic watermark. Save that watermark.
2. To watermark a photo. Take or choose a photo then select from the watermark roller the watermark you created.
3. Save and/or Share it.
– On iPhone/iPad watermarked photos go into the Camera Roll and into the ‘iWatermark’ folder.
– On Android watermarked photos go the ‘iWatermarked Images’ in external storage.
Choose from a selection of included example watermarks (both text and graphics) or add your own text or graphic watermark. Your customized watermark can be text, a business logo or your signature and you can easily adjust its scale, opacity, font, color and angle. Then from the watermark roller select one of our examples or your own and instantly watermark any photo.
Save to your photo library or share via Facebook/Twitter/Flickr or email in various resolutions.


Android Update 9/11/23 IMPORTANT: Fixed the issues of not being able to use the gallery for iWatermark paid and lite versions. Make sure to get the Sept 6th iWatermark 1.4.8 paid and lite 1.5.1 versions for that fix. This allows being able to watermark again. Issues remain. One remaining bug is the camera does not allow saving and that permission issue will be fixed in the next couple of days.
Explanation: All developers have been scrambling to meet a deadline that Google set for all apps to targetAPI level 31 by Aug 30, 2023 to remain available in Google Play for users. We met this targetAPI with the last version but in doing that exposed new issues caused by that change. There will be more updates this next week. Thanks for the feedback, understanding and your patience. It was a sudden change but the apps can be used again for watermarking.
No changes for iOS version at this time.
People like iWatermark. So much so that we found that we could not upgrade features and user interface because they liked it as it is and did not want it to change. Therefore when we had ideas for a version with a new interface (way to operate the program) and new features that didn’t fit in iWatermark we couldn’t change it so we created a new app and called it iWatermark+. Details, differences and special upgrade cost is all here:
https://plumamazing.com/iwatermark-upgrade/
Once added this visible watermark displays your creation and ownership of this photograph or artwork. iWatermark lets you create a graphic, QR or text watermark then edit them to change opacity, rotation, color, size, etc via touch then easily share via email, Facebook, and Twitter. Share to Flickr via email.
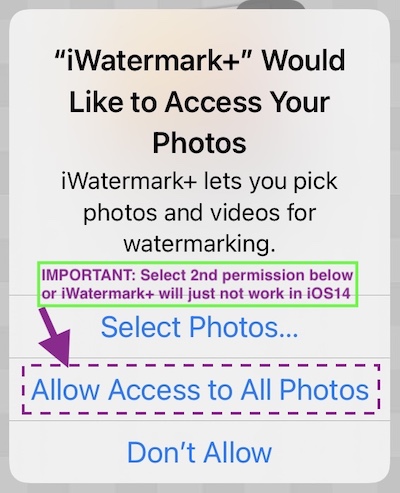
IMPORTANT: If you are using iOS and the app puts up a dialog asking you for permissions to use all photos. Why? Simple, because the app needs to access your photos to display them, allow you select certain one and then watermark them singly or in batches. When you first use the app Apple puts up this permissions dialog. It is essential to set this permission correctly to avoid the problem of not being able to access your photos. If you find an issue selecting photos or watermarking it’s because you didn’t select the option below.
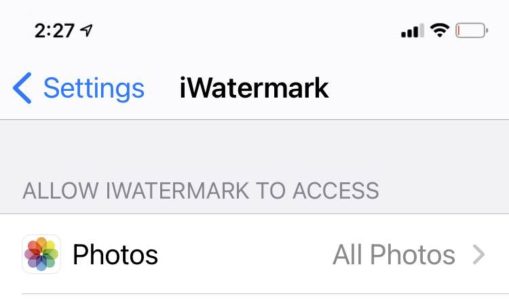
At any time you can change the setting by tapping on the ‘Settings’ app and at the very top type in iWatermark and then select it when it appears. Change the ‘Photo’ setting to ‘All Photos’
There are two free apps:
 iWatermark Lite (Android)
 iWatermark Lite (iOS)
Many people try the lite/free one first to try out the app and features. It has an icon with Free on a green banner. It has no ads and lets you use all features but also adds our watermark to every photo that says, ‘Created with iWatermark Free’. You are welcome to continue using it or upgrade to the inexpensive paid app which does not have our additional watermark. If you get the paid version then delete the free one.
 iWatermark (iOS and Android) Paid version icon
The paid version supports the continuing evolution of iWatermark. Every time someone buys a copy it supports more programming to improve the app which benefits everyone. Yay! The paid app does not add our watermark on your photo only yours. Buying the regular version supports our continuing work on this app. Thanks!
IMPORTANT: Remember, delete the free version after buying. It can confuse you and you no longer need it.
In the future, you may feel the need for a more powerful watermarking app. For more visible watermarks and invisible watermarks, metadata, photos and video, templates, etc there is iWatermark+. Features and details on upgrading from iWatermark to iWatermark+ are all here on this page: https://plumamazing.com/iwatermark-upgrade/
If you like the continuing improvements and want it to continue, please submit an App store review and/or let your friends (especially photographers) know about the app. A simple mention by you on Facebook, Twitter, Instagram Pinterest, etc. might help someone decide to download it which helps us to keep improving it for you. We love hearing from you. Big Thanks!
IMPORTANT: Would you like your watermarked photos seen by more people? Follow iWatermark (@Twitter, @Facebook, @Instagram, @Pinterest, etc.) and tag your best artworks #iWatermark to be featured!
![]() Like us on Facebook coupons, news, ask questions, post your watermarked photos.
Like us on Facebook coupons, news, ask questions, post your watermarked photos.
Mac/Win: If you’d like to test out our Mac or Win software, come to our site and download the free to tryout. Give iClock a try it is essential/useful/fun and 100 times better than the old Apple menubar clock.
For more info on the Mac or Win versions click here.
iOS/Android: After using iWatermark the next step up is iWatermark+. If you are a pro photographer or a heavy user of Instagram, Pinterest, or Twitter you will find iWatermark+ invaluable. Try out iWatermark+ the free version here. To get an overview of all it’s abilities check out the manual for iWatermark+ here. As an iWatermark owner you can upgrade for $1.99 (at this time) by going straight to the app store to get the bundle for $3.99 then if you paid for the original iWatermark (usually 1.99) that is automatically deducted by Apple when you buy the bundle which brings the cost of upgrading to iWatermark+ a mere $1.99.
iWatermark+ is seriously step up and polished professional app with many more features. I can say this because I wrote the manual and didn’t do the coding. I use both iWatermark and iWatermark+ all the time in my work and recreationally. Don’t think for a moment that all watermarking tools are the same. iWatermark is the best. But the next step is iWatermark+ which has a different user interface and is incredibly powerful. There is a massive amount of programming in the app. The user interface is beautifully tuned to how photographers work. Don’t take my word for it, look at the manual or try out the free version for iWatermark+ like you did for the original iWatermark.
Please email if you have a problem. Putting up a review of 1 star and writing a complaint is not really a review and doesn’t help solve the problem. Instead of putting up a review that is not actually a review but a call for help, email us direct and we can clear things up faster whether its a bug or a misunderstanding. Details and a screenshot help. We love talking to you all and we are working hard to make sure everyone is happy. Thanks.
Version Changes for iOS
Version Changes for Android
Thanks for downloading iWatermark! iWatermark is the most popular multi-platform tool for watermarking photos. It is available on Mac as iWatermark Pro, Win as iWatermark, iPhone/iPad and Android too. iWatermark lets you add your personal or business watermark to any photo or graphic. Once added this visible watermark displays your creation and ownership of this photograph or artwork. iWatermark lets you create a graphic, QR or text watermark then edit them to change opacity, rotation, color, size, etc via touch then easily share via email, Facebook, and Twitter. Share to Flickr via email.
IMPORTANT: To share watermarked photos to Facebook, Twitter and Instagram, those apps must be installed/configured on your device prior to opening iWatermark.
There are now two versions for iPhone/iPad/Android: iWatermark Lite and iWatermark. The only difference between the two is that iWatermark Lite puts a small watermark that says ‘iWatermark Free – Upgrade to remove this watermark’ at the bottom of a picture. In the Free version a button to upgrade to the regular version is on the main page. Many will find that fine, otherwise there is an inexpensive upgrade to remove that watermark. Upgrading supports the evolution of iWatermark, its a small price for such a sophisticated program.
iWatermark comes with examples of text (names, dates, etc) and graphic (signatures, logos, etc.) watermarks which you can use immediately to test out iWatermark. But soon you will want to create your own watermarks, text or graphics. Text watermarks you can make directly in iWatermark and saved for reuse. Graphic watermarks, like signatures or logos, can be imported:
Digitally sign your photos/artwork with iWatermark to claim, secure and maintain your intellectual property and reputation. Build your company brand, by having your company logo on all your images. Avoid the surprise of seeing your photos and/or artwork elsewhere on the web or in an ad. Avoid the conflicts and headaches with plagiarists who claim they didn’t know that you created it. Avoid the costly litigation that can be involved in these cases of misuse of ip. Avoid intellectual property squabbles.
1. Create a watermark. Take or use a picture to use as a backdrop to create a watermark either from text or a graphic. Create a Text or Graphic watermark. Save that watermark.
2. To watermark a photo. Take or choose a photo then select from the watermark roller the watermark you created.
3. Save and/or Share it.
– On iPhone/iPad watermarked photos go into the Camera Roll and into the ‘iWatermark’ folder.
– On Android watermarked photos go the ‘iWatermarked Images’ in external storage.
Choose from a selection of included example watermarks (both text and graphics) or add your own text or graphic watermark. Your customized watermark can be text, a business logo or your signature and you can easily adjust its scale, opacity, font, color and angle. Then from the watermark roller select one of our examples or your own and instantly watermark any photo.
Save to your photo library or share via Facebook/Twitter/Flickr or email in various resolutions.
You can either:
1. Create a watermark (graphic or text or QR).
or
2. Watermark a photo.
IMPORTANT: Don’t mistake creating a watermark for actually watermarking.
For both the above you need to start by selecting or taking a photo.
Then once you have selected a photo and it becomes the background of the main screen you can now click any of the 3 lowest buttons:
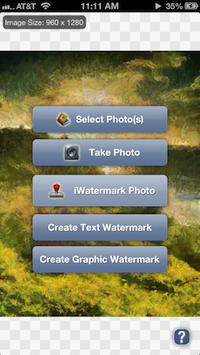
Clicking this button will take you to the Watermarking page. Here you can click on the menu at the bottom of the page Watermarks, a roller will slide up then choose one of many example watermarks or your own watermarks. Once you select one you will see it on your photo. Click on the photo or the watermark menu to have the roller disappear. Now use touch to adjust the watermark:
Hit save and it saves a copy of that photo with that watermark on it in your photo library or can share via email, facebook, etc.
IMPORTANT: you can change the location, agle and size but you will not be able to change opacity, font, or color. To change those create a new watermark with whatever of those properties you want.
First select a photo as a background to help create and view your watermark. You will be creating and saving a watermark for later use not actually watermarking that photo.
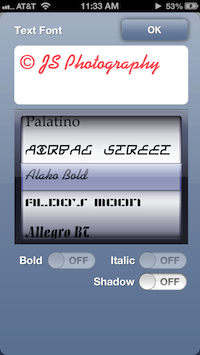
Once you are on the Create Text Watermark page you will see a new menu at bottom left called Edit. Click that and at the top you will see the menu item Text, click that. In this text dialog type anything you want, like your name. Once you have done that choose any of the other Edit menu buttons to change scale, opacity, font, color and/or angle to adjust them to your liking.
Use the buttons in the edit menu at bottom left to change the font, angle, scale, opacity, etc. or do it by touch in the usual iOS ways:

In the Text area you can type from the keyboard and select special characters like ©, ™ and ®. Also the date and time can be added to a watermark.
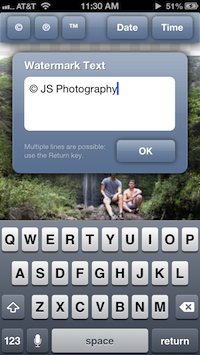
Select one of the 150 fonts available in iWatermark. Text and the font are displayed in the actual font face, wysiwig (what you see is what you get, see below).
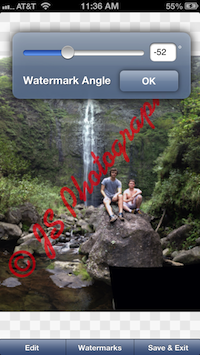
Change the angle via the edit menu or by putting on two fingers and twisting (not the 60’s dance but the touch gesture).
First select a photo as a background to help create and view your watermark. You will be creating and saving a watermark for later use not actually watermarking that photo.
For Graphic Watermarks you can use any graphic but they should be graphics with transparent backgrounds. The sample signatures, symbols and other graphics we include have transparent backgrounds and are .png files. That means the signature itself is seen but the background is transparent and shows the photo underneath. The file format to do this is called .png and it allows the background to be transparent (a .jpg does not allow this transparency, .png must be used).
Check out the FAQ (below) or Google ‘png’ and ‘transparency’ to learn more about making png files with transparent backgrounds.
There are 3 ways to get these transparent background graphics into iWatermark to use as watermarks. You can either
1. find a png graphic with transparency on the web by searching. Touch and hold on the graphic
2. use the built in tool iWatermark Scan Signature/Graphic or
3. make a .png file of your signature/graphic on your computer, email it to yourself then import it to use on your photos.
1. Find a .png graphic on the web.
Find a png graphic with transparency on the web by searching. Touch and hold on the graphic to save to the camera album. This works on iOS and Android.
2. iWatermark Signature/Graphic Scanner
This is a special tool we created especially to import your signatures and art so you don’t have to learn how to do this on your computer. First sign your signature with a black pen (using something thicker then a pen and smaller then a magic marker is best) on very white paper. Next select Create Graphic Watermark from the main page then select Scan Signature.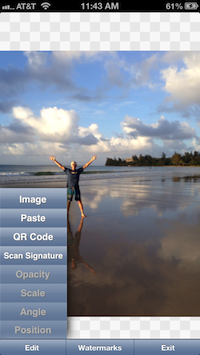
Once you do that it will open the camera to take a photo. Then in good bright lighting without shadows take a photo of your signature. You can fill the screen with your signature. If it looks good hit the Use button and it will instantly add transparency to the background of your signature and import and place it on top of whatever photo you chose in the beginning. Now by clicking on the ‘Edit’ menu items you can change the opacity, angle, scale in the usual ways. When you save, it will save your signature as a watermark you can use anytime. You may need to do this a few times to get it just right. IMPORTANT: This does not watermark that photo. This photo is only a background during the creation of a watermark. Once you create and save a watermark then you can use it on any photo in the future.
In addition to scanning signatures, the scan signatures can be used to import simple high contrast graphics.
The below picture is part of a tutorial by photographer Mark Alberhasky.
3. Create Graphics On Your Mac or Win Computer, Email, Then Open In iWatermark.
Make the graphics on your computer using Photoshop, Gimp or one of the many graphic eiditors. Here is an outline of the steps to create a graphic with an alpha mask also called a transparency.
a. Create graphic with transparency.
1) Create a layer and draw a watermark on it (or simply paste)
2) Magic wand all the background you want to be transparent. Then hit delete. You are left with the checkerboard background. If you don’t see the checkerboard (no background) then there may be other layers you need to hide or delete.
3) Save as PNG. A transparency cannot be created with .jpg it must be a .png file. This link more details about doing this. Here are 5 more ways to do this. You can also google creating a signature with transparent background to get more info.
b. Transfer graphic from your computer to your iOS or Android device
From your computer email the .png to yourself. Open on your iPhone/iPad or Android and you will see something like this.![]()
Touch and hold on the graphic that you sent. In this case its the iKey icon. That will pop up the dialog below. Click on the “Save to Camera Roll” button.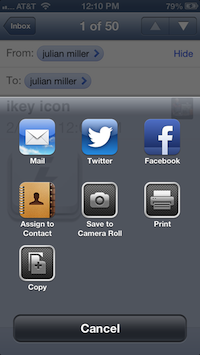
On Android graphics can also be put directly to sdcard/iWatermark/Watermarks folder and then used in iWatermark.c. Import into iWatermark
In iWatermark touch the Edit menu at the bottom of the screen. In the menu that pops up touch ‘Image’ button (see below) find the image you saved in the camera roll and it will be imported and appear as a watermark on the photo. You may then want to change its opacity to make it more visible.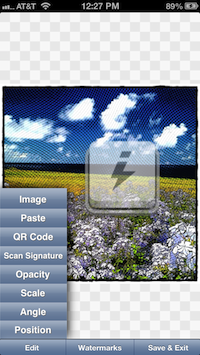
The iKey icon graphic could be your signature, logo or other graphic that is now your personal watermark. Once you have imported your graphic watermark you can act on it with any of the items in the edit menu on the left/bottom side of the screen.
Use the buttons in the edit menu at bottom left to change the font, angle, scale, opacity, etc. or do it by touch in the usual iOS ways:
What is a QR code? QR means quick response and its a kind of barcode that can hold a lot of info. Learn more at Wikipedia. iWatermark for iPhone/iPad allows you to encode multiple lines of date into a QR code which can then be used as a watermark. Many apps on the iPhone can decode (scan and read) QR codes, one is the iPhone just point the camera at a QR code and it will show the url and ask if you want to go to that link. To find more in the iTunes App Store in the search box type ‘QR code’ to find apps that decode QR codes. Android has an app that comes as a default app that reads QR codes called ‘Barcode Scanner’. Its a good one because when it encounters a URL in a QR code it opens the browser and takes you directly to the site.
What is a QR code as a watermark good for? Now, instead of no info on your photo you can have some very exact info about you or your business which can easily be scanned by the proper app in a smartphone. No need to type in a website just scan and it will go there in its browser. A QR code as a watermark on a photo can do many things:
How to Create a QR code in iWatermark.
Follow the ‘create a graphic watermark’ (above) choose QR Code in the left side EDIT menu (see screenshot above). Enter the data you want to encode. Then hit the GENERATE button. It will create and insert the QR code. Save this with an appropriate name. Now any time you want this QR code can be used to watermark a photo. Once you create a QR code its good to test it.

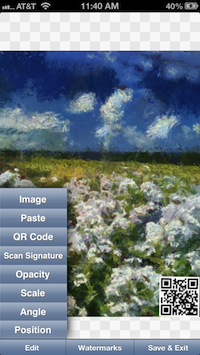
To delete a watermark is also simple. Select a photo or take one.
For iPhone/iPad – choose the button to do a Text Watermark or Graphic Watermark. At the bottom of the screen choose the Watermark navigation tab then in the roller which pops up select the watermark you want to delete and hit the red button with a – in it.
For Android – choose the button to do a Graphic Watermark. At the bottom of the screen choose the Watermark navigation tab then in the roller which pops up select the watermark you want to delete and hit the red button with a – in it.

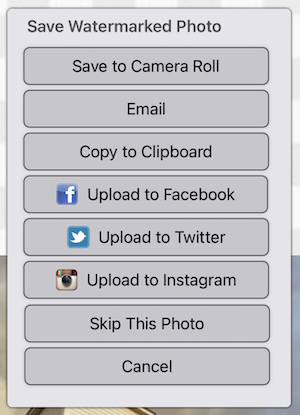
When you hit the save button at bottom right after watermarking an image the dialog above appears. Here you can:
IMPORTANT: To share watermarked photos to Facebook, Twitter and Instagram, those apps must be installed/configured on your device prior to opening iWatermark.
Access to photos must be turned on. To make sure this is on in:
iOS 6 go to the settings:privacy:photos and put the switch on to use Photos.
iOS 5 go to the settings:privacy:location services: and make sure that iWatermark is turned on. We don’t use the location data but this needs to be turned on for multiple selection to work.
Select more then one photo to start as in screenshot above. Hit the ‘Done’ button then on the main screen choose the Watermark button and select one of yours or our watermarks. After you share (save to albums or facebook, etc) it will go thru each photo in turn and you can save to wherever you want (album, flickr, facebook, etc.)
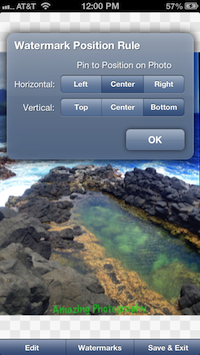
Use the Position button to pin watermarks to same location for each photo. Click the position button in the Text or Graphic Watermarks and you will get the dialog above. Choose the horizontal location and the vertical location (like left, top) to place a watermark in the same place each time for individual photos or batch photos.
The position tool is particularly important when you have multiple photos to batch process, that are different orientations (portrait or landscape) or different resolution and you want the watermark to appear in the same spot on each.
Q: What is the difference between iWatermark Free and iWatermark both for iPhone/iPad?
A: The only difference between the two is that iWatermark Free puts a small watermark that says ‘iWatermark Free – Upgrade to remove this watermark’ at the bottom of a picture. In the Free version a button to upgrade to the regular version is on the main page. Many will find that adequate. Otherwise upgrade to remove that watermark. Upgrading supports the evolution of iWatermark, its a small price for such a sophisticated program.
Q: What is the difference between iWatermark on iOS and Android?
A: Not a lot so we use the same manual. The Android version does save the files in a different place. The answer is in the next Q&A.
Q: I saved why can’t I find my watermarked photo?
A: These are 2 different items to save a (1) watermark or a (2) watermarked photo. Don’t confuse one for the other.
1. Open a photo, create a text or graphic watermark then save only the watermark.
or
2. Open a photo, add a saved watermark, watermark the photo then save that watermarked photo.
When you did 1 (above) you may have been confused because when you create a watermark you load a photo first to see what the watermark will look like on a photo. When you save it saves the watermark you just created not the photo. The watermark is saved into the camera roll where it can be reused anytime.
1 allows you to create different watermarks that you can then select anytime later to watermark photos easily.
2 is the actually watermarking and saving of a watermarked photo.
Q: Where does the Android version save it’s files.
A: When you first start the Android version it puts up a dialog that says, “Helpful tip: Photos watermarked using this app are saved inside the folder marked ‘iWatermarked Images’ in your external storage. You can access them using a file browser app or thru the Gallery”.
Q: What is the difference between iWatermark for the iPhone/iPad and the desktop versions for Mac/Win?
A: The desktop versions takes advantage of the faster processors and larger display. Desktop versions have more abilities, can handle photos that are much larger and they are easier to use on hundreds or thousands of photos in a photographers workflow. The iPhone/iPad version are designed to allow you to use touch to change the various parameters. Both are designed to fit their hardware. To find out more go here iWatermark Pro for Mac and iWatermark for Win. Like us on Facebook to get news and a special discount coupon for the Mac or Win version.
Q: Why should I watermark the photos I put on Facebook, Twitter, Instagram, Tumblr, etc.
A: Excellent question! Because all those services remove your metadata and there is nothing tying that photo to you. People can just drag your picture to their desktop and share to others till there is no connection to you and no info in the file that says you created or own it. A watermark makes sure that everyone is clear on the fact that the photo is your IP (intellectual property). You never know when a photo you took will go viral. Be prepared.
Q: Does iWatermark Pro save a photo in highest resolution to the photo album?
A: Yes, iWatermark for iPhone saves in the highest resolution to the photo album. It may show you a reduced resolution for your display to improve speed but the final output is equivalent to the input. You can also email watermarked photos straight from the app at your choice of resolutions including the highest resolution. It may be that if you are trying to email from the photo album itself and you are on 3g (not wifi) Apple is choosing to lower the resolution of photos. That has nothing to do with iWatermark. It does have something to do with choices by Apple, ATT and maximizing the 3G bandwidth.
Q: How do I use the fonts from the iPhone/iPad or Android version of iWatermark in the Mac Version?
A: To get the fonts out of the iWatermark iPhone app you need to find where the iPhone app is stored on the Mac.
In iTunes, applications pane, control+click an app, and choose “Show in Finder”.
It will reveal a file located here:
Macintosh HD > Users > *User Name* > Music > iTunes > Mobile Applications
and will highlight the file called iWatermark.ipa When transferred to the Mac or Win is the iWatermark application.
Copy this file. option key and drag this file to the desktop to copy it there. it should now still be in the original folder and a copy on your desktop.
Change the name of the desktop one’s extension to .zip. so it should now be named iWatermark.zip
Double click to unstuff. you will now have a folder, inside are these items:
Click on the Payload folder then control click on the iWatermark file and you will get the dropdown menu above.
Click on ‘Show Package contents’ and inside there you will find all the fonts.
Double click a font to install it on the Mac.
Q: I choose ‘Do not allow iWatermark access to photos’ by accident. How do I turn that on for iWatermark?
A: Go to settings:privacy:photos and in there turn on the switch for iWatermark.
Q: How do I move the watermark?
A: To move the watermark just touch it with your finger and drag it wherever you want. You can also change the font size, scale (using pinch/zoom) and change the angle (two finger twist) directly by touch.
Q: Does iWatermark pass on the EXIF info from the original photo?
A: Yes, any watermarked photo you save to the Photo Album or send via email has all the original EXIF info including GPS info.
Q: I had a crash what do I do.
A: Its rare but a crash can happen for 4 reasons and there are simple solutions.
1. A bad download in which case you need to delete the version on your iPhone/iPad and also in iTunes or Android device then redownload.
2. Using photos from an SLR which are 10 megs or higher is size. iWatermark for iPhone was designed for iPhone and iPad photos. It will work on other bigger photos but keep in mind the limitations of memory in Android and iOS devices presently.
3. Something is going on with the phones OS. Restart to put the phone back in its default state.
4. Not enough memory left on the device. The solution is simply delete a podcast, video or other temporary content.
After you have checked and done the above and have a consistent bug please let us know the details to reproduce it and if we can reproduce it then we can fix it.
Q: I want to use my signature as the visible watermark for my photos. How do I add graphics like the example signatures by Picasso, Ben Franklin, etc.?
A: There are 2 ways:
Here is an outline of those steps:
A transparency needs to be created in Photoshop like this:
1) create a layer and draw a watermark on it (or simple paste)
2) magic wand all the whitness, then hit delete. You are left with the checkerboard background which is
3) hide the background layer
4) save as PNG. A transparency cannot be created with .jpg it must be a .png file.
More details on the process are below.
Use any graphic as a watermark. To use your own signature, first you need to scan in your signature and then eliminate the background. If you have a signature with a white background then this will obscure a part of your photo, the signature watermark will look like a white block. To make sure that does not happen put your scanned signature into a graphic editor like Photoshop (or some other graphics editor like Gimp which is free) open your signature, remove the white background with the magic tool then save the file as a .png file. It is essential the file is a .png file since a jpg file does not allow having a transparent background.
This link gives you the steps to do this. Here are 5 more ways to do this. You can also google creating a signature with transparent background to get more info.
To easiest way transfer it to your iPhone/iPad is to email the file to yourself, open the email then save the attached file to the photo library. There are also other ways and tools to transfer graphics to the photo library on the iPhone. On Android you can save the png graphics direct to the phone storage.
Then in iWatermark you make a graphic watermark and use your signature image (from the iPhone photo libarary) and give it your name. You can have many of these at different resolutions, rotations, opacities, etc and give each a name to identify it.
Q: How does Photo Stream work? do I add a photo to Photo Stream instead of the Camera Roll?
A: This is controlled by Apple not by us. More info is here.
Q: How do I delete the example signatures and logos that are provided?
A: Select a photo (to act as a background) then click on create graphic watermark. Next click on the watermark and the roller will pop up. Click the red – sign to delete that example.
Q: I lost my phone and need to redownload the iPhone/iPad (or Android) version. Do I have to pay again?
A: No. Both the Apple iTunes store and Google Play let you redownload apps you already bought and their policies are at those links.
Q: Is there a version of iWatermark for the Mac or Windows?
A: Yes, they are available on our site here. They are very powerful especially the new iWatermark Pro for Mac. It allows multiple watermarks simultaneously, uses parallel processing (FAST) and has more effects and flexibility. Great for photographers.
Q: If I want to use iWatermark for both iPad and iPhone, do I need to pay for two apps or just one?
A: Some app makers want you to pay twice. We don’t. The same iWatermark works fine on iPhone and iPad. Legally you are the owner of both and you can have your software on both. But please get your friends to buy one or put up a nice 5 star review on iTunes app store since its only .99 and apple gets a third of that. Both of those help us to keep evolving, programming and improving the application.
IMPORTANT: The signatures of John Hancock, Ben Franklin, Galileo are just examples of graphic watermarks. They are the authentic signatures of these individuals. Each was scanned in, digitized, the background removed and saved as .png files. The are included for fun and to show what is possible. We recommend you create your own signature or use your logo for your photos. See the info in the Q&A above about how to create and put your own signature or logo into iWatermark. If you don’t want to create your own graphic watermark you can always create text watermarks as you need them.
People like iWatermark. So much so that we found that we could not upgrade features and user interface because they liked it as it is and did not want it to change. Therefore when we had ideas for a version with a new interface (way to operate the program) and new features that didn’t fit in iWatermark we couldn’t change it so we created a new app and called it iWatermark+.
iWatermark satisfies the watermarking needs most people have. But for photojournalists, professional photographers and people with greater needs iWatermark+ was created. It has more iWatermark types, you can use many watermarks simultaneously, and do many things that are not possible in iWatermark. Many say it’s more powerful than many desktop apps. It’s also a steal considering the price of desktop apps and the vast number of hours of programming in iWatermark+. Then you have both our apps. You can upgrade from iWatermark to iWatermark+ easily. Tap here for info on iWatermark+ and how to upgrade.
Please send us your suggestions, bugs and just to tell us how you like it here. Email us a good quote and a link to your site. If you have a great photo with watermark feel free to send it along. We would enjoy hearing from you.

Join us on Facebook and get news and the discount coupon for the Mac or Windows version of iWatermark. Use your desktop in conjunction with your iPhone or Android version of iWatermark.
The tutorials & reviews are about iOS and Android. The app works the same on both.
A very nice overview screencast of iWatermark and iWatermark+ by Tabitha Carro
This screencast video is from Phylis Kare
Screencast by spiderworking
Katherine Roussopoulos made this informative screencast.
© 2007-2023 Plum Amazing. All rights reserved.