By Plum Amazing
Originally by Ryan Leigland
2012-13 Updates by Mark Fleming
2014-20 Updates by Bernie Maier
Version Changes
Latest Download on Plum Amazing
PixelStick is a tool for measuring distances (in pixels), angles (in degrees) and colors (RGB) on the screen. Photoshop has distance, angle and color tools but they only work in Photoshop. PixelStick works in any app, between app, in the Apple Finder in addition it is lightweight, handy, fast and inexpensive. Excellent for designers, navigators, mapmakers, biologists, astronomers, cartographers, graphic designers or anyone who uses a microscope or telescope or wants to measure a distance on their screen in any window or application. PixelStick is a sophisticated ruler, protractor and eyedropper that works anywhere that you do on your Mac.

Measurement can be defined as ..
…the comparison of ..
…an unknown quantity of some physical quality/dimension/phenomena…
..with..
.. a known, pre-selected value of the same physical quality/dimension/phenomena, called the Unit..
..So that we can find out how many iteration or fractions of the unit..
..are contained in the unknown quantity.
Or..
… So that we can find out how many repeations of the unit equals the unknown quantity.
Once again, with no breaks
Measurement can be defined as the comparison of an unknown quantity of some physical quality/dimension/phenomenon with a known, pre-selected value of the same physical quality/dimension/phenomena, called the Unit so that we can find out how many iteration or fractions of the unit are contained in the unknown quantity Or so that we can find out how many repeations of the unit equals the unknown quantity. -Nadia Nongzai on Quora
When you can measure what you are speaking about, and express it in numbers, you know something about it, when you cannot express it in numbers, your knowledge is of a meager and unsatisfactory kind; it may be the beginning of knowledge, but you have scarcely, in your thoughts advanced to the level of Science. – William Thomson, Lord Kelvin
Accurate measurement is essential in many fields, and all measurements are necessarily approximations.
PixelStick measures pixels and the distance between pixels. The relation between pixels and whatever you are measuring is scale. It is measurement by comparison. In this way PixelStick can measure distance between galaxies planets, countries, cities, people, molecules, atoms or various sub-atomic particles in a photo if the scale is known. It is the same as the use of scale in a map. In a map you can look at the bottom right and see the scale which might be 1 in/1 mile. On that map cities that are 5″ apart are 5 miles from one to the other. Custom scales are available are available in PixelStick and can be used by astronomers, microbiologists, etc.
“Not everything that counts can be counted and not everything that can be counted counts.” – Albert Einstein
PixelStick is a utility that allows easily measuring distances and angles on your screen, zooming in under the cursor to show colors and allows copying those colors in 7 formats (CSS, HTML and several RGB integer and hex variations) in any application, window and across the desktop. In addition it does scaling so if you know the scale of a document you can measure its contents. Out of the box its measurements will work with Google Maps, Yahoo Maps and Photoshop. Since there is no standardized scale for arbitrary documents on the Mac, for other documents you can create customized scaling options in PixelStick that it can use in its measurements.
“If it can’t be expressed in figures, it is not science. It is opinion.” – Robert Heinlein
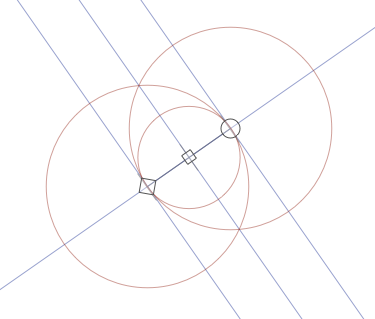
Most of what PixelStick does is obvious. Drag the endpoints to change the distance or angle. Click the locks or hold down the shift key to constrain the distance or angles.
How PixelStick behaves when you have more than one screen depends on your version of macOS/OS X. OS X Mavericks introduced a user preference to allow screens to have separate spaces. When this preference is set (it set on by default in OS X Yosemite), application windows cannot span multiple screens. Therefore, PixelStick can only measure on one screen at a time when this preference is set. You can switch which screen PixelStick is measuring on by dragging the midpoint (i.e. the square) between screens. You can also use the Reset Position menu item on the copy of the menu on screen you want to measure on; if the PixelStick menu is not visible on that screen you can just drag the palette to that screen.
“Measurment is defined as process of determining the value of unknown quantity by comparing it with some pre-defined standard.” – Rasika Katkar
When the screens have separate spaces preference is not set, or when PixelStick is running on older versions of macOS, PixelStick spans all available screens.
PixelStick requires Mac OS X 10.7 or later. Older versions of PixelStick are available for older versions of Mac OS.
2 permissions are required by PixelStick to use all features.
Tap to open the Screen Recording panel in System Preferences
MacOS System Preferences -> Security & Privacy -> Privacy -> Screen Recording.
In older versions of Mac it looks like this. Notice below the checkmark is on for PixelStick for ‘Screen Recording’ permission.
![]()
If this is not on the eyesdropper will see the desktop colors not the colors of the window you are in
More details about this tool are in the ‘Eyedropper‘ section.
2) The ‘Screen Elements Tool‘ requires the permission called ‘Accessibility‘.
The app should ask for this permission but you can set it yourself. Click the link below to open the panel in 10.13 (Ventura) or higher:
Tap to open the Accessibility panel in System Preferences
Or go to: MacOS System Preferences -> Security & Privacy -> Privacy -> Accessibility. Give PixelStick permission to access macOS’s accessibility services. When you click on the icon the system will put up this dialog.
![]() Tap the ‘Open System Preferences’ and it will open the System Preferences:Security&Privacy:Privacy:Accessibility settings and will add PixelStick to the list on the right.
Tap the ‘Open System Preferences’ and it will open the System Preferences:Security&Privacy:Privacy:Accessibility settings and will add PixelStick to the list on the right.
![]() Unlock that dialog (at bottom left where the lock icon is) and make sure to add a checkmark to the left of the PixelStick icon. Now PixelStick has permissions.
Unlock that dialog (at bottom left where the lock icon is) and make sure to add a checkmark to the left of the PixelStick icon. Now PixelStick has permissions.
Once you have granted permission to use the accessibility services, the next time you click on the screen elements ruler icon various screen elements underneath the mouse cursor will be highlighted and PixelStick shows the dimensions of the highlighted element.
More details about this tool are below in the ‘Screen Elements‘ section.
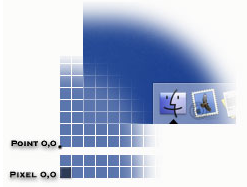
PixelStick uses a coordinate system like the macOS coordinate system. X can be seen as width and y as height. This means that the origin (pixel 0,0) is at the lower left corner of the screen. However, macOS deals mainly in points, whereas PixelStick is all about pixels since pixels are easier to visualise when describing a document on a screen. A point has no width and resides between pixels. Note that on modern hardware and modern macOS versions, these pixels are not necessarily the physical pixels on a display, especially a Retina display. macOS has scaling options that take away the direct correspondence between hardware pixels and what it reports to apps (like PixelStick) as pixels.
PixelStick reports both pixel distance and pixel difference. When you see two numbers together in the user interface of PixelStick like this 230,114 it is (x, y) or (width, height).

x starts at the bottom left of the screen.
The pixel distance includes the width of the PixelStick endpoints. This is so that the actual size of the item being measured is reported. The pixel difference merely subtracts the coordinates.
“Measure what is measurable, and make measurable what is not so.” – Galileo Galilei
In the illustration to the right, the height of the picture is 13 pixels, so the distance is reported as 13.00. Note that if the diamond endpoint is at a position of y = 1, then the circle endpoint is at a position of y = 13. Thus pixel difference is 13 – 1 = 12.
By default, PixelStick reports the angle between the baseline (usually the horizontal line but if you set a new baseline, this is the dotted line) and the line made by the endpoints with values increasing as you move the diamond endpoint anticlockwise. The angle values can be positive or negative depending on the position of the diamond endpoint relative to the circle endpoint.
If you turn on Map Mode PixelStick changes the way it reports angles to be like bearings on a map. It reports angles using only positive values from 0 to 360 degrees, increasing clockwise. The baseline still defaults to horizontal or whatever you set it to last time. To set the baseline as north / south, just shift+drag the diamond endpoint to be above the circle endpoint and set the baseline, which is now a vertical line.
![]() Preferences – open and close the PixelStick prefs.
Preferences – open and close the PixelStick prefs.![]() Eyedropper – expands the palette to reveal the loupe and eyedropper tools. IMPORTANT: Eyedropper requires PixelStick to be added to the permissions. See Permissions major section above for details.
Eyedropper – expands the palette to reveal the loupe and eyedropper tools. IMPORTANT: Eyedropper requires PixelStick to be added to the permissions. See Permissions major section above for details.![]() Help – opens this online manual.
Help – opens this online manual.![]() Screenshot – The screen grab icon displays a window with a preview of the current contents of all screens. You can then click and drag to select the region of the screen to grab. PixelStick then prompts you for a location to save the image file containing the screen grab.
Screenshot – The screen grab icon displays a window with a preview of the current contents of all screens. You can then click and drag to select the region of the screen to grab. PixelStick then prompts you for a location to save the image file containing the screen grab.![]() Screen elements – The screen elements ruler icon allows you to measure elements that make up the windows of the currently running applications.
Screen elements – The screen elements ruler icon allows you to measure elements that make up the windows of the currently running applications.
To do this, make sure to give PixelStick permission to access macOS’s accessibility services. Go to major section above called ‘Permissions’ for more details
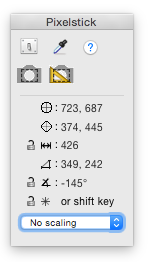
Once you have granted permission to use the accessibility services, the next time you click on the screen elements ruler icon various screen elements underneath the mouse cursor will be highlighted and PixelStick shows the dimensions of the highlighted element.![]() Circle endpoint – draggable point of measuring. Shows x and y.
Circle endpoint – draggable point of measuring. Shows x and y.![]() Diamond endpoint – draggable point of measuring. Shows x and y.
Diamond endpoint – draggable point of measuring. Shows x and y.![]()
![]() Distance – pixel distance in pixels based on the circle and square endpoints.
Distance – pixel distance in pixels based on the circle and square endpoints.![]()
![]() Distance – locks the distance when rotating or adjusting the ruler.
Distance – locks the distance when rotating or adjusting the ruler.![]() Delta – pixel difference between the circle/square endpoints in x and y values.
Delta – pixel difference between the circle/square endpoints in x and y values.![]()
![]() Angle – unlocked freely change the angle.
Angle – unlocked freely change the angle.![]()
![]() Locked Angle – click to lock maintains the same angle when adjusting the ruler.
Locked Angle – click to lock maintains the same angle when adjusting the ruler.![]()
![]() Locked Snap – click to lock or hold shift key so rotation snaps to 45° increments.
Locked Snap – click to lock or hold shift key so rotation snaps to 45° increments.![]() Unlock – Click the lock to lock/unlock.
Unlock – Click the lock to lock/unlock.
TIP : Double click any measurement to select it and then copy to the clipboard.
Measurement Via Scale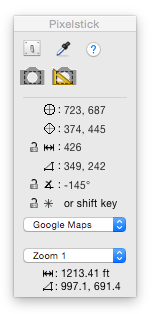
The PixelStick palette (seen above) displays your measurements.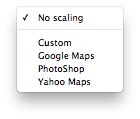
The drop down menu (at the bottom of the palette above) displays ‘No scaling’ clicking it reveals the items to the right.
Selecting Google Maps will allow you to scale the measurement for a particular zoom on google maps.
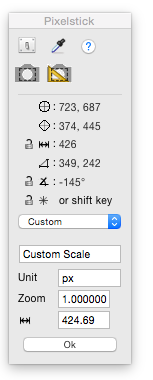 Or you can select custom and make a scale of your own which you can name and save. See Scaling FAQ
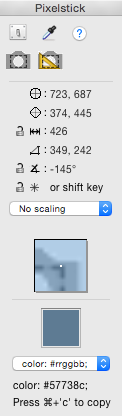
Tapping the ‘eyedropper’ icon ![]() gives more info on color and allows you to copy a colors format codes. Click on the ‘color’ drop down menu above to see the screen seen below.
gives more info on color and allows you to copy a colors format codes. Click on the ‘color’ drop down menu above to see the screen seen below.
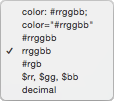
To Use: After tapping the eyedropper when the point of the cursor is over a pixel, that area is magnified and the color is displayed (see above screenshot). Below that you can choose from the drop down menu the color format (hex, decimal, # in front or not, etc.). Then leave the point of the cursor over the colored pixel you want to capture, release the mouse, hold down the Command key and tap c to copy that number to the clipboard. When you paste the clipboard (command v) you will see something like this: ‘color: #d3eac6;’
Menus
File
Preferences – See below for details.
Check for Updates – If you have the shareware version from us you can click this to check for new version. Getting fresh new versions right away is one very good reason to get your software direct from us.
Edit
Invert Colors – Inverts the colors.
Reset Position – If for some reason changing monitors puts the ruler out of your reach click this and it will center it on the screen.
Set Baseline – Sets the line between the two endpoints as the baseline against which angles are measured. This allows you to measure arbitrary angles, not just angles relative to the horizontal. PixelStick draws this baseline as a dotted line.
To set the baseline (the dotted line) rotate the square or the circle till the main line is where you want the baseline to be then go to the PixelStick ‘Edit’ menu and select the menu item ‘Set Baseline’ or hit command b.
Map Mode – Changes the way angles are displayed in the palette: either increasing anticlockwise like on a regular geometric plane or (when map mode is on) increasing clockwise like bearings on a map.
Help – One way to get to this manual.
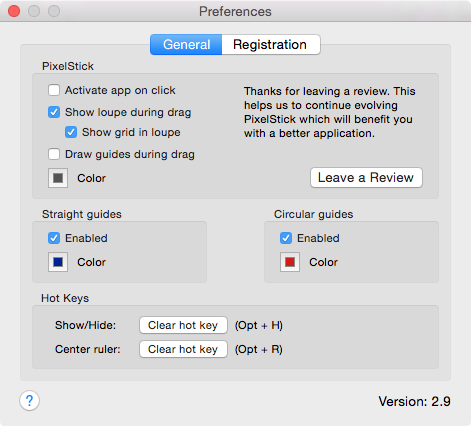
Activate app on click – Checking this means you can click on the ruler to bring the whole PixelStick app to the front. It is off by default because you can have the app running and use the ruler to measure things in PhotoShop without pushing PhotoShop into the background.
Show loupe during drag – Check this option to be able to see the loupe that magnifies the area under the endpoint you are dragging.
Show grid in loupe – Check this option to add a grid to the loupe to help identify how the underlying pixels are magnified.
Draw guides during drag – Check this option to be able to see the guide lines when you are dragging the ruler around.
There are also options to choose the color of PixelStick’s endpoints plus the straight and circular guide lines and whether or not to display the guides.
In general changes take effect immediately, so you can try turning on/off and changing settings then try the ruler out to see how the preferences affect the way it works.
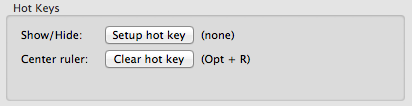
In the Pixelstick preferences set hotkeys for Show/Hide and to Center Ruler.
Minimize Palette – double click title bar also hides guidelines.
Show/Hide Palette – hit the hotkey set in the preferences also hides guidelines.
Angle Lock – hold the shift key and it will lock every 45, 90 and 180 degree angles.
Invert Colors – control key and click to show the contextual menu.
* All of the below work when the Pixelstick app is the frontmost app.
Right, Left and Up, or Down Arrow Keys – moves the whole ruler 1 pixel in that direction.
Right, Left and Up, or Down Arrow Keys + Shift Key – moves the whole ruler 10 pixel in that direction.
Command + Left or Right Arrow Key – to have the square move 1 pixel away from the circle, so the ruler expands in size.
Command + Left or Right Arrow + Shift Key – to have the square move 10 pixel away from the circle., so the ruler expands in size.
Command + Up or Down Arrow Key – to have the diamond rotate around the circle.
Command + Up or Down Arrow + Option Key – changes the angle, circle is the center and square is the part that moves 1 degree.
Command + Up or Down Arrow + Option + Shift Key – changes the angle., circle is the center and square is the part that moves 10 degree.
Control + click on the center or endpoints to get this dropdown menu of options like this.
![]()
Q: Can i measure in millimeters?
A: First, it is very important to understand what PixelStick is:
PixelStick is not a conventional fixed, physical ruler, e.g., not a 1 foot or meter, etc. stick.
Instead PixelStick uses the pixels on your monitor to measure pixels, distances between pixels and angles.
PixelStick measures accurately in pixels.
PixelStick uses pixels as a unit in computer monitor cartography.
PixelStick measures pixels and the distance between pixels.
The relation between pixels and whatever you are measuring is scale.
It is measurement by comparison. A ratio.
A pixel (abbreviated px). The word pixel is a portmanteau of the 2 words [pic]ture & [el]ement, pix el. A pixel is the smallest unit of a digital image or graphic that can be controlled and displayed on a digital display.
A pixels size depends on the monitor you are using.
If you want to measure something other then pixels then PixelStick depends on you for the scale. Scale is a ratio of pixels/unit (e.g. 3 pixels/lightyear). That scale will be need to be different when measuring distance in a photo of amoeba or stars in a galaxy. That means PixelStick can measure anything if the scale is known and accurate. If you have a map with no scale you wouldn’t be able to tell the real-world distance between two points, unless you had scale, right? PixelStick can work and give you distances in maps when it knows the scale. The same is true for inches, miles, lightyears, kilometers or AU. This can be in the seen in the scaling dropdown menu of PixelStick which shows, Custom, Google Maps, Yahoo Maps and Photoshop. These we added. Use ‘custom’ to add your own scales. Google and Yahoo change scales so beware of that.
Q: I’m an astronomer. How do I create a custom unit like AU for PixelStick and make 1 AU to be x pixels?
A: PixelStick has two ways to set scaling to custom units like AU. If you know how many pixels make up 1 AU, you can set the zoom factor directly. The zoom factor is the reciprocal of the distance in pixels. For example, if 1 AU is 100 pixels, the zoom factor is 1/100, i.e. .01. Select custom scaling and click on the Edit button or + button to add a new scale. In the Zoom field, enter 0.01. Click OK. Now, when you measure with PixelStick, the distance in your custom units is shown at the bottom of the panel in addition to the distance in pixels shown in the middle of the panel.
The other way is if you don’t know the exact scale, but you have a reference image where you can measure a known distance. You first use PixelStick to measure out on the screen a length of (say) 1 AU. Then select custom scaling and click on the Edit button or + button to add a new scale. In the Distance field, enter 1. Click OK. Now PixelStick will show the distance in your custom units is shown at the bottom of the panel as in the first example.
Q: When I set the Zoom or Distance field why do the other field changes automatically?
A: This is because of the two different ways you can specify a custom scale. Also, some users may just want a known zoom factor rather than alternative units, and so PixelStick allows the custom units to be set by either entering a zoom factor or by measuring a known length and entering that length.
Q: Why in scaling, when i enter numbers in one field then move to the second field the first one changes?
A: There’s a issue for European users that use commas as decimal points. It might be worth their while to enter numbers with a period even though their region settings will display it with a comma.
Q: If Pixelstick’s eyedropper shows the desktop colors and not colors in the app your are using or does not show accurate or shows misleading pixel values when running in hiDPI Displays in hiDPI mode. i.e. a 4K display.
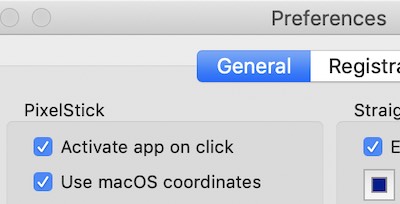
A: Go to the preferences and make sure the ‘Use MacOS coordinates’ is on (screenshot below). Also check that both permissions are set correctly.
Q: When I move the handles while holding down the shift key (so that the two handles are constrained to a horizontal line), I get two different numbers for the total-distance and component-distance. An example would be in the screenshot provided. The distance shows 180.00, and the components read 179 and 0. Which is the right distance, and why is it different?
A: The answer is here under Distance.
Q: I am an orthopaedic surgeon and would like to measure the angle between the femur above and the tibia below. This is called the angle of knee flexion. How I can measure that angle with this software. Can you detail the steps?
A: Pull up a photo of the item (femur, knee and tibia in this case) you want to measure the angle of and place the circle endcap of the pixelstick ruler on the knee, like the screenshot below. The circle is on the knee and the square on the femur and the angle reads -343.0907.

To change this to 0.00 degrees (make sure that PixelStick is the frontmost app) then going up to the Edit menu in PixelStick choose ‘Set Baseline’ and you’ll see the angle change to 0.00 (screenshot below)
Swing the square endcap to the tibia. Below you see the angle is 137.2244 degrees.
It may be useful to use the hotkeys (above) to set the angle from the keyboard. (You also may be interested in reading the next Q&A item which is similar.)
Q: How do I change the origin (reference) of the angle measure; now it’s the horizontal axis which is taken into account, it would be useful to use the vertical axis because I use the geographic north to calculate the azimuth angle for astronomical alignments.
A: Shift+Drag the diamond end to be vertically above the circle end. Then in the PixelStick edit menu select Set Baseline (or press Command+B) when PixelStick is the frontmost application. You probably also want to turn on Map Mode (also using the edit menu or pressing Command+M). This changes the way PixelStick shows angles relative to the baseline. (You also may be interested in reading the previous Q&A item which is similar.)
Q: Why can’t I use PixelStick on an app when it is in Full Screen Mode?
A: Full Screen Mode for apps makes them the frontmost app and disallows all other apps including PixelStick from getting in front of them. If you need to measure something you can take a screenvid or screenshot. Apple can do that with their screenshot app command shift 5 allows you to do that. Then hopefully you could use PixelStick on screenvid or screenshot.
Q: I usually run in darkmode but PixelStick is better when it’s in lightmode, is it possible to force PixelStick in lightmode?
A: Yes. If you can run a terminal command type to force running in lightmode:
defaults write com.plumamazing.PixelStick NSRequiresAquaSystemAppearance -bool yes
Tap here to learn how to get to the ‘Library’ folder on the Mac which is hidden by default.
Please purchase PixelStick to remove all limitations and the dialog that comes up after 30 days, and to support the continuing evolution of PixelStick.
Thanks
The Folks at Plum Amazing
We appreciate suggestions and bug reports. Please write to us.