* Use command f to find a word or phrase on the page.
Volume Manager Manual
Requirements
Intel/Apple Silicon – Mac 10.11-15.1+
IMPORTANT: 2 versions
We created 2 versions of Volume Manager. One is for sale in our store and the other for sale in Apple’s Store. While both versions are nearly identical, the Apple App Store version requires sandboxing, meaning external volumes mount within a restricted container for enhanced security. Volume Manager for the Apple App Store limits direct access to /Volumes without explicit user permission each time, which complicates functionality. If that is important to you then we recommend downloading Volume Manager from plumamazing.com instead of the Apple App Store for easier functionality.
Adding this feature to Volume Manager for the Apple App Store version involves complex coding and Apple’s review process, with no guarantee of semi-permanent permissions.
For a less restricted experience, we suggest using version from our website.
Languages
Localizations: ✔ English ✔ Korean, ✔ Spanish, ✔ French, ✔ German, ✔ Japanese, ✔ Chinese, ✔ Urdu, ✔ Arabic
If you’re Mac is set for Arabic then Volume Manger will open with Arabic menus and dialogs, etc. To set Volume Manger in another language then the System language see the last FAQ item below.
Terminology
This section explains key terms used in Volume Manager to help both beginners and experts understand the app’s functionality.
Mount
To “mount” a volume is a process by which the operating system makes files and directories on a storage device (like a network drive or server share) available for users to access via the computer’s file system. Once mounted, the volume appears on the Mac on the left side of a Finder window under Locations, allowing you to interact with it as if it were a locally attached drive.
Mount Point
A “mount point” is the location on your Mac where the mounted volume is accessible. In macOS, this is usually a folder under /Volumes/ (e.g., /Volumes/SharedDrive).
Network
A “network” is a group of connected devices that can communicate with each other. Volumes managed by Volume Manager are typically shared over a local area network (LAN) or via the Internet.
Network Volume
A “network volume” is a storage device (such as a hard drive) shared over a network. These volumes are not directly attached to your Mac but can be accessed using the SMB protocol using Volume Manager.
Network Sharing
Network sharing is a feature that allows resources to be shared over a network, be they files, documents, folders, media, etc. … By connecting a device to a network, other users/devices in the network can share and exchange information through this network. Network sharing is also known as shared resources.
Server
A ‘server’ is a computer or device that provides services, such as file sharing, to other devices on the network. In the context of Volume Manager, the server hosts the shared network volume you want to mount.
Server Path
The “server path” is the address used to locate the shared volume. It typically follows this format:
smb://<server-address>/<share-name>
For example: smb://192.168.0.100/MySharedFolder or smb://NAS/SharedFiles.
The <server-address> can be an IP address (e.g., 192.168.0.100) or a hostname (e.g., NAS).
SMB (Server Message Block)
A protocol used for sharing files, folders, and other resources over a network. SMB is the protocol supported by Volume Manager and is widely used across macOS, Windows, and other devices.
Credentials
Credentials refer to the username and password needed to authenticate with a network server or volume. Some volumes allow guest access, while others require specific credentials for security.
Auto-Mount
A feature in Volume Manager that automatically mounts a configured network volume when your Mac starts, wakes from sleep, or reconnects to the network.
Local Area Network (LAN)<
A “LAN” is a network of devices within a small geographic area, such as your home or office. Volume Manager is designed to mount SMB network drives shared on the same LAN.
Dynamic DNS (DDNS)
>A service that provides a consistent hostname for your network, even if your public IP address changes. DDNS is useful for accessing network volumes over the Internet without needing to track IP changes.
Public IP Address
The “public IP address” is the unique address assigned to your router by your Internet Service Provider (ISP). It is required to access your network from outside (e.g., for mounting drives over the Internet). Often called, “External IP” to distinguish the Public IP Address from the, ‘Internal (Private IP) IP” which is assigned in your local network.
Port Forwarding
A router setting that forwards external requests (from the Internet) to a specific device on your local network. For example, you can forward SMB traffic on Port 445 to a server on your LAN to allow remote access.
Firewall
A security system that controls incoming and outgoing network traffic. If SMB traffic is blocked by your firewall, you may need to allow Port 445 to enable connections.
Dynamic IP Address
An IP address assigned to a device that can change periodically. If your server or router uses a dynamic IP, you may need to use DDNS to maintain consistent access.
VPN (Virtual Private Network)
A VPN creates a secure, encrypted connection between your device and your home or office network. Using a VPN is a safer alternative to exposing your network volumes directly via port forwarding.
Finder
Mac OS’s file manager where mounted volumes appear under Locations. From Finder, you can browse, open, and manage files on your mounted network drives.
A server is a computer, a device or a program that is dedicated to managing network resources. Servers are often referred to as dedicated because they carry out hardly any other tasks apart from their server tasks.
There are a number of categories of servers, including print servers, file servers, network servers and database servers.
In theory, whenever computers share resources with client machines they are considered servers.
Share
A share is a portion of a volume or folder that is made accessible to other devices over a network. It allows users to access specific parts of a volume without exposing the entire volume. A network share is typically a folder on a PC, Mac or server.
Volume
A ‘volume’ is a storage unit, typically a logical section of a physical drive or a networked drive, that is formatted with a filesystem (e.g., NTFS, APFS) and ready to store data.
Installation
Download Volume Manager from Plum Amazing. The app will be downloaded to the Download folder, move it to the Application folder and double-click to launch the app. It will appear in the menu bar. Then use the Quick Start below.
To uninstall just quit the app and drag to the trash.
The preference file is here:
~/Users/juliankauai/Library/Preferences/com.plumamazing.volumemanager.plist
Quick Start
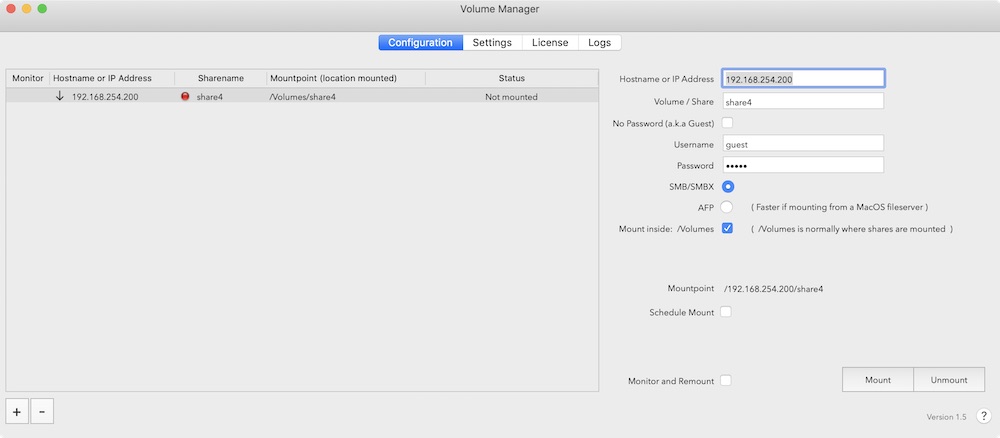
Step 1. When you first start Volume Manager, no records will be present in the Identity Table. Click the + button at the bottom left to add a new record.
Step 2. The Mount Identity record is fake sample mount data. You can modify the fake sample data with your own data to successfully mount a volume or tap the + button at bottom left to create a new record. Start by changing the Mount Identity to a unique text string that will allow you to easily know what volume is being mounted by this record.
Step 3. The text field named (File Server Hostname or IP Address) is very important to get correct. You really have three options for entering data here:
Option 1. You can enter the IP address of the fileserver that holds the volume you are mounting. This is the safest and most accurate way for Volume Manager to always work. If you know the IP address of the fileserver, it is preferred that you enter it. The only reason why you would not want to enter an IP address is if you are mounting a volume from a computer that is getting an address dynamically (via DHCP) and the address is always changing. Then you must use Option 2 below.
Option 2. If your place of business uses their own DNS server and they have properly configured a hostname for this fileserver inside of their DNS server, then you may enter the DNS hostname of the server. The only requirement is that Volume Manager will attempt to convert this hostname into an IP address and if it fails, then Volume Manager will display an error saying the hostname is not resolvable. Which means the text string you entered could not be turned into an IP address.
Step 4. Enter the name of the volume that the server is making available to be mounted (this is called Sharing) and that you are trying to mount. If you are unsure what this is, you should select the Finder and then enter Command+K and it will open a window that lets you enter data to mount a server. If the server is a Mac, enter afp://1.2.3.4 (where 1.2.3.4 is the IP address of the server). If the server is a Windows server, enter smb://1.2.3.4. You will then be prompted for your username and password and the server will authenticate you. You will then be presented with a window that displays all the volumes the server is sharing. It is one of those volume names being displayed that you should enter in the Volume or Share Name field of Volume Manager. Essentially, Volume Manager lets you automate the mounting of volumes. The volumes are just like the volumes you saw in the Command+K output but can only mount a volume if the server is Sharing it (or making it available to be mounted). If you do not know the volume or share name and you cannot determine it from Command+K, you need to contact the person that manages the fileserver (or computer) and ask them.
Step 5. When Volume Manager mounts a volume on your behalf it must provide the fileserver with username and password to authenticate you to the server and if the username and password is valid, then you will be granted access to the volume.
Step 6. If it is your desire for Volume Manager to always monitor a particular volume and if Volume Manager detects the volume is not mounted, then Volume Manager will try to re-mount the volume. Volume Manager will only try to re-mount the volume if it detects that it can reach the fileserver across the network. To accomplish this you would need to check the check-box named:
Monitor and Remount: checkmark this so that the share is monitored and and if the volume is found unmounted, auto remount if possible.
Schedule Mount: this allows setting the time to mount a share for instance at the beginning of work at 8:00 AM
FAQ (Frequently Asked Questions)
Q: I downloaded the version of Volume Manager from the Apple App Store and can’t mount in the /Volumes directory.
A: The answer is that this is easily done using the Volume Manager app from the Plum Amazing store. It can not be done in the Apple App Store version of the app which required sandboxing.
The 2 versions are exactly the same except for the sandboxing of the Apple App store version. Select the version that is right for you. More details below.
Sandboxing is done for extra security. Sandboxing means an app can only access items within the sandbox. Apple provides a way around this but it is quite complicated and requires permissions that may require being set each day. It also requires us to do a lot of coding and after that’s done not know if Apple will approve it. The 2 versions are exactly the same except for the sandboxing on the Apple App store version.
In the Plum Amazing Store version volumes mount easily inside the /Volumes/ path because it doesn’t use sandboxing. Get this version if you really want that feature.
Q: I’m getting an invalid hostname error.
A: In the setting ‘Hostname or IP Address’ please try with the IP and not the hostname.
Q: I got a new M1 iMac. I can’t get my shares back. More detail:
I replaced an Intel mac with an M1 iMac. I can’t get my shares back. The iMac shows as a server but when adding a share I get “Error: Mountpoint is not valid.” When I check Finder>Network the iMac shows and Finder shows the drives but they can not be opened/mounted.
A: The “secret” from Apple support: Turn off FileSharing. Restart iMac (or any M1 Mac). Restart FileSharing.
* Big thanks to user Tim, who had the problem and called Apple and they told him the solution and he told us. We don’t know yet if this is an M1 issue or what.
Q: Why has AFP (Apple File Protocol) been removed from Volume Manager?
A: Because Apple has been deprecating it for years and removed support in Big Sur. We decide to sunset it based on available info. A variety of good info is here:
https://apple.stackexchange.com/questions/285417/is-afp-slated-to-be-removed-from-future-versions-of-macos
More info is here:
https://eclecticlight.co/2019/12/09/can-you-still-use-afp-sharing/
This is what Apple says on the topic:
https://support.apple.com/guide/mac-help/network-address-formats-and-protocols-on-mac-mchlp1654/mac
Q: Why can’t I add more shares?
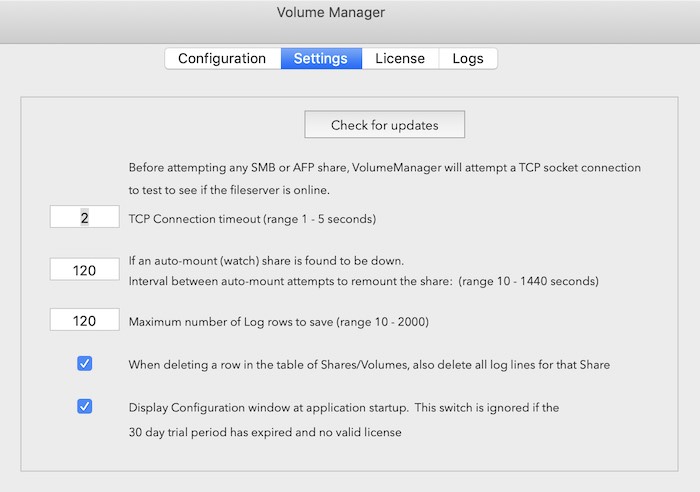
A: The name of each drive in volume list needs to be unique within the list. For example if mount point ‘Development’ is already in the list. You can’t add another volume with the same name in list and will give the error ‘Mount Point already being used’. Also after 30 days of using Volume Manager to add more shares you need to purchase the app.
Q: Why doesn’t my share remount automatically?
A: Drive remount works only if checkbox ‘Monitor and Remount’ for that drive is enabled. If you manually unmounted any drive, then you need to enable ‘Monitor and Remount’ checkbox again if you wanted that drive to remount automatically after the specified interval. Also when the Mac goes into deep sleep shares are unmounted, When the Mac is awakened it takes a little while before they remount.
Q: Why does VM mount to the root and not the location I want to?
A: Not every path is valid for mounting. In the screenshots below if we select any folder from Locations listed as Valid, mounting will work otherwise user will get the error “Error: Mountpoint is not valid“.
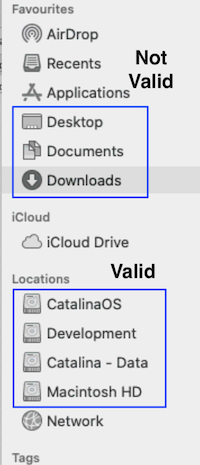
Specifying custom mount point paths from Documents, Downloads and Desktop Folder are not valid.
However if we specify any other mount point in ‘Specify Custom MountPoint’ like from volumes listed under Locations, we will be able to mount the remote drive.

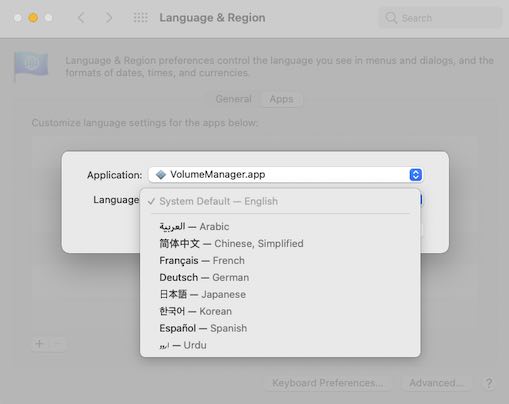
Q: How do I change the language used in Volume Manager?
A: If the language on your Mac is French then Volume Manger will open with French menus and dialogs. If you want to change the language you use just for an individual app like Volume Manger not the whole System and all apps then follow the steps below..
- On your Mac, choose Apple menu > System Preferences, then click Language & Region.
- Click Apps.
- Do one of the following:
- Choose a language for an app: Click the Add button , choose an app and a language from the pop-up menus, then click Add.
- Change the language for an app in the list: Select the app, then choose a new language from the pop-up menu.
- Remove an app from the list: Select the app, then click the Remove button . The app uses the default language again.
- If the app is open, you may need to close and then reopen it to see the change.
Q: After sleep my shares don’t remount?
More detail: After deep sleep of my iMac volume manager don’t remount my smb share.
A: “Monitor and Remount” once activated works. A share is unmounted after deep sleep but the tool monitors this and after a short while it mounts the drive.
* The Q&A above are both thanks to, user ‘Micro’
