A Plum Amazing guide for Mac
Volume Manager Pro Manual
Keep your network shares close at hand. Learn to connect, organize and reconnect your storage with confidence.
App version 3.0.1 Manual updated 2026-10-27
By Plum Amazing
The smart way to manage network shares on your Mac
For Volume Manager Pro 3.0.1. Existing screenshots show the 3.0.0 interface. The import, sidebar and duplicate-share instructions describe 3.0.1. The separate Original edition keeps its older manual.
Table of Contents#
Part 1: Getting Started#
- Introduction
- Requirements
- Two Apps
- Installation
- Terminology
- Quick Start
- The Dashboard
- Preferences
- Licensing
- FAQ
Part 2: Pro Features#
Part 3: Enterprise Features#
- Enterprise Overview
- Configuration Export & Import
- MDM Deployment
- Active Directory Integration
- Audit & Compliance
- Enterprise Troubleshooting
Reference#
Part 1: Getting Started#
Introduction#
Volume Manager automatically mounts network shares (file servers, NAS devices, cloud storage) on your Mac. Instead of manually connecting to servers every time you restart or wake your Mac, Volume Manager handles it automatically.
Our Philosophy: Productivity Through Simplicity
We believe connecting to network storage should be effortless. Volume Manager brings transparency to what was once a confusing, technical process:
- Home users: We make it easy, discover everything for you, and guide you through setup
- Enterprise: IT controls everything, security first, no extra permissions needed
What Volume Manager Does:
- Network Discovery with Browse - Find servers AND their shares automatically (no more guessing share names!) — Pro and up
- Automatically mounts network shares when your Mac starts
- Reconnects shares when your WiFi reconnects
- Monitors connections and remounts if disconnected
- Schedules mounts for specific times
- Organizes multiple shares into groups
Key Features:
- One-click discovery - Click the globe icon, browse servers, add shares instantly (Pro and up)
- Smart reconnection - Volume Manager keeps your shares connected
- Flexible scheduling - Mount at startup, on schedule, or on-demand
- Enterprise-ready - MDM deployment, configuration profiles, audit logging
Who Uses Volume Manager:
- Home users connecting to a NAS or router USB storage
- Creative professionals accessing media servers
- Remote workers connecting to office shares
- IT departments managing fleets of Macs
Requirements#
Volume Manager Pro (Personal, Pro, Pro+, Enterprise — one app):
- macOS: 15 Sequoia and later (Intel & Apple Silicon)
- Protocols: SMB, AFP, NFS, WebDAV, WebDAVS
- Network: Access to file servers on your local network or via VPN
- Languages: English, German, French, Spanish, Chinese (Simplified), Italian, Japanese, Korean, Arabic (Preferences → General)
Original Volume Manager (maintenance app for existing owners):
- macOS: 12 Monterey and later
- Same core protocols; no new features
- Not for sale. Latest build: VolumeManager.zip
Two Apps#
Volume Manager is two products, not a Mac App Store vs website split.
Volume Manager Pro (recommended)#
- Bundle ID
com.plumamazing.volumemanagerpro - Download: Volume Manager Pro.zip
- A license activates the app to be either Personal, Pro, Pro+, or Enterprise. Each license can be used on three of your computers.
- 15-day trial with every feature unlocked (including Enterprise). After the trial, Starter keeps Personal-level tools with one share.
- Full access to
/Volumes; not sandboxed.
Original (maintenance)#
- Bundle ID
com.plumamazing.volumemanager - The earlier AppKit app. Existing owners can keep using it; it is not sold on the current product page.
- Install alongside Pro (different bundle IDs). In 3.0.1, Pro checks for Original shares before creating example entries. If you have already configured Pro, use Preferences → General → Import Original Settings to add missing shares while keeping your Pro entries. Original settings are left in place.
A Mac App Store build may exist separately and is sandboxed (mounts in a container). For /Volumes and the current feature set, use the plumamazing.com download.
Installation#
From Plum Amazing (recommended)#
- Download Volume Manager Pro.zip
- Unzip and drag Volume Manager Pro to Applications
- Double-click to launch (macOS may ask to open an app from the internet)
- Volume Manager appears in the menu bar by default; open the Dashboard from the icon
- On first launch, allow Local Network if macOS asks — required for Network Discovery and Browse (Pro and up)
Original (existing owners)#
Download VolumeManager.zip and replace the app in Applications. Do not buy Original from the shop; it is maintenance only.
From Mac App Store#
If an App Store listing is available, it is a separate sandboxed build. For /Volumes and the current Personal–Enterprise feature set, use the zip above.
Uninstalling#
- Quit Volume Manager (menu bar icon → Quit, or Volume Manager Pro → Quit)
- Drag the app from Applications to Trash
Preferences:
- Pro:
~/Library/Preferences/com.plumamazing.volumemanagerpro.plist - Original:
~/Library/Preferences/com.plumamazing.volumemanager.plist
Terminology#
Understanding these terms will help you use Volume Manager effectively:
| Term | Definition |
|---|---|
| Mount | Connect to a network share so it appears in Finder |
| Unmount | Disconnect from a network share |
| Volume | A storage location on a server that you can mount |
| Share | Another name for a network volume that's been shared |
| Server | A computer or NAS that hosts shared volumes |
| Hostname | The name or IP address of a server |
| Protocol | The method used to connect (SMB, AFP, NFS, WebDAV) |
| Credentials | Your username and password for authentication |
| Mount Point | Where the volume appears on your Mac (usually /Volumes/) |
| Share Set | A group of related volumes (Pro feature) |
Protocol Quick Guide#
| Protocol | Best For |
|---|---|
| SMB | Windows servers, most NAS devices, general file sharing |
| AFP | Older Macs and NAS devices (legacy, being phased out) |
| NFS | Linux/Unix servers, high-performance environments |
| WebDAV | Cloud storage (NextCloud, Box), SharePoint |
| WebDAVS | Secure WebDAV over HTTPS |
Connection Types#
Volume Manager works with any network-accessible storage. Here are common ways to connect drives:
| Connection | Speed | Best For | Volume Manager? |
|---|---|---|---|
| NAS (Ethernet) | Fast (1-10 Gbps) | Multiple users, always-on backups | ✅ Perfect fit |
| Thunderbolt NAS | Very fast (10-40 Gbps) | Video editing, creative workflows | ✅ Perfect fit |
| Router USB | Moderate | Simple file sharing, home use | ✅ Great fit |
| Mac File Sharing | Fast (network speed) | Sharing between Macs | ✅ Works well |
| Windows Share | Fast (network speed) | Mixed Mac/PC environments | ✅ Works well |
| Cloud (WebDAV) | Varies (internet) | Remote access, NextCloud, Box | ✅ Supported |
| USB Drive Arrays | Varies | Multiple drives via hub/NAS | ✅ If network-shared |
| Direct USB | Very fast | Single Mac, portable drives | ❌ Not needed* |
| Direct Thunderbolt | Fastest | Single Mac, DAS arrays | ❌ Not needed* |
*Direct-attached drives (USB plugged into your Mac, Thunderbolt DAS) mount automatically.
Network-attached devices (NAS, Thunderbolt NAS, router-shared drives) benefit from Volume Manager.
Drive Formatting Guide#
The best format depends on where the drive is connected:
For Router USB Ports:
| Format | Router Support | Notes |
|---|---|---|
| exFAT | ✅ Excellent | Best cross-platform choice |
| NTFS | ✅ Most routers | Windows-native, widely supported |
| APFS | ⚠️ Some routers | Works on Deco and some others |
| HFS+ | ⚠️ Limited | Older Mac format, check router docs |
| ext4 | ⚠️ Some routers | Linux format, NAS devices often support |
For NAS Devices: Most NAS devices handle formatting internally. Common options:
- Btrfs - Modern, supports snapshots (Synology)
- ext4 - Fast, reliable (most NAS brands)
- ZFS - Enterprise-grade, data protection
For Direct Mac Connection:
| Format | Read/Write | Best For |
|---|---|---|
| APFS | ✅ Native | Modern Macs, SSDs, Time Machine |
| HFS+ | ✅ Native | Older Macs, HDDs |
| exFAT | ✅ Native | Cross-platform (Mac + Windows) |
| NTFS | ⚠️ Read-only* | Windows drives |
*Use Mounty or similar tools for NTFS write support on Mac.
Choosing Your Setup#
Home User (1-2 people):
- Simplest: Router USB port with exFAT drive
- Better: Entry-level NAS (Synology DS223, QNAP TS-233)
Small Office/Power User:
- NAS with multiple bays for redundancy
- Gigabit or faster ethernet
Creative Professional:
- 10GbE NAS for video/photo workflows
- Consider Thunderbolt NAS for maximum speed
Enterprise:
- Managed NAS with IT control
- Volume Manager Enterprise for MDM deployment
Quick Start#
Get your first network share connected in under 2 minutes:
The Easy Way: Network Discovery (Recommended, Pro and up)#
During the 15-day trial, Discovery is unlocked. On Personal after the trial, add shares manually (below).
Step 1: Click the Volume Manager icon in your menu bar → Dashboard
Step 2: Click the globe icon (🌐) next to "SHARES" in the top-left
Step 3: Wait for your devices to appear (5-10 seconds)
Step 4: Click Browse next to the server you want to connect to
Step 5: In the Browse Shares window, click Add next to the share you want
Step 6: Back in Dashboard, click Mount
Done! Your share appears in Finder. No guessing share names, no hunting through settings.
The Manual Way: Enter Details Yourself#
If Network Discovery doesn't find your server, or you know the details:
Step 1: Open Volume Manager Click the Volume Manager icon in your menu bar, then click Dashboard.
Step 2: Add a New Share Click the + button at the bottom left of the share list.
Step 3: Enter Server Details
Mount Identity: A friendly name for this share (e.g., "Work Documents")
Hostname or IP Address: Enter one of:
- IP address (preferred):
192.168.1.100 - Hostname:
fileserver.localornas.mycompany.com
Volume or Share Name: The name of the shared folder (e.g., Documents, Media, Public)
💡 Tip: Don't know the share name? Use Network Discovery's Browse feature to list available shares!
Step 4: Enter Credentials
- Username: Your account on the server
- Password: Your password (stored securely in Keychain)
- Or check Guest Login if no credentials are required
Step 5: Set Mount Options
- Monitor and Remount: ✅ Enable this to automatically reconnect if disconnected
- Auto Mount: ✅ Enable to mount when Volume Manager starts. Volume Manager runs a first auto‑mount pass about 3 seconds after launch (so the network has time to come up after login), and then re‑checks on a configurable interval (default 15 seconds; adjustable in Preferences → Logs → Auto-remount interval, 10–1440 s) while the app is running. If a share with Auto‑Mount on becomes unmounted (server reboot, sleep/wake, brief Wi‑Fi drop), it will be re‑mounted on the next tick. Use Pause Automount in the Dashboard toolbar if you want to temporarily stop this behavior.
Step 6: Test the Connection Click Mount to connect. If successful, the volume appears in Finder under Locations.
The Dashboard#
The Dashboard is your control center for managing all network shares.
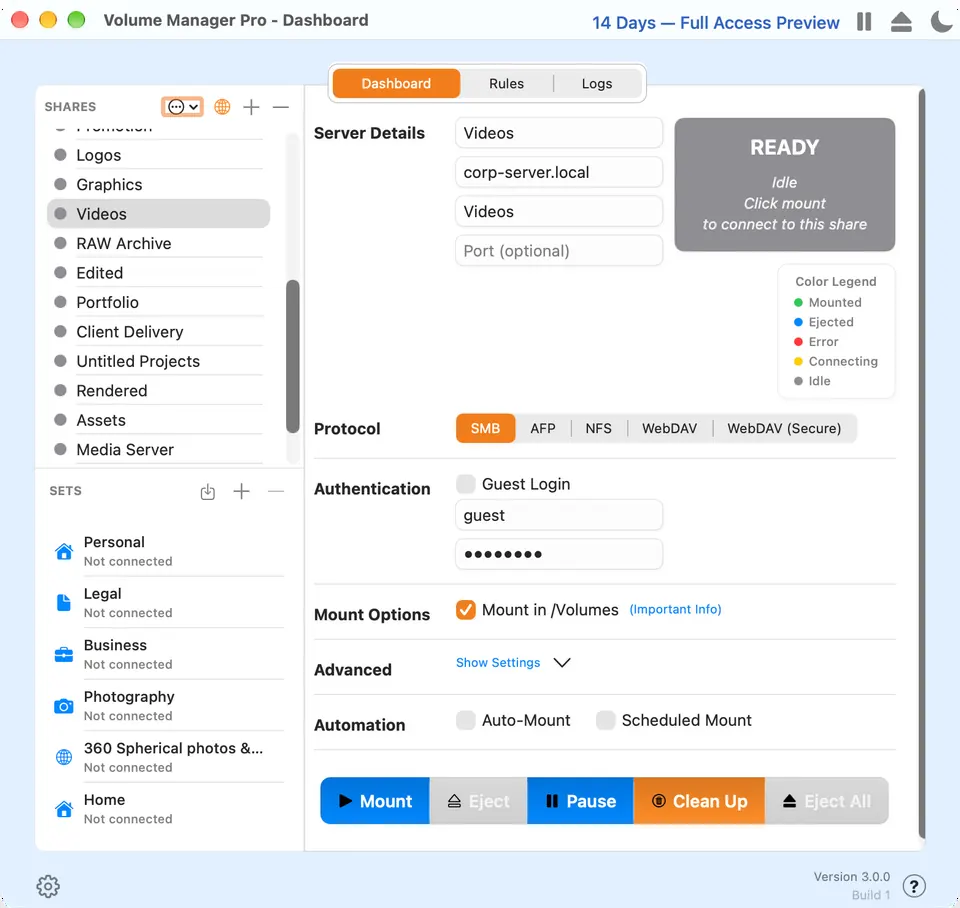
Dashboard with a share selected. Action bar: Mount, Eject, Pause, Clean Up, Eject All. The globe icon (Pro and up) opens Network Discovery.
Window Layout#
The Dashboard window is divided into these main areas:
More room for long share names (3.0.1): Drag the divider between the Shares list and Server Details to the right. You can widen the list without making the entire window larger. The app remembers your chosen width; making the window wider gives the extra space to the detail pane. If Server Details becomes too narrow, scroll it horizontally to reach the remaining fields. You can also focus the divider and use the left/right arrow keys to adjust it.
┌─────────────────────────────────────────────────────────────┐
│  [Dashboard]  [Rules]  [Logs]  [Preferences]    ← Tab Bar   │
├──────────────────┬──────────────────────────────────────────┤
│  SHARES 🌐 + −   │  Server Details         [ERROR panel]    │
│  ─────────────── │  ────────────────────                    │
│  • share1        │  Hostname: ___________                   │
│  • share2        │  Share Name: _________                   │
│  • share3        │  Protocol: [SMB][AFP]...                 │
│  ─────────────── │  Authentication: _____      Legend       │
│  SETS    + −     │  Mount Options: _____       • Mounted    │
│  ─────────────── │  Advanced: ___________      • Error      │
│  No sets yet     │  Automation: _________      • Connecting │
│                  │                             • Idle       │
│                  │  [Mount] [Unmount] [Pause] [Eject All]   │
├──────────────────┴──────────────────────────────────────────┤
│  Version (Pro)                                         (?)  │
└─────────────────────────────────────────────────────────────┘
Tab Bar (Top)#
| Tab | Description |
|---|---|
| Dashboard | Main view for managing shares and sets |
| Rules | Create automation rules (Pro feature) |
| Logs | View connection history and troubleshoot |
| Preferences | App settings (also accessible via menu) |
Left Sidebar#
SHARES Section Header
- SHARES - Section label
- 🔒 (orange lock) - Appears if you have IT-managed shares
- 🌐 (globe) - Network Discovery - Click to scan for devices on your network
- + - Add a new share manually
- − - Remove the selected share
- ⋯ (ellipsis menu) - Bulk actions: Mount All, Unmount All, etc.
Share List
Each share shows:
- Colored dot indicating status (see Legend)
- Share name you assigned
Make a copy of a share (3.0.1)
- Right-click or Control-click the share and choose Duplicate Share.
- The new entry appears immediately after the original and is selected. Its name ends in Copy: for example, “Research Archive” becomes “Research Archive Copy.”
- Change the name, server, share or mount folder to suit the new connection. Review the copied username, password and any scripts as well.
- Click Mount when ready. Auto-Mount and Scheduled Mount start switched off for the copy; enable them only after checking its settings.
The original entry stays unchanged. The duplicate has its own saved identity and credential entry. Avoid mounting both entries to the same custom folder. IT-managed shares cannot be duplicated.
Try it: duplicate a share you use often, change only its display name, then remove the unused copy after exploring its settings. You do not need to connect it.
SETS Section
- SETS - Section label for Share Sets (Pro feature)
- + - Create a new set
- − - Delete selected set
- Sets group multiple shares for batch operations
Right Panel - Server Details#
When you select a share, this panel shows its configuration:
Server Details
- Server Details (header) - Shows the display name
- Hostname/IP - The server address (e.g., 192.168.68.50)
- Share Name - The specific share on that server (e.g., "Documents")
- Port - Optional, usually left blank (uses default)
Protocol Selector
Choose how to connect:
- SMB - Windows/standard sharing (most common)
- AFP - Apple File Protocol (legacy)
- NFS - Network File System (Linux/Unix)
- WebDAV - Web-based sharing
- WebDAV (Secure) - WebDAV over HTTPS
Authentication
- Guest Login - Toggle for anonymous access
- Username - Your account on the server
- Password - Your password (stored in Keychain)
Legend (Right Side)
Status indicators:
- 🟢 Mounted - Successfully connected
- 🔴 Error - Connection failed (see error message)
- 🟡 Connecting - Mount in progress
- ⚫ Idle - Not mounted, ready to connect
Mount Options
- Mount in /Volumes - Standard mount location
- (Important Info) link - Click for details about mount locations
Advanced Section
Click "Show Settings" to expand:
- Wake-on-LAN MAC address
- Post-mount script path
- Pre-unmount script path
- SSID limitation
Automation
- Auto-Mount - Keeps the share mounted whenever Volume Manager is running. On launch, the first auto‑mount attempt fires ~3 seconds after the app starts (giving the network stack a moment to come up after login). After that, Volume Manager re‑checks on a configurable interval (default 15 seconds, see Preferences → Logs → Auto-remount interval, range 10–1440 s) and re‑mounts any Auto‑Mount share that is currently unmounted. Combined with "Start at Login" (Preferences → General), this is what makes your shares come back automatically after a reboot — no need to click Mount by hand.
- Scheduled Mount - Mount and unmount on a fixed time window and weekday set (e.g., Mon–Fri 9:00–17:00). When a scheduled mount is enabled, Auto‑Mount is ignored for that share — the schedule wins. The schedule is evaluated on the same recurring tick as Auto‑Mount.
Bottom Action Buttons#
| Button | Color | Action |
|---|---|---|
| Mount | Green | Connect to the selected share |
| Unmount | Orange | Disconnect the selected share |
| Pause | Red | Pause all automatic mounting |
| Eject All | Gray | Unmount ALL shares at once |
Error Panel (Red Box)#
When a mount fails, a red error panel appears showing:
- ERROR header
- Brief description: "Something went wrong"
- Check the Log Manager for details - Click Logs tab for more info
Footer#
- Version and Build number
- ? (Help button) - Opens the manual
Keyboard Shortcuts#
| Shortcut | Action |
|---|---|
| ⌘ + | Add new share |
| ⌘ − | Remove selected share |
| ⌘ M | Mount selected share |
| ⌘ U | Unmount selected share |
| ⌘ , | Open Preferences |
Preferences#
Access Preferences from the Dashboard tab bar, or Volume Manager Pro → Preferences.
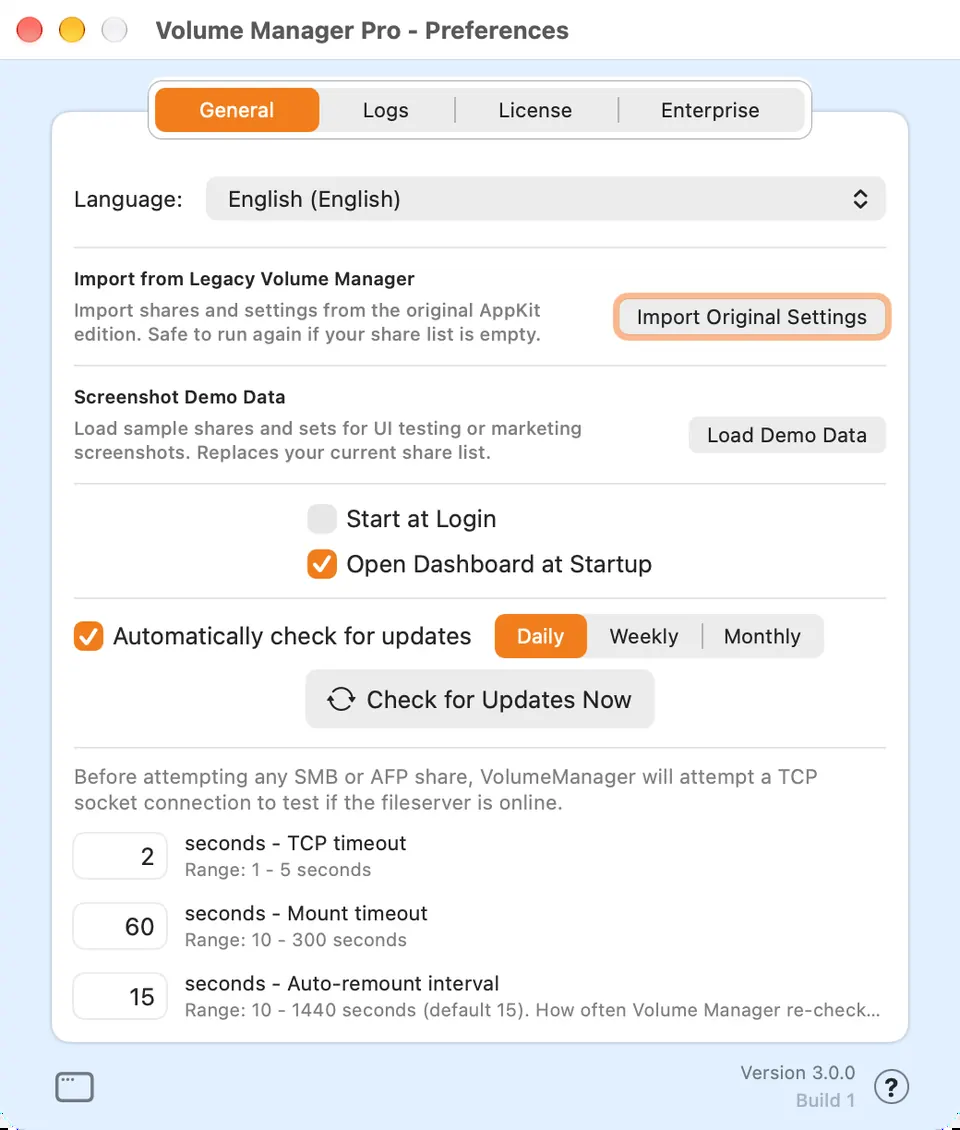
General Tab#
Language Choose the interface language in this tab (System Default, or one of the nine listed languages). The app offers to restart so the change takes effect.
Startup Options
- Start at Login: Launch Volume Manager when you log in
- Open Dashboard at Startup: Show the Dashboard window on launch
App presence (right side of General tab)
Choose how Volume Manager appears in the system UI:
- Menu bar only — menulet icon only; hidden from the Dock and App Switcher (⌘Tab). Default.
- Menu bar and Dock — menulet plus Dock icon; clicking the Dock icon opens the Dashboard.
- Dock only — Dock and App Switcher only; the menu bar icon is hidden.
Menulet clicks: Left click brings the Dashboard to the front, then opens the menulet menu. Right click or Control+click opens the menu only (Preferences, License, Quit, …).
Import Original Settings — bring your earlier shares into Pro without rebuilding them by hand.
In 3.0.1, automatic import runs before the first-launch examples are created. It also recovers an earlier first launch that left only untouched example entries. If you have entered or edited real shares in Pro, automatic import leaves your setup alone.
To import yourself:
- Open Original Volume Manager under the same macOS user account and check that your shares are still there. Quit Original so its saved settings are up to date.
- In Pro, open Preferences → General → Import Original Settings.
- Read the result message. In 3.0.1 the importer adds missing configurations, keeps existing Pro entries and preferences, and leaves Original's saved settings unchanged. Running it again does not add identical configurations again. Original's direct-download and Mac App Store preferences locations are both checked.
- Select an imported share and check its server, mount location and automation before connecting. A password may need to be entered again if macOS cannot provide the old credential safely.
If you are still using 3.0.0: back up your Pro configuration before using this button if you have already entered new shares. That version's manual import replaces its share list; 3.0.1 changes it to merge.
If nothing imports: tell support your macOS version, both apps' versions/builds, whether Original came from the Mac App Store or Plum Amazing, whether Pro shows examples or your own entries, and the exact import message. Do not send passwords or raw preferences files by email: older settings archives can contain saved passwords.
Automatic Updates
- Enable/disable automatic update checks
- Choose frequency: Daily, Weekly, or Monthly
- Click "Check for Updates Now" for manual check
Network Settings
- TCP Timeout: How long to wait for server response (1-5 seconds)
- Mount Timeout: How long to wait for mount completion (10-300 seconds)
- Auto-Remount Interval: How often to check if shares need remounting (10-1440 seconds)
Logs Tab#
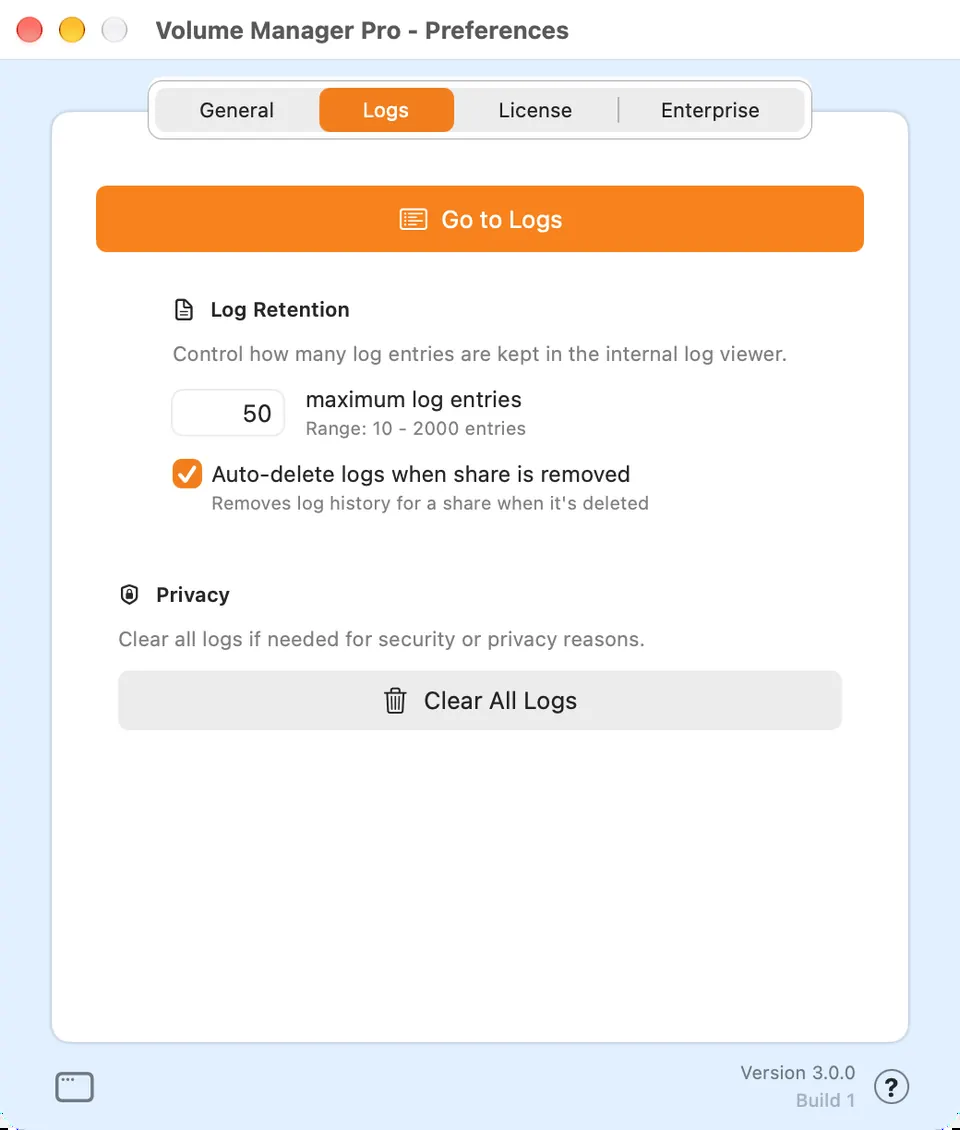
- Maximum Log Entries: How many log entries to keep (10-2000)
- Auto-delete logs when share removed: Clean up logs when you delete a share
- Clear All Logs: Remove all log history
License Tab#
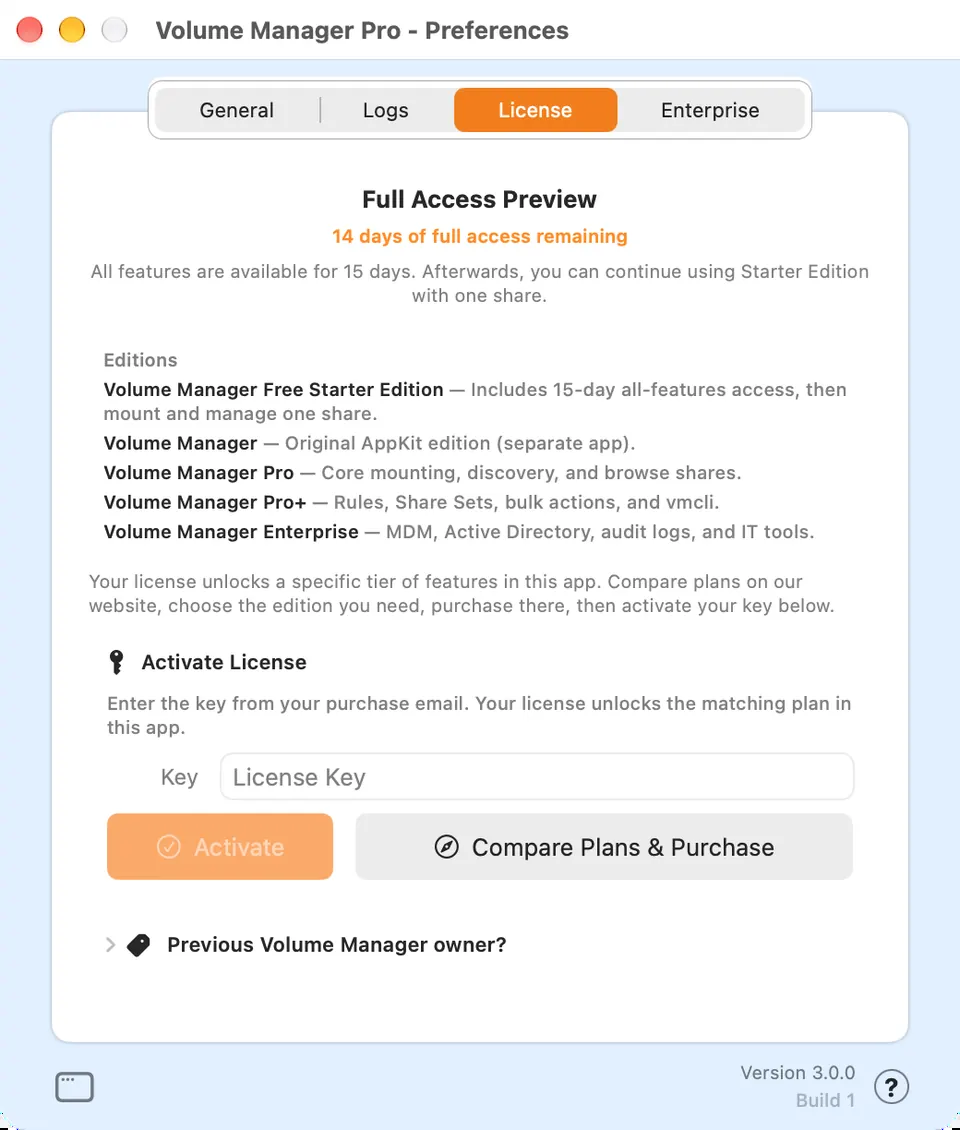
- View license status and current edition (Personal, Pro, Pro+, Enterprise, or trial)
- Enter or refresh license key
- Deactivate license to transfer to another Mac
- Previous Original owners can verify an Original key for an in-app upgrade discount (code is not printed on the website)
- Purchase link
Enterprise Tab (Enterprise Edition)#
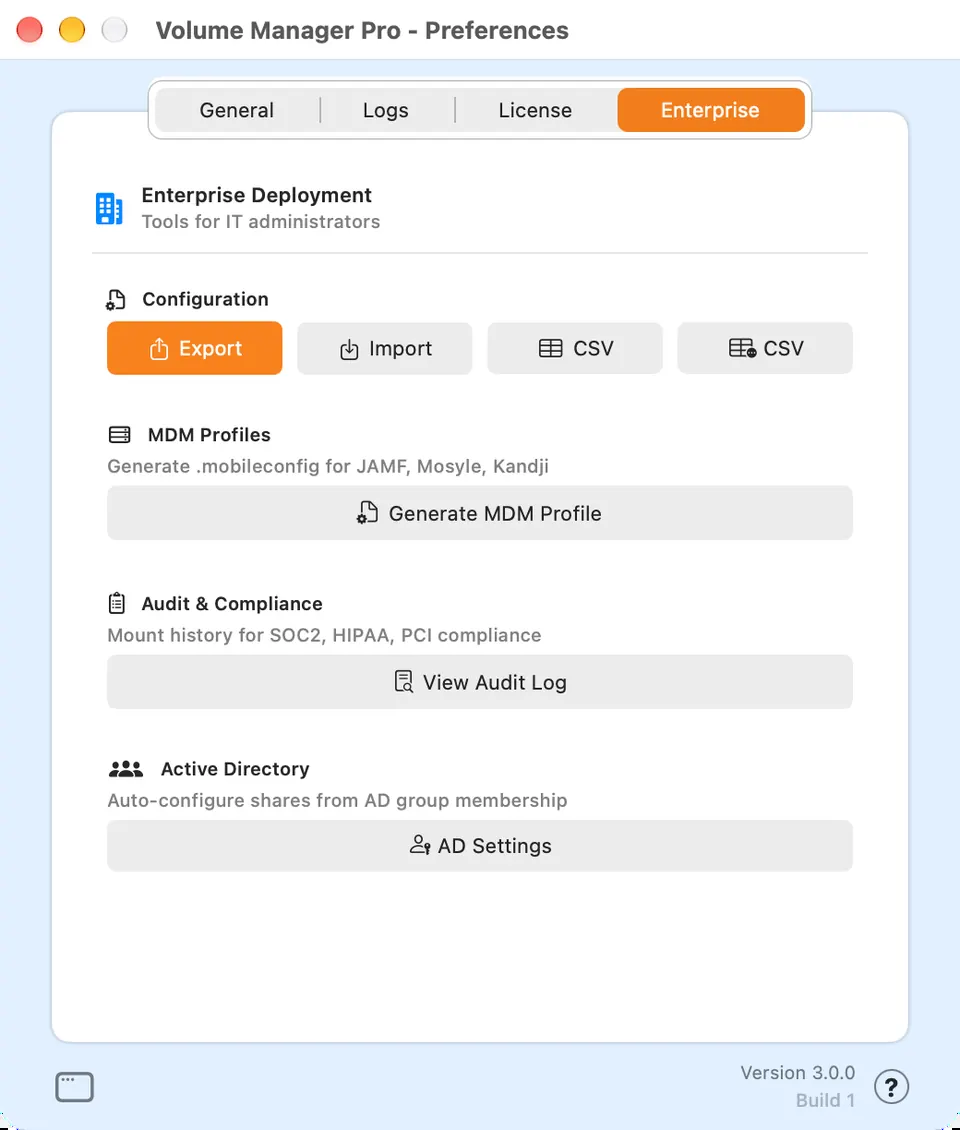
- Configuration Export/Import
- MDM Profile Generation
- Active Directory Settings
- Audit Log Viewer
Licensing#
Trial Period#
Volume Manager Pro includes a 15-day free trial with all features enabled (Personal through Enterprise). No credit card required.
After the trial (if you do not buy):
- Personal-level tools remain
- 1 mounted share at a time
- 3-hour sessions then 1-hour cooldown
- Full features restore when you enter a license key
Editions (Original, Personal, Pro, Pro+, Enterprise)#
Original is the older AppKit app (com.plumamazing.volumemanager), in maintenance and not sold on the current page. Personal, Pro, Pro+, and Enterprise are license tiers inside one app — Volume Manager Pro (com.plumamazing.volumemanagerpro). Change tier by swapping the license key in Preferences → License (no reinstall).
See the full checkmark table in Documentation/Edition_Tier_Feature_Matrix.md (same columns as the compare page). Short version:
- Original — core mounting, macOS 12+, separate download for existing owners, no new features.
- Personal — that job in the new app, plus Clean Up, live status bar, and remount after a dropped share.
- Pro — Personal plus Network Discovery and Browse Shares.
- Pro+ — Rules, Share Sets, bulk actions, vmcli, Wake-on-LAN.
- Enterprise — MDM, Active Directory, audit log, IT-locked shares.
Pricing (USD)#
| Plan | Monthly | Yearly | Lifetime |
|---|---|---|---|
| Personal | $1.49 | $11.99 | $19.99 |
| Pro | $1.99 | $14.99 | $29.99 |
| Pro+ | $3.99 | $34.99 | $59.99 |
| Enterprise | $7.99 | $79.99 | $149.99 |
Original is not listed for sale. Existing Original owners can still download the latest Original build.
Compare plans and buy at plumamazing.com/volume-manager or shop.plumamazing.com.
Previous Original owners: Open Volume Manager Pro → Preferences → License, verify your original license key, and receive 30% off Personal, Pro, Pro+, or Enterprise (subscription or lifetime). The thank-you letter and code are shown only in the app after verify — not on the public website.
Activating Your License#
- Purchase Personal, Pro, Pro+, or Enterprise from shop.plumamazing.com
- Open Volume Manager Pro → Preferences → License
- Enter your license key
- Click Activate
Original keys do not activate Volume Manager Pro. Verify them in Pro only to receive the owner-upgrade discount, then buy a Personal (or higher) key.
Transferring Your License#
- Open Preferences → License on the old Mac
- Click Deactivate
- Activate on the new Mac with the same license key
FAQ#
Connection Issues#
Q: macOS asked me for "Local Network" permission. Should I allow it? A: Yes. Starting with macOS 15 Sequoia, Apple requires apps to ask before scanning the local network. Volume Manager needs this permission to:
- Discover SMB / AFP / NFS servers via Bonjour (NAS, routers, Macs, Raspberry Pi, etc.)
- Test port reachability when you click Scan in Network Discovery
- Browse the share list on a server when you click Browse
If you previously denied it (or never saw the prompt), grant it manually:
System Settings → Privacy & Security → Local Network → enable Volume Manager.
After changing the toggle, quit and relaunch Volume Manager so the new setting takes effect.
Note: regular share mounting (the Mount button) goes through Apple's NetFS framework and works even without Local Network permission — only Network Discovery / Browse needs it.
Q: I'm getting "Invalid hostname" error A: Try using the IP address instead of the hostname. To find your server's IP:
- On the server, check Network settings
- On your router, check the client list
- Use
ping servernamein Terminal
Q: My Auto-Mount shares don't come up after I restart my Mac A:
- In Preferences → General, make sure Start at Login is enabled — otherwise Volume Manager won't be running to do the mount.
- Make sure Auto-Mount (or Scheduled Mount) is enabled on each share in the Dashboard.
- The first auto-mount attempt happens about 3 seconds after Volume Manager launches; if your Wi‑Fi takes longer than that to come back, don't worry — the app re‑checks on the Auto-remount interval (default 15 s, configurable in Preferences → Logs) and will mount the share as soon as the server is reachable.
- If you have Pause Automount turned on in the Dashboard toolbar (the pause icon), automatic mounting is suspended. Click it again to resume.
- For Wi‑Fi‑restricted shares: confirm the share's Limit to WiFi SSID matches the network you're actually on (case-sensitive, exact match).
Q: Can I change how often Volume Manager checks Auto-Mount shares? A: Yes. Go to Preferences → Logs → Auto-remount interval and set a value between 10 and 1440 seconds (default 15). Lower values reconnect faster after a disconnect; higher values are quieter on the network and easier on battery. Changes take effect immediately — no restart needed.
Q: View Audit Log is empty but I mounted shares A: In earlier builds, individual mount events were not written to the Audit Log. Use the main window's Logs tab for connection history. The Audit Log (Preferences → Enterprise) now records individual mount/unmount events plus bulk actions. Mount a share once after updating to populate it.
Q: My share remounts as ShareName-1 A: Click Clean Up on the Dashboard toolbar. This removes empty leftover folders under /Volumes that block the intended name.
Q: My shares don't reconnect after sleep A:
- Ensure "Monitor and Remount" is enabled for each share
- After deep sleep, reconnection takes a few seconds
- Check that your network is connected before shares can remount
Q: Network Discovery's Browse says "Server did not respond in time" A: Volume Manager waits up to 15 seconds for a server to list its shares before giving up — long enough for healthy servers, short enough to not freeze the app on a half‑online one. If you see this message:
- Confirm the server is online and SMB/AFP file sharing is actually enabled on it.
- Try the server's IP address instead of its Bonjour name.
- If the server requires authentication, expand Authentication in the Browse dialog, enter the username and password, then click Retry.
Q: Why does mounting fail on my M1/M2/M3 Mac? A: If you see "Mountpoint is not valid" errors:
- Go to System Preferences → Sharing
- Turn OFF File Sharing
- Restart your Mac
- Turn File Sharing back ON
(This is an Apple Silicon quirk that Apple Support recommends)
Q: Can I mount to a custom location instead of /Volumes? A: Custom mount points must be:
- Inside /Volumes (recommended)
- A valid location from Finder's sidebar "Locations"
- NOT in Documents, Downloads, or Desktop
Protocol Questions#
Q: Which protocol should I use? A:
- Windows servers/most NAS: SMB
- Older Mac servers: AFP (but SMB is preferred now)
- Linux servers: NFS or SMB
- Cloud storage: WebDAV/WebDAVS
Q: Why was AFP removed/deprecated? A: Apple has been phasing out AFP since macOS Big Sur. SMB is now the recommended protocol and works with virtually all servers.
Q: Can I connect to cloud storage like Google Drive or Dropbox? A: Only if they offer WebDAV access. Services with proprietary APIs (Google Drive, Dropbox, AWS S3) require their own sync clients or a WebDAV gateway.
General Questions#
Q: Why can't I add more shares? A: Each share must have a unique name in your list. Also check if your trial has expired.
Q: How do I set Volume Manager to a different language? A: Open Preferences → General and choose a language (or System Default). The app asks to restart. The nine languages in that picker are English, German, French, Spanish, Chinese (Simplified), Italian, Japanese, Korean, and Arabic.
You can also set a per-app language in System Settings → General → Language & Region → Apps.
Q: Where are my preferences stored? A: Volume Manager Pro uses ~/Library/Preferences/com.plumamazing.volumemanagerpro.plist. Original uses ~/Library/Preferences/com.plumamazing.volumemanager.plist.
Part 2: Pro and Pro+ Features#
Network Discovery and Browse Shares require Pro (or Pro+ / Enterprise, or the 15-day trial). Rules, Share Sets, Wake-on-LAN, and vmcli require Pro+ or Enterprise.
Rules Engine#
The Rules Engine automates volume mounting based on conditions you define. Pro+ and Enterprise (and the 15-day trial).
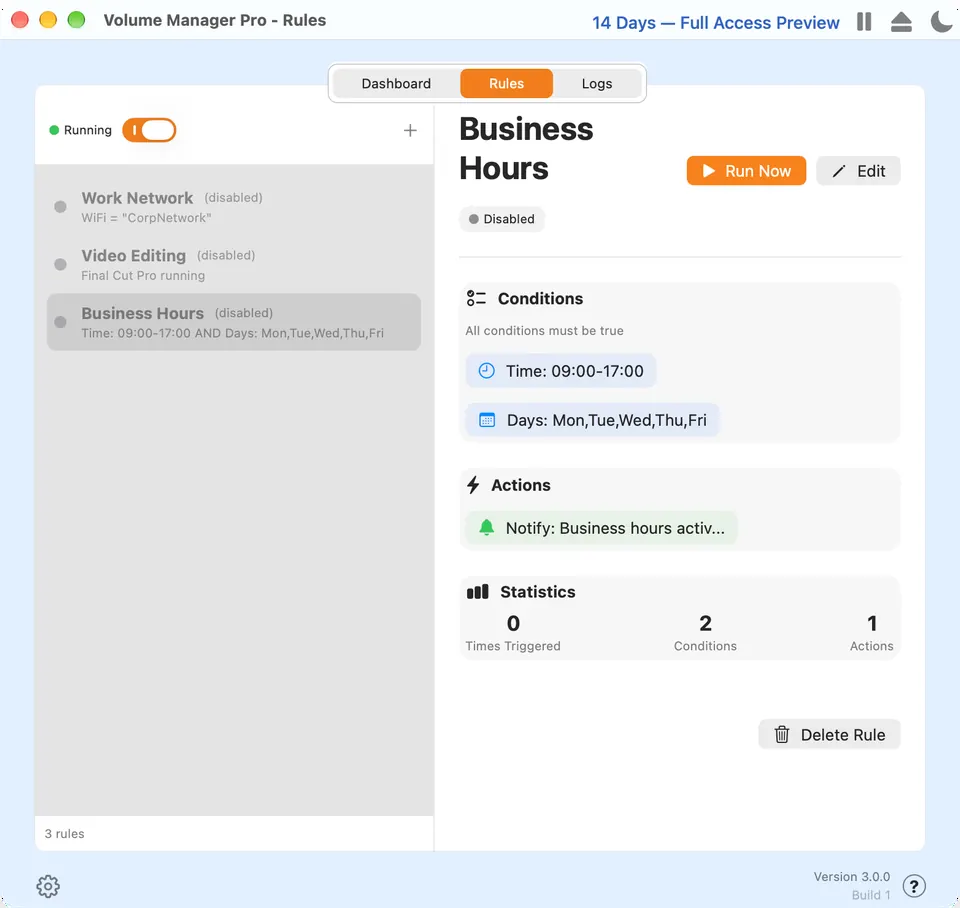
A Business Hours rule. Conditions and actions run in order when the rule is enabled.
Accessing Rules#
- Open the Dashboard
- Click the Rules tab
Creating a Rule#
- Click + to add a new rule
- Give it a descriptive name (e.g., "Mount Work Shares at Office")
- Add one or more Conditions (all must be true to trigger)
- Add one or more Actions (execute in order when triggered)
- Enable the rule with the toggle
Conditions#
| Condition | Description | Example |
|---|---|---|
| WiFi Network | Connected to specific SSID | "CorpWiFi" |
| WiFi Disconnect | Disconnected from SSID | Left the office |
| Time Window | During specific hours | 9:00 AM - 5:00 PM |
| Day of Week | On specific days | Monday-Friday |
| App Running | When app is open | Final Cut Pro |
| Power Source | On battery or AC power | Plugged in |
| VPN Status | VPN connected/disconnected | Connected to work VPN |
| Volume Mounted | When specific volume mounts | Backup drive connected |
Actions#
| Action | Description |
|---|---|
| Mount Volume | Mount a specific share |
| Unmount Volume | Unmount a specific share |
| Mount All | Mount all configured shares |
| Unmount All | Unmount all mounted shares |
| Mount Set | Mount all shares in a Share Set |
| Unmount Set | Unmount all shares in a Share Set |
| Run Script | Execute a shell script |
| Show Notification | Display a macOS notification |
| Delay | Wait before next action |
Example Rules#
"Work Mode"
- Condition: WiFi = "CorpWiFi"
- Actions: Mount "Projects", Mount "Shared Drive"
"Video Editing"
- Condition: App Running = "Final Cut Pro"
- Action: Mount "Media Server"
"Leave Office"
- Condition: WiFi Disconnected from "CorpWiFi"
- Action: Unmount All
"Nightly Backup"
- Conditions: Time = 2:00 AM, Day = Weekdays, Power = AC
- Actions: Mount "Backup NAS", Run Script "/Users/me/backup.sh"
Share Sets#
Share Sets let you group related volumes and manage them together. Pro+ and Enterprise (and the 15-day trial).
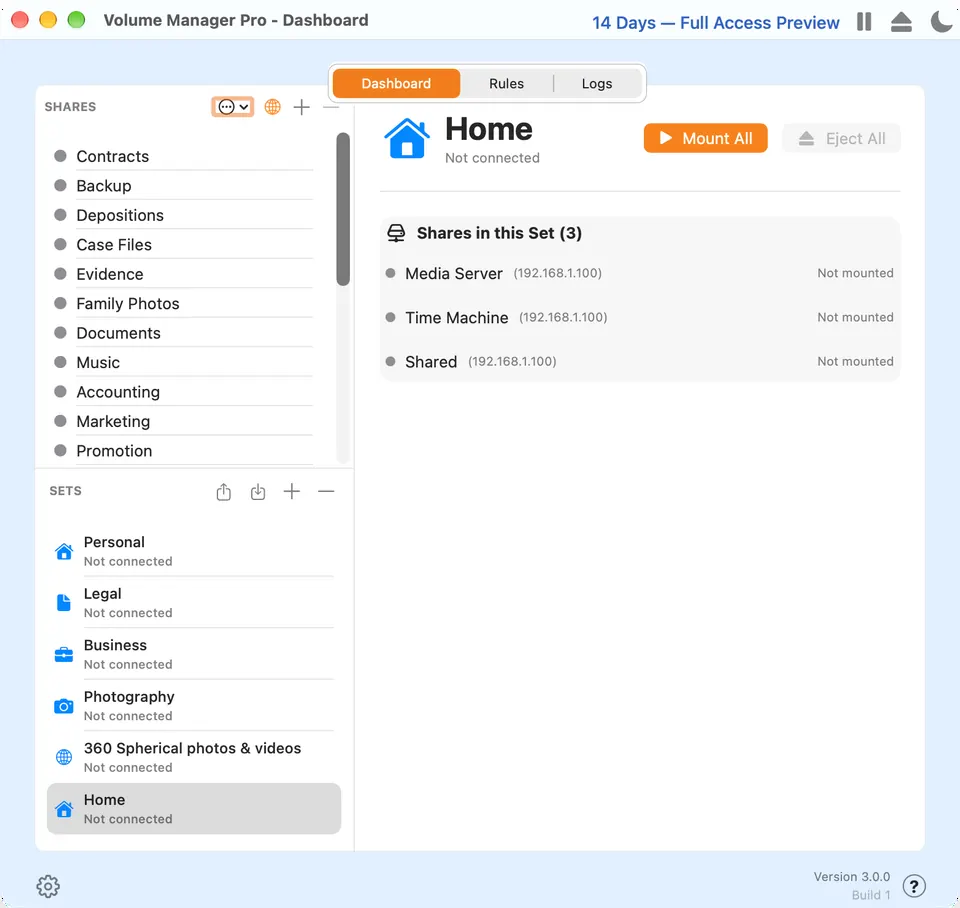
Home set selected in the sidebar. You can also keep a Business set, Legal set, and so on.
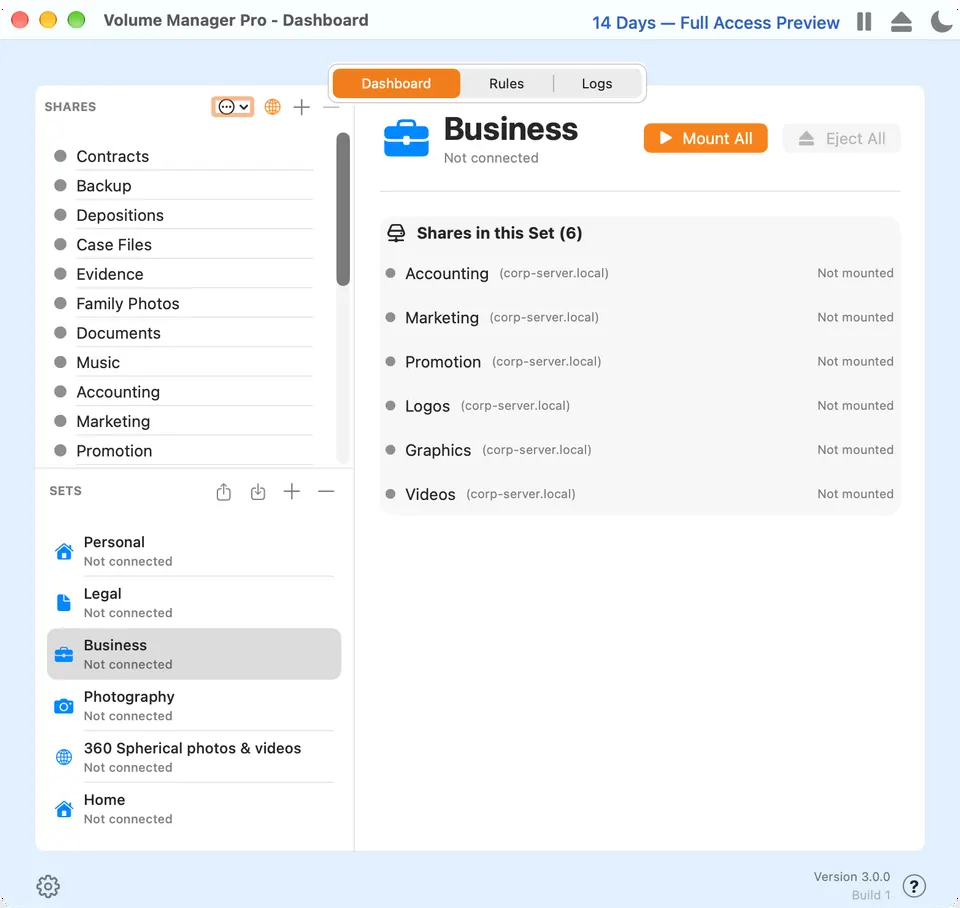
Creating a Share Set#
- In the Dashboard, click the Sets section
- Click + to create a new set
- Name it (e.g., "Work", "Media", "Backup")
- Drag shares into the set or assign via share details
Using Share Sets#
- Mount Set: Right-click a set → Mount All in Set
- Unmount Set: Right-click a set → Unmount All in Set
- Export Set: Right-click a set → Export Set... (saves shares + set for sharing)
- Import Set: Click the download icon (↓) in the SETS header
- In Rules: Use "Mount Set" / "Unmount Set" actions
Exporting and Importing Sets#
Share your drive setups with family or team:
- Export: Right-click a set → Export Set... → choose location
- The file includes all shares in that set (passwords not included)
- Import: Click the ↓ icon in the SETS section → select the file
- Shares are added (merge mode); duplicate hostname+share are skipped
- The set is created with the correct shares
Use cases: Family movie libraries, enterprise role-based setups, team project drives.
Example Sets#
| Set Name | Shares |
|---|---|
| Work | Projects, Shared Docs, Archives |
| Media | Video Library, Music Server, Photos |
| Backup | Time Machine, Carbon Copy Clone destination |
Network Discovery#
No more guessing share names!
Network Discovery is one of Volume Manager's most powerful features. It automatically finds file servers on your network AND can list the actual shares available on each server—making setup effortless.
The Philosophy#
Volume Manager takes different approaches for different users:
| Home Users | Enterprise |
|---|---|
| Make it easy | IT controls everything |
| Ask for permissions | No extra permissions needed |
| Discover everything automatically | Security first |
| Guided setup | Configuration via MDM |
For home users and small offices, we believe no one should suffer trying to figure out obscure share names and connection details. Volume Manager does the hard work for you.
Accessing Network Discovery#
Click the globe icon (🌐) in the top-left corner of the Dashboard, next to the SHARES header. Pro, Pro+, and Enterprise (Personal does not include Discovery).
macOS Local Network Permission (Sequoia & later)#
The first time you run Network Discovery on macOS 15 Sequoia or newer, macOS will pop up:
"Volume Manager" would like to find and connect to devices on your local network.
Click Allow. Without this permission, the scan will appear to run but won't find any servers — Apple silently blocks the underlying Bonjour / port-scan queries.
If you missed the prompt or accidentally clicked Don't Allow, you can grant it later in:
System Settings → Privacy & Security → Local Network → toggle Volume Manager on, then quit and relaunch Volume Manager.
Regular share mounting (the Mount button) does not need this permission — it goes through Apple's NetFS framework. Only Network Discovery and Browse need it.
Running a Scan#
- Click the globe icon to open Network Discovery
- The scan starts automatically (or click the refresh icon)
- Wait for devices to appear (usually takes 5-10 seconds)
- Tip: At the bottom you'll see how many servers were found
How Browse works under the hood: When you click Browse on a discovered server, Volume Manager asks the server to list its shares. It waits up to 15 seconds for an answer before giving up with "Server did not respond in time." For most servers a healthy response comes back in under 2 seconds; the long ceiling exists so a flaky / half‑online server can't freeze the app.
What Network Discovery Finds#
Volume Manager scans your network using Bonjour/mDNS and finds:
- Computers sharing files (Macs, PCs, Linux servers)
- NAS devices (Synology, QNAP, WD, Drobo, etc.)
- Routers with USB storage (drives plugged into your router)
- Time Capsules and other Apple network devices
- Any SMB, AFP, or NFS file server
Each discovered device shows:
- Hostname or IP address
- Protocol detected (SMB, AFP, etc.)
- Green dot = responding/online
- Browse button = list shares on this server
- Add button = add this server to your shares
The Magic: Browse Shares#
This is the game-changer. Instead of guessing share names:
- Find your server in the Network Discovery list
- Click Browse next to it
- Volume Manager connects and lists ALL available shares
- Click Add next to the share you want
- The share is added with the correct name already filled in!
That's it. No more hunting through router admin pages. No more trial and error.
Browse Shares Details#
When you click Browse, a new window shows:
- Server name and IP at the top
- Authentication section (always visible) with username/password fields
- List of shares with their full paths (e.g.,
smb://192.168.68.1/G) - Add button next to each share for one-click setup
Authentication Tips:
- Many home devices allow guest access—just click Browse and it works
- For Macs and secured shares, enter your username and password, then click Retry
- Username format: usually just your username (e.g.,
julian) - For some Windows servers, try
WORKGROUP\username
Quick Add vs. Browse Add#
| Quick Add | Browse Add |
|---|---|
| Click Add next to server | Click Browse, then Add next to share |
| Adds server IP only | Adds server IP AND share name |
| You enter share name manually | Share name is filled in automatically |
| Good when you know the share name | Good for discovering what's available |
What If Browse Doesn't Work?#
Some servers require authentication before listing shares:
- "Authentication required" - Enter username/password, click Retry
- "Invalid parameter" - The server name has special characters; Volume Manager will try to resolve the IP automatically
- "Could not connect" - Server may be offline or firewall is blocking
Helpful tips shown on error:
- Enter username and password above
- Click 'Retry'
- If using a hostname, try the IP address instead
Legacy Method: Manual Share Names#
If Browse isn't available for your device, you can still add shares manually:
For Macs:
- System Settings → General → Sharing → File Sharing → see shared folder names
For Windows PCs:
- Right-click folders → Properties → Sharing tab
For NAS Devices:
- Log into the NAS web interface → Shared Folders or File Station
For Routers with USB Storage:
- Log into your router's admin page (usually http://192.168.1.1 or similar)
- Find USB Storage or File Sharing settings
- Look for the share name (often "USB_Storage", "disk1", "HDD", etc.)
Common Issue: "Device Found But Won't Mount"#
If Network Discovery finds your device but mounting fails:
- Missing share name: The IP was added but the Share Name field is empty
- Solution: Use Browse to discover the share name, or enter it manually
- Wrong credentials: The device requires a username/password
- Solution: Enter the correct login credentials
- Protocol mismatch: Trying AFP on a Windows server, or SMB on old Mac
- Solution: Try different protocols in the dropdown
- Firewall blocking: Your Mac's firewall is blocking the connection
- Solution: Allow connections in System Settings → Privacy & Security → Firewall
- Device not actually sharing: The device is on the network but file sharing isn't enabled
- Solution: Enable file sharing on the device
Example: Router USB Drive (The Easy Way)#
You plugged a USB drive into your Deco router:
- Click the globe icon to open Network Discovery
- Find your router (e.g., "192.168.68.1 (SMB)")
- Click Browse - shares appear (e.g., "G", "Backup")
- Click Add next to the share you want
- Back in Dashboard, click Mount
- Done! Your drive appears in Finder.
Example: Connecting to Another Mac#
- On the target Mac: System Settings → General → Sharing → enable File Sharing
- In Volume Manager, click the globe icon
- Find the Mac (e.g., "Mac Studio (SMB)")
- Click Browse and enter your Mac account username/password
- Your shared folders appear - click Add on the one you want
- Mount and enjoy seamless access!
Advanced Features#
Wake-on-LAN (WOL)#
Wake up sleeping servers before mounting.
- In share details, expand Advanced
- Enter the server's MAC Address (e.g.,
00:11:22:33:44:55) - Volume Manager sends a wake packet and waits before connecting
Script Hooks#
Run scripts when volumes mount or unmount.
Post-Mount Script: Runs after successful mount
- Use case: Start backup software, notify you, index files
Pre-Unmount Script: Runs before unmount
- Use case: Close applications, stop services, sync data
Enter the full path to your script:
/Users/yourname/scripts/backup_start.sh
Make sure scripts are executable: chmod +x script.sh
SSID Limiting#
Restrict auto-mounting to specific WiFi networks.
- In share details, find Limit to WiFi SSID
- Enter your network name exactly (e.g., "HomeWiFi")
- Auto-mount only works when connected to that network
Use case: Don't try to mount work shares when at a coffee shop.
Global Actions#
In the Dashboard toolbar:
- Pause/Resume Automount: Temporarily disable all automatic mounting
- Clean Up: Removes leftover empty folders under
/Volumesthat can block reconnecting (the cause ofShareName-1mount names). Auto-Mount shares reconnect afterward. - Unmount All: Quickly disconnect all shares (great before closing your laptop)
Stale Mount Folders (ShareName-1 problem)#
If a network share reconnects as MyShare-1 instead of MyShare, macOS usually left an empty "ghost" folder at /Volumes/MyShare from a previous session. Volume Manager Pro can fix this automatically:
- Click Clean Up in the Dashboard toolbar, or
- Let the app remove ghosts before each mount attempt (built in)
If you also use Finder's "Reopen windows when logging back in", consider turning that off in System Settings → Desktop & Dock → Windows to avoid mount races at login.
Command-Line Interface#
The vmcli tool enables scripting and automation.
Location#
/Applications/Volume Manager Pro.app/Contents/Resources/vmcli
Adding to PATH (Optional)#
sudo ln -s "/Applications/Volume Manager Pro.app/Contents/Resources/vmcli" /usr/local/bin/vmcli
Commands#
# Export configuration
vmcli export -o backup.vmconfig
# Import configuration
vmcli import -f backup.vmconfig -m replace
# List all shares
vmcli list
# Check status
vmcli status
# Help
vmcli help
Import Modes#
replace- Remove existing, import newmerge- Keep existing, add newupdate- Update existing, add new
Part 3: Enterprise Features#
The following features are available in Volume Manager Enterprise edition.
Enterprise Overview#
Volume Manager Enterprise is designed for IT teams managing multiple Macs.
Key Capabilities:
- Deploy standard configurations to hundreds of Macs
- Lock critical shares from user modification
- Integrate with Active Directory
- Generate audit logs for compliance
- Deploy via MDM (JAMF, Mosyle, Kandji)
Accessing Enterprise Features#
- Open Preferences (⌘,)
- Click the Enterprise tab
Configuration Export & Import#
Share configurations across your organization.
Exporting#
- Go to Preferences → Enterprise
- Click Export Config
- Save the
.vmconfigfile
What's Exported:
- All shares (excluding passwords)
- Share Sets
- Automation Rules
- Optionally: Preferences
Importing#
- Click Import Config
- Choose mode:
- Replace All: Start fresh with imported config
- Merge: Add new items, keep existing
- Select the
.vmconfigfile
⚠️ Security: Passwords are never exported. Users must enter credentials after import.
CSV Export/Import#
For Excel, Numbers, or text editor editing:
- Export CSV: Preferences → Enterprise → CSV (export)
- Opens in Excel/Numbers; edit nickname, hostname, shareName, protocol, username, guest, port, group
- Import CSV: Preferences → Enterprise → CSV (import)
- Choose Merge or Replace All
CSV columns: nickname, hostname, shareName, protocol, username, guest (yes/no), port, group, autoMount, password (optional; cells starting with YOUR_ are skipped). Blank shareName is valid (WebDAV server root).
IT Control (Enterprise)#
IT can disable export and/or import via MDM:
- AllowShareExport = false → Export Config, Export CSV, Export Set are disabled
- AllowShareImport = false → Import Config, Import CSV, Import Set are disabled
Set in MDM Profile Generator → Policy toggles.
File Association#
Double-clicking a .vmconfig file opens Volume Manager and prompts for import.
MDM Deployment#
Deploy configurations via Mobile Device Management.
Supported MDM Solutions#
- JAMF Pro
- Mosyle
- Kandji
- Addigy
- Workspace ONE
- Any MDM supporting custom profiles
Generating MDM Profiles#
- Go to Preferences → Enterprise
- Click Generate MDM Profile
- Enter organization details:
- Organization Name
- Description
- Contact Email
- Add shares with server addresses
- Click Generate
- Save the
.mobileconfigfile
Deploying the Profile#
JAMF Pro:
- Computers → Configuration Profiles → New
- Upload the
.mobileconfig - Scope to target computers
- Save and deploy
Mosyle:
- Management → Profiles → Add Profile
- Upload Custom Profile
- Assign to device groups
Kandji:
- Library → Custom Profiles
- Add Custom Profile
- Upload and add to Blueprint
IT-Managed Shares#
Shares deployed via MDM are locked (🔒):
- Users see a lock icon
- "IT-Managed Share" banner displayed
- Users cannot edit or delete
- Users CAN still mount/unmount manually
Active Directory Integration#
Automatically configure shares based on AD group membership.
Requirements#
- Mac bound to Active Directory
- User logged in with AD credentials
Setting Up Group Mappings#
- Go to Preferences → Enterprise → AD Settings
- Verify AD connection status
- Click + to add a mapping
- Enter AD group name (e.g., "Engineering")
- Add shares for that group
- Save
Example Mappings#
| AD Group | Shares |
|---|---|
| Engineering | //server/code, //server/builds |
| Marketing | //server/creative, //server/campaigns |
| Domain Users | //server/shared |
Applying Mappings#
Click Apply Mappings to:
- Check current user's AD groups
- Auto-add shares for matching groups
- Skip shares that already exist
Audit & Compliance#
Track activity for SOC 2, HIPAA, PCI DSS compliance.
Viewing Audit Logs#
- Go to Preferences → Enterprise
- Click View Audit Log
Logged Events#
| Event | Description |
|---|---|
| APP_LAUNCH | Application started |
| MOUNT_SUCCESS | Share mounted |
| MOUNT_FAILURE | Mount failed |
| UNMOUNT_SUCCESS | Share unmounted |
| CONFIG_IMPORT | Configuration imported |
| CONFIG_EXPORT | Configuration exported |
| MDM_CONFIG_APPLIED | MDM profile applied |
| SHARE_ADDED | New share created |
| SHARE_REMOVED | Share deleted |
Exporting Logs#
Click Export to save as:
- CSV: For spreadsheets, SIEM systems
- JSON: For automated processing
Log Fields#
| Field | Description |
|---|---|
| timestamp | ISO 8601 format |
| eventType | Event category |
| shareName | Affected share |
| hostname | Server address |
| user | macOS username |
| success | Boolean |
| details | Additional context |
Enterprise Troubleshooting#
Shares Not Appearing After MDM Deploy#
Check profile installation: System Preferences → Profiles
Verify plist exists:
ls /Library/Managed\ Preferences/com.plumamazing.VolumeManager.plistRestart Volume Manager
Users Can't Connect After Import#
- Passwords are not exported for security
- Users must enter credentials manually
- Check network connectivity to server
AD Integration Not Working#
- Verify Mac is bound:
dsconfigad -show - Check user's groups:
id -Gn - Ensure Volume Manager can read AD attributes
Diagnostic Commands#
# Check if app is running
pgrep -x VolumeManager

# View managed preferences
defaults read /Library/Managed\ Preferences/com.plumamazing.VolumeManager.plist

# Check AD binding
dsconfigad -show

# Test server connectivity
nc -zv fileserver.company.com 445
Log Locations#
| Log | Location |
|---|---|
| App logs | ~/Library/Application Support/VolumeManager/ |
| Audit logs | ~/Library/Application Support/VolumeManager/audit.json |
| System logs | Console.app → Volume Manager |
Support#
Website: plumamazing.com
Support Page: https://plumamazing.com/tech-support
Support Email: [email protected]
Manual: ? icon at bottom right corner of the app & Help → Volume Manager Manual
When reporting issues, include:
- MacOS version
- Volume Manager version
- Steps to reproduce
- Screenshots if applicable
- Relevant log entries
Languages#
Volume Manager Pro’s in-app picker (Preferences → General) lists:
- System Default
- English
- German (Deutsch)
- French (Français)
- Spanish (Español)
- Chinese Simplified (中文简体)
- Italian (Italiano)
- Japanese (日本語)
- Korean (한국어)
- Arabic (العربية)
Changing the picker asks you to restart the app so strings reload.
You can also set a per-app language in System Settings → General → Language & Region → Apps (add Volume Manager Pro).
Urdu localization files exist in the project but are not in the in-app picker, so they are not announced as a supported language.
Volume Manager Pro Manual 3.0.1 · October 2026 · © 2024-2026 Plum Amazing, LLC · All rights reserved.
Revision history#
| App version | Manual updated | Changes |
|---|---|---|
| 3.0.1 | 2026-10-27 | Preserved the existing 23-chapter book; added a searchable reader; documented Original import recovery and merge, a wider Shares sidebar, Duplicate Share and current Help routing. |