A photographic studio guide for Mac
iWatermark+ for Mac
Make your first watermarked photo, build a reusable identity, and prepare a consistent batch in the Mac beta.
Mac beta · App version 7.2.7 Updated 2026-10-12
This guide is for the iWatermark+ Mac Catalyst beta, version 7.2.7. Add a visible identity, place information on a photo, or prepare a consistent set of images without changing your originals. It describes the Mac app, not the older iWatermark Pro desktop app or every feature of the Android and iPhone/iPad editions.
The beta is for testing. Review finished files before using it for important work. See Known limits and troubleshooting for StegoMark, video, format and large-batch limitations.
Installation and requirements#
The app declares macOS 12 or later and includes both Apple Silicon and Intel code. The current beta has been tested on Apple Silicon; this is not a claim of testing on every supported Mac or macOS release. Allow space for your source media and a second copy of each exported result.
Download the Mac beta from Plum Amazing, expand its ZIP, and move the app to Applications. Open iWatermark+. If macOS reports that the app is damaged or cannot verify it, stop and download a fresh copy from the official source rather than disabling Mac security. Report the exact message and version to support.
Only one copy should run at a time. Before replacing an older beta, quit it. Check the version/build shown in the app when reporting a problem. Keep the older desktop iWatermark Pro separate: its documents, identity and manual are not replaced by this beta.
Photos access is optional for saving individual files. To pick from Photos or batch-save to Photos, open a working System Photo Library in the Photos app and allow access when macOS asks. iCloud Photos is not required. File and folder import uses the locations you choose.
The quick path#
- Drag one or more photos, or a folder of photos, into the Photos tray at the bottom of the window. You can also click the empty tray or Add… to choose files or a folder.
- Click a thumbnail in the tray. The selected image appears on the large canvas.
- Open Create in the left column to make a watermark, or List to turn existing watermarks on and off. Active watermarks appear on the image. Click a watermark's settings control to edit it in the right-hand inspector.
- Click the toolbar Export icon to choose Save Current to File, Save Current to Photos (One by One), Batch Process All to Photos, or Share. You can also use File → Save (⌘S) for a single file. For a whole tray, the fast Batch Process All path currently saves the watermarked results to Photos.
Importing a photo does not change the original. The watermarked result is made when you save, share, copy, or batch-process it.
Navigating and sorting the Photos tray#
Short rows of thumbnails are centered. A long row scrolls horizontally, and selecting a photo brings its thumbnail into view. Click a thumbnail to focus the tray, then use the left/right arrows to choose the previous or next photo. Command + Left/Right moves approximately one visible page of thumbnails. Arrow keys keep their normal behavior when editing text or adjusting Position. The horizontal scroll indicator helps you move through a long sequence.
The tray's Sort menu offers Import order, Name (A–Z), Created (oldest first), Created (newest first), and Recently added. Filename sorting uses natural order, so numbered names sort as people expect. Creation sorting uses the Photos asset's creation date or the source file's creation date; unavailable dates sort last. Recently added reverses the import order. Sorting does not change which photo is selected and does not change the underlying batch-processing order.
Choose S / M / L / XL to change thumbnail size. These controls change the tray, not the resolution of your photos. Sorting affects tray navigation but does not change the underlying batch order.
Tour of the window#
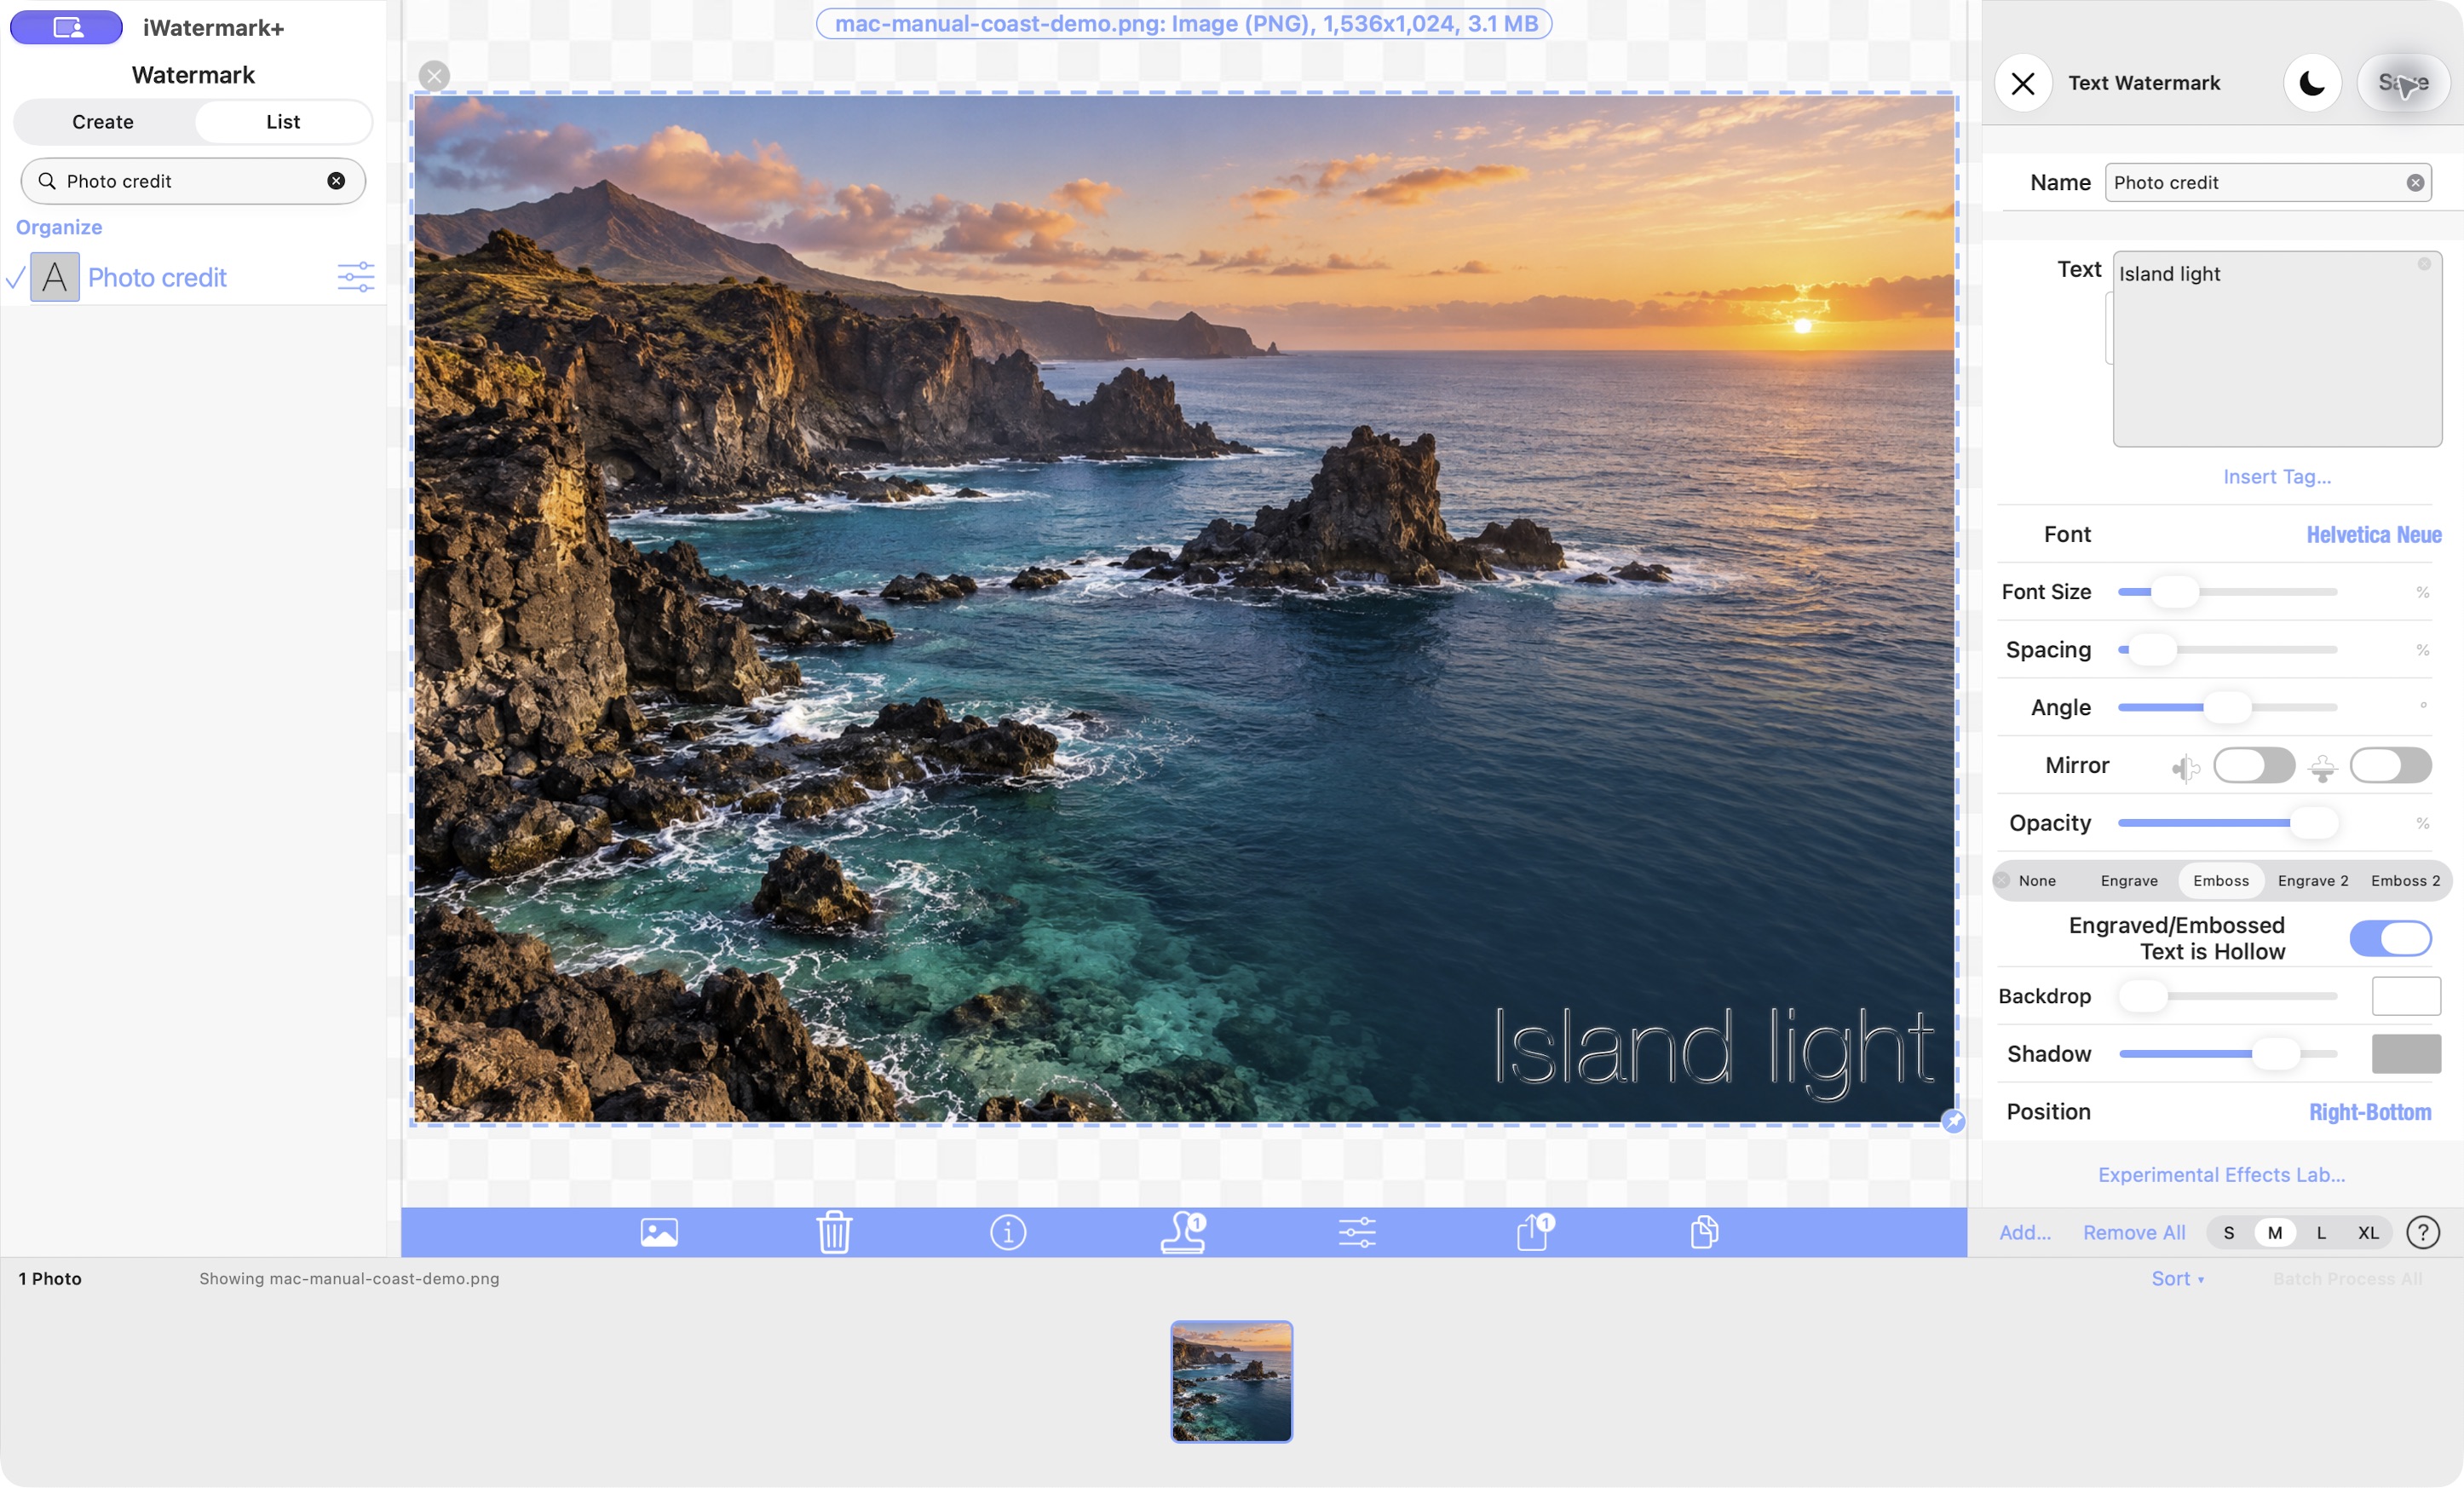
- Left column, Create / List: Create a watermark type, or find, select, reorder, activate, and edit saved watermarks. The list's search field filters watermarks. Selecting a watermark for editing is different from turning it on for export: check which watermarks are active before processing a batch.
- Canvas preview: Shows the selected photo and its active watermarks. The checkerboard outside the photo is workspace, not part of the exported image.
- Right column inspector: Shows settings for the selected watermark or Photo Info. Give a watermark a descriptive Name so it is easy to find in List; the name is not necessarily the visible text drawn on the photo. For a Text watermark, put the visible words in Text. A QR watermark has its own content; Resize has a name plus dimensions, not a separate content box.
- Bottom Photos tray: Holds the imported sequence. Click a thumbnail to preview that image. Use S / M / L / XL to change thumbnail size; scroll to move through a long sequence. Add… appends more files. Right-click a thumbnail to remove just that item, or use Remove All to empty the tray. Removing from the tray does not delete the source file.
- Toolbar and menus: Provide import, export, sharing, copying the finished image, Photo Info, Help, and other app actions. Menu names and keyboard shortcuts are discoverable in the Mac menu bar.
Importing photos and folders#
Drop a folder on the Photos tray to scan its subfolders for supported media. A progress message appears while items are prepared and imported. If fewer items arrive than were found, the tray reports how many were skipped. The folder is a source of images, not a permanent library inside iWatermark+.
The current importer recognizes these filename extensions: JPEG (.jpg, .jpeg), PNG, HEIC, HEIF, AVIF, TIFF (.tif, .tiff), GIF, BMP, WebP, DNG, and video MOV, MP4, M4V, AVI, MPG, MPEG. Recognition means the file is considered for import; successful decoding, preview, and export depend on the file and the codecs available on the Mac. Not every format in this list has passed end-to-end testing yet. If an item is skipped, note its filename and format for a bug report.
The tray currently accepts up to 4,096 items from a dropped folder. For a very large job, first try a small representative folder, confirm the output, then run the full batch. Keep the Mac awake until processing finishes.
Making and managing watermarks#
Choose a watermark type in Create, then use its inspector. You can make text and graphic watermarks and use utility types such as QR, Resize, Metadata, and Redact/Pixelate. Available controls differ by type. A watermark's Name identifies it in List; content and appearance settings determine what is rendered. Save the settings, inspect the preview on a real photo, and verify the active checkmarks before export.
For Text, type the words to appear on the photo into Text, not Name. Use the inspector to adjust font, size, position, and effects. Engrave, Emboss, Engrave 2 and Emboss 2 offer different relief treatments. The apparent depth depends on the font, size, hollow setting and background. Try a heavier font to make the edge treatment easier to see. Check the result against several photos before exporting a batch. For QR, supply both a descriptive name and the QR content. For Resize, set width and height. Redact/Pixelate may be substantially slower than a simple Text watermark, especially across a large batch, so test its results on a few images first.
On Mac, click the small Photo colors button beside a color square to show four colors sampled from the photo currently on the canvas. Choose one for Text color, Graphic or Border tint, or a Vector graphic's fill, stroke, or backdrop. The regular color square remains available for any other color. The suggestions change when you select another photo, and the popover works without widening the inspector.
A Border normally follows the photo edges automatically. If a Resize watermark aspect-fits the photo into a larger colored canvas, the Mac preview and export frame the visible photo content rather than the added color bands. Border Size changes the artwork's thickness and Inset moves it in from those edges; separate width and height settings are not needed.
Watermark definitions can also be exported and imported as .iw+ packages using File → Export Watermark Package and File → Import Watermark Package. This is different from exporting a finished watermarked photo. Keep a copy of valuable packages and check that any embedded graphic assets travel with them.
Choosing a watermark type#
Watermarks can add visible content, write information into an output file, or transform its appearance. Several may be active together. Start with one, check its result, then add the next.
| Type | What it does and how to start | What to check |
|---|---|---|
| Text | Type a name and the visible words. Choose a font, color, size and Position. | Readability on light and dark parts of the photo. |
| Arc Text | Set the text and adjust its curved layout. | Letter spacing, arc and placement at full output size. |
| Graphic / Bitmap | Pick a logo or graphic, then set size, tint, opacity and Position. | Transparent edges and the graphic's resolution when enlarged. |
| Vector | Pick vector artwork and adjust its available fill, stroke and backdrop controls. | Fine strokes, colors and scale. |
| Border | Pick border artwork; adjust Size, Inset, color and opacity. | It follows the photo content, including when Resize adds canvas bands. |
| QR Code | Enter the payload, such as a website address, and set size and position. | Scan the finished image with a separate reader before sharing. |
| Signature | Choose or prepare signature artwork through its editor, then position it. | Transparency and contrast against the photo. |
| Lines | Choose the criss-cross line shape and adjust Size, Width, color and corners. | Coverage without obscuring more of the subject than intended. |
| Metadata | Enter Author, Copyright, Keywords or Comments. | These are file information, not visible lettering. Inspect the finished file's metadata. |
| StegoMark | The editor saves a hidden message and password. | Encoding is not available in this Mac beta. Leave this type inactive to export. |
| Resize Photo | Choose the size mode and dimensions. | Output dimensions, aspect ratio and any added canvas bands. |
| Photo Filter | Pick a filter and adjust the controls offered by that filter. | The actual saved image, not just its preview. |
| Redact / Pixelate | Choose a cover or pixelation mode and position its region. | Inspect the exported region at full size. Automatic face placement needs careful review. |
| Export Options | Choose output format, quality and applicable metadata/date/album options. | Actual output type and destination; not every format supports the same information. |
For an understated credit, create a Text watermark with your name, use a modest size, place it near a corner, and compare Engrave or Emboss with ordinary text at lower opacity. A watermark that suits one photo can disappear against another. Preview both a bright and a dark image.
Metadata and dynamic text tags#
Photo Info reads the selected source photo. A Metadata watermark writes fields into the output file. A Text watermark containing tags puts those fields visibly on the image. These are three different jobs.
To copy information from Photo Info → Meta, click one or more rows to check them. Click a checked row again to deselect it. Right-click a checked row and choose:
- Copy for fixed text, for example
FNumber: 10. - Copy tags for variables, for example
FNumber: %CAM_FNUM.
Paste the result into a Text watermark's Text box. Checked rows are copied in their displayed order, one per line. Right-clicking an unchecked row targets that row instead. A normal click only selects; it no longer copies or creates a watermark. Some file-system information has no tag, so Copy tags may be unavailable for it.
You can also click Insert Tag… beneath the Text box. Search by field name or token, inspect the current photo's value, and choose All tags or Available for this photo. Turn Include field names off if you want only the value. Choose a tag to insert it at the caret or replace selected text. Cancel leaves the text unchanged.
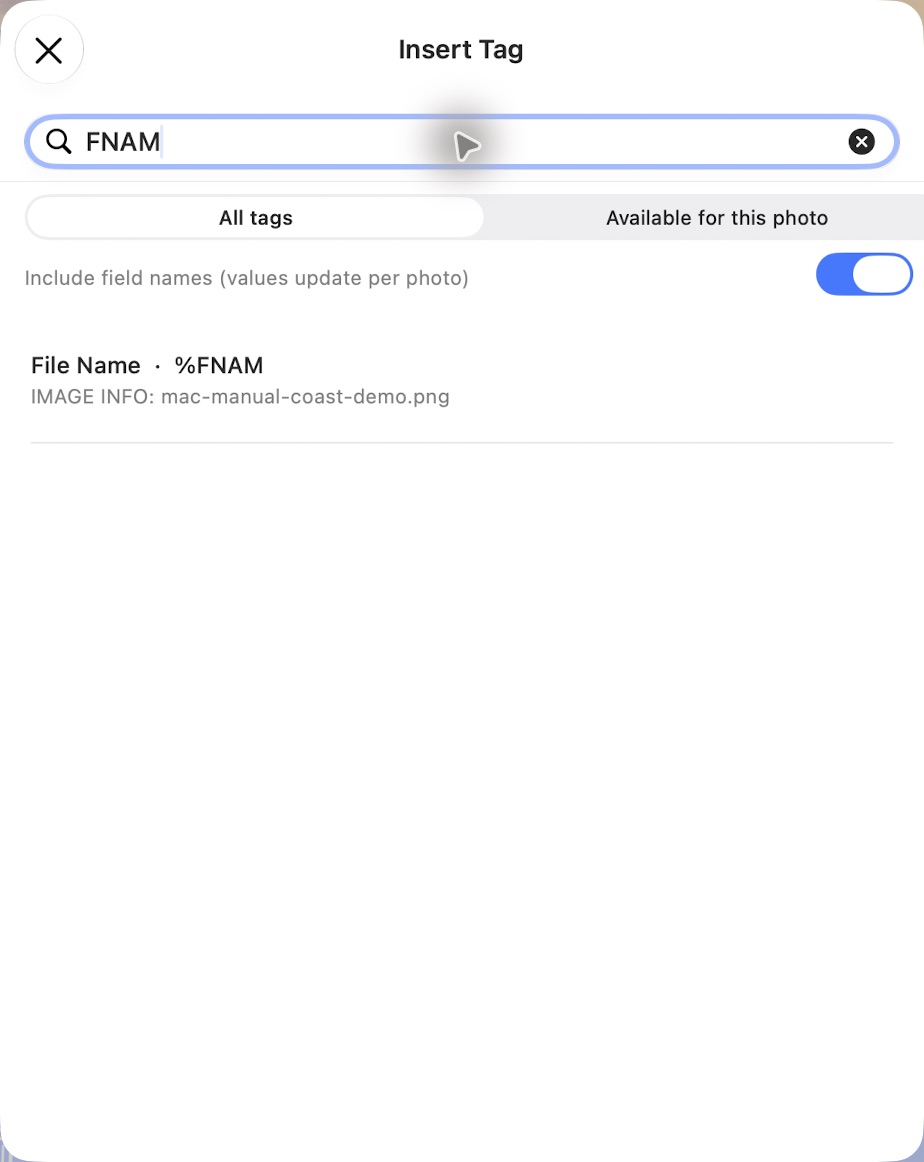
For example, use this Text content:
File: %FNAM
Aperture: %CAM_FNUM | Focal length: %CAM_FOCL
The filename, aperture and focal length change for each photo during a batch. Fixed copied text does not. A missing value can display n/a; check your selection on a photo with and without camera metadata. GPS tags can reveal a location, so include them only when you intend to share that information.
Existing iPhone/iPad tags, including %FNAM, remain compatible. Additional Mac metadata fields may use a token such as %META[{Exif}|ExposureProgram]. These additional tokens currently resolve on Mac only. Do not assume a watermark using them will produce the same result on iPhone/iPad.
Experimental Effects Lab (Mac development build)#
In a Text watermark's settings, scroll below Position and choose Experimental Effects Lab…. This separate preview page lets you compare recessed engraving and raised embossing without changing the saved watermark or exported photos. Start with Subtle cut, Soft emboss, Deep cut, or Color stamp, then adjust Strength and choose Hollow/photo or Colored face. The face-color button opens a picker.
Use Show advanced controls for depth, bevel width, softness, lighting direction/elevation, highlight/shadow strength, fill amount, and placement. Try the actual Photo, Light, Dark, or Texture background and switch Before/After to compare. The sample text is a copy; changing it here does not edit the watermark. Reset restores the current source sample and starting settings.
Save experiment remembers one lab-only recipe for the next visit. Closing without saving discards new lab adjustments. This prototype deliberately has no Apply or Export action. The existing four effects continue to render normally. If the lab is absent in a particular build, use the ordinary Text effect controls instead.
Exporting finished images#
Save one to a Mac file: Select its thumbnail, check the preview and active watermarks, then choose File → Save (⌘S). After rendering, choose the destination and filename in the system save panel. Use Show Export Folder in Finder to find the last saved result.
Share one: Choose Share (⌘⇧S) for the system sharing choices, such as an available app or service. A share destination can have its own permissions and completion behavior.
Copy one: Use Copy Watermarked Image (⌘⇧C) to place the full-resolution watermarked photo on the clipboard. Paste it into an app such as Preview to check the result.
Save one to Photos: Use File → Save to Photos. The app needs Photos permission; macOS may ask the first time. If permission was denied, open System Settings → Privacy & Security → Photos and review access for iWatermark+.
Batch Process All: With two or more items in the tray, click Batch Process All. The current Mac batch path saves to the Photos library, shows processing status, and can be cancelled. It does not ask for a destination for every item. Batch processing begins at the first photo in the tray and uses the active watermark set. Check a few finished items in Photos before trusting a large job. A faster, destination-selectable batch export to a Mac folder is planned but is not part of the current beta.
One-by-one sequence: In the toolbar Export menu, choose Save Current to Photos (One by One). After saving, the app can offer to stay on this photo or process the remaining images as a batch. The ordinary Mac Save action opens a save panel for one result; it is not the same as Batch Process All.
Output settings#
An Export Options watermark can change output behavior, including image type (original/default, HEIC, JPEG, PNG, or GIF), quality, some metadata handling, output album, and date handling. Video options depend on the source and Mac capabilities. Make a small trial export to check the actual file type, dimensions, quality, and metadata before a large batch. Do not assume the imported format will always be the exported format when an Export Options watermark is active.
Useful Mac commands#
| Action | Shortcut |
|---|---|
| Save current watermarked image | ⌘S |
| Share current watermarked image | ⌘⇧S |
| Copy finished image | ⌘⇧C |
| Photo Info | ⌘I |
| Import watermark package | ⌘⇧I |
| Export watermark package | ⌘⌥I |
| Close window | ⌘W |
The Photo Info inspector has File, Image, Credits, StegoMark, and Metadata tabs. It is for viewing information about the selected source; it is not the finished-image export dialog.
Click the sun/moon control to switch the app appearance. Drag a column divider to give the canvas or inspector more space. The color-suggestion popover does not require widening the inspector.
Known limits and troubleshooting#
- Nothing on the canvas: Click a tray thumbnail and allow the image to load. If it remains blank, try a common JPEG or PNG first and note the failing filename/format.
- Fewer tray items than expected: The importer filters by extension; corrupt or undecodable files may be skipped. Compare the import status with the folder contents. Avoid assuming every recognized extension will render correctly.
- Batch results missing from Photos: Check Photos permission and the selected output album. Try a two-image batch before a large job, and report the exact error if it fails.
- “Photos could not open its current library” (error 41015): This is a Photos-library problem, not a missing watermark. Open Photos and check that it can open a working System Photo Library. Until then, use Save Current to File for individual images. Do not move or replace a library without a backup.
- Large batches: More than 2,000 items have been imported into the tray, but a complete 2,000-item live Photos export is not yet release-verified. The test speed reported by development dry runs does not include a real Photos-library save. Keep originals and review a sample of the output.
- Hidden-message export stops: Deselect the StegoMark watermark. Its saved editor content does not mean this beta includes the encoding engine. StegoMark 2 is not part of this release.
- A metadata tag repeats or shows n/a: Make sure the Text box contains a token, not a copied fixed value. Check whether each source photo has that field. Additional
%META[...]tokens are currently Mac-only. - A pixelated or covered face is still recognizable: Review the finished file at full size and adjust the region manually. Do not treat automatic face detection or a preview as a privacy guarantee.
- Video or an unusual format fails: Keep the source unchanged and try a representative JPEG to separate a media-specific issue from general export behavior. Video and mixed-format coverage remain beta limitations.
- An export looks wrong: Recheck which watermarks were active and whether an Export Options watermark changed file type, dimensions, or metadata. Test with one Text watermark to separate general export issues from a particular watermark effect.
- Report a problem: Include the app version/build, source format and dimensions, item count, selected watermark types, destination (file, Photos, or Share), the exact message, and whether it reproduces with a single JPEG.
Privacy and originals#
Your source images remain in their original locations unless you delete them yourself. Importing and removing tray items does not delete those files. Saving to Photos adds output to your library; saving to a file creates an output at the destination you choose. Photos-library access is controlled by macOS. Review any sensitive metadata settings before distributing an exported image.
Permissions and recovery#
If Photos access was denied, review System Settings → Privacy & Security → Photos. A working local System Photo Library is sufficient; do not enable iCloud just to use this app. Until the library is working, save individual results to files.
Choose a new output filename or folder to avoid replacing something valuable. Back up useful watermark definitions as .iw+ packages before changing computers or replacing a beta. Import a package on the destination Mac and check its fonts, graphics, active checkmarks and sample output. Keep your original images separately backed up.
This beta is not a complete migration of the old desktop iWatermark Pro. Do not assume its older presets or every old feature will transfer. Existing manuals and the older app remain separate.
Purchasing and licensing in this beta#
This direct-download beta uses the full-version configuration. It does not provide a verified license-key activation or timed-trial workflow. Do not buy the iPhone/iPad app expecting that purchase to activate this Mac beta. Pricing, store distribution and final licensing will be announced separately by Plum Amazing.
The app family also has free-edition branding logic. When enabled, Created with iWatermark+ is a hollow Emboss mark centered vertically inside the right photo edge, reading bottom-to-top. Its presence in a demonstration does not establish a timed trial or a working Mac purchase flow. It is not automatically added by this full-version Release configuration.
Use the official beta download for updates and check the running build after replacement. An automatic update feed is not established for this beta. For help, use the app's support controls or Plum Amazing support. Never include a password or license key in a public bug report.
Revision history#
| Manual edit date | App version | Changes |
|---|---|---|
| 2026-10-12 | 7.2.7 Mac beta | Updated tray navigation, dynamic tags, watermark reference, permissions, beta licensing and known limits. Preserved the existing chapter order. |
| 2026-10-02 | 7.2.7 Mac beta draft | Existing quick start, workspace, export and troubleshooting guide. |