A Plum Amazing guide for Mac
Clip Notes Manual
Small enough for a thought. Big enough for an idea. Learn to capture, find, format, and keep the little things that matter.
App version 1.0.4 Manual updated 2026-10-10
Small enough for a thought. Big enough for an idea.
Plum Amazing · Clip Notes for Mac · Direct-download edition · macOS 13 or later
This guide follows the Clip Notes 1.0.4 interface, including the five-tab Preferences window. The manual revision date is October 10, 2026. Your version and build appear at the bottom of Preferences. The Preferences ? button, Manual menu commands, and the help action in Shortcuts all give you access to this manual.
Contents#
- Requirements
- Download and install
- Quick start
- The note window
- Writing and formatting
- Colors paper and titles
- Finding saved notes
- Private and locked notes
- Dictation Voice Control and Speech Health
- Learn with Clip Notes
- Calendar alarm and sounds
- Clip Notes inside CopyPaste
- Files and sharing
- Shortcuts Siri and links
- Licensing and purchase
- Updates
- Troubleshooting
- Keyboard shortcuts
- Help and support
- Revision history
Welcome to Clip Notes#
Clip Notes gives you the scrap of paper you always wished was nearby: a colorful note that appears instantly, floats above your work, and stays where you put it. Use one for a phone number, reminder, recipe, name, idea, poem, quote, chore, list, goal, password, meeting, piece of code, or any other small but important thing.
A note can remain a familiar sticky or transform into a half-page workspace. It can use rich text or live Markdown, accept Apple Dictation or Voice Control, show a calendar, set a playful pendulum alarm, and open a reviewed lesson as a group of illustrated cards.
Clip Notes is available as its own Mac app and is also built into the Mac app CopyPaste.
Think of an ordinary note as a small piece of working memory: close its window when it is in the way, then find it again when it matters. A lesson card is different. It is temporary teaching material until you explicitly keep it in your notes.
Requirements#
- macOS 13 Ventura or later.
- Apple silicon or Intel Mac.
- An internet connection is needed to download Clip Notes, check for updates, activate a license, and open online help. Notes and the included lessons work locally.
Download and install#
- Download Clip Notes from plumamazing.com/clip-notes.
- Open the downloaded archive or disk image.
- Move Clip Notes to the Applications folder if macOS or the app asks you to do so.
- Open Clip Notes. Its sticky-note icon appears in the menu bar.
Success looks like this: the icon is visible at the top of the screen, and New Clip Note opens a writable note. If the first-run tour appears, you can explore it or close its cards and make your own note.
Clip Notes prevents duplicate copies of itself from running. If you open another copy, the existing app comes forward instead of adding another menu-bar icon.
Quick start#
Make a note#
For a first experiment, use a harmless reminder rather than something you cannot afford to lose:
- Hold Option and click the Clip Notes menu-bar icon.
- Type
Lunch: avocado, lime, and a little courage. - Drag the note by its title bar to an unused corner of your screen.
- Click its X, then choose Recent Notes from the menu-bar menu and reopen it.
Expected result: the reminder returns with its words intact while the tryout or a license allows permanent saving. Closing a filled note clears the screen; it does not delete the note. During free mode after the tryout, session changes are temporary—see Licensing and purchase.
To undo a text change, press Command-Z. To remove this practice note permanently, choose ☰ → Delete This Note and confirm only after checking that you selected the practice note.
Other ways to create a note:
- Hold Option and click the Clip Notes icon in the menu bar. A new note appears immediately without opening the menu.
- Or click the menu-bar icon and choose New Clip Note.
- Or press Command-N while Clip Notes is active.
The first time a new installation opens with an empty library, Clip Notes creates a sticky-size welcome note below its menu-bar icon. An arrow points to the icon. After a short pause, the note types its unusually comma-rich introduction, then offers More?. You set the pace of the rest of the tour.
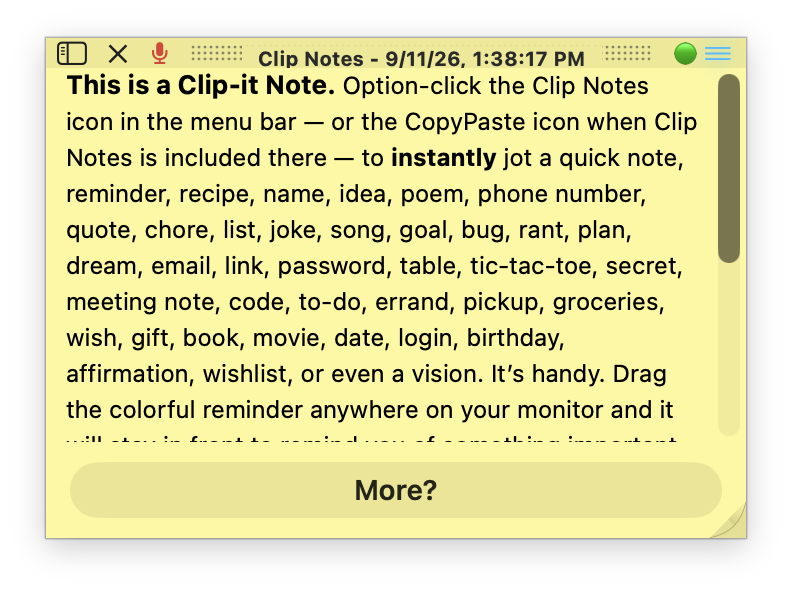
When the introduction finishes, click More? for an optional nine-card tour. Each card waits for you before moving on. The tour uses colorful notes to show you how to:
- Make and close notes.
- Open the note menu and saved-notes drawer.
- Write a recipe, preview Markdown equations, and include an SVG picture.
- Expand a sticky into a larger workspace with Control-T.
- Open Preferences and close a group of notes with Option-click X.
The last cards disappear one by one with a soft pop, leaving a fresh note that says Now it’s up to you. Enjoy! You can replay the tour from the Clip Notes menu-bar menu, any note’s ☰ menu, or Show Onboarding Again in Preferences.
Write, place, and close it#
Type normally, drag the title bar to place the note anywhere, and resize it from its edges. Notes float above other windows by default. Click X when you no longer need one on screen. A note containing text is saved automatically; a completely empty note is discarded when closed.
Transform a sticky#
Press Control-T to expand the active sticky into a half-page note. Press Control-T again to return it to sticky size. The text and formatting remain the same—only the workspace changes.
The note window#
Pause the pointer over any control to see a tooltip explaining it.
- Notes-list icon: shows or hides saved notes beside the current note.
- X: closes the note. On a lesson card, Option-click X closes the entire lesson with a gentle half-second card-by-card animation.
- Microphone: starts or stops Apple Dictation, or focuses the note for Voice Control, according to Preferences → Dictation.
- Status ball: tells you whether the note is saved and where it is stored.
- ☰ menu: contains color, text size, Markdown, privacy, export, transformation, the introductory tour, the manual, and other note commands.
- Undo / Redo: appear near the top of the ☰ menu and follow the active rich-text or Markdown editor.
- Date in the title: opens the calendar when the calendar feature is enabled.
- Time in the title: opens the pendulum alarm when the alarm feature is enabled.
The note menu#
Click the ☰ icon at the upper right of an ordinary note to open Note Settings. The heading identifies the menu; it is not itself a command.
- Undo: reverses the most recent text edit. It is dimmed when there is nothing to undo. Shortcut: Command-Z.
- Redo: restores the most recently undone text edit. It is dimmed when there is nothing to redo. Shortcut: Command-Shift-Z.
- Color: changes the paper color of this note. It does not change the default color for future notes.
- Text Size: changes this note to Small, Medium, Large, or Extra Large text.
- Transform Clip Note / Restore Sticky Size: switches between the compact sticky and half-page workspace without changing the note’s contents. Shortcut: Control-T.
- Speech Input: starts or stops the Apple speech method selected in Preferences → Dictation. The name and shortcut shown here reflect the current speech settings.
- Markup: chooses how this note handles Markdown:
- Off (Rich Text) uses the normal formatted editor.
- Edit Markdown shows the Markdown source for writing.
- Split View shows the source and rendered result together.
- Preview shows the rendered result for reading.
- Make This Note Private / Remove Privacy: locks or unlocks the note using the Mac’s device-owner authentication.
- Save to CopyPaste: adds the note to CopyPaste History. This command appears only while CopyPaste is running.
- Export as .cpnt File…: saves a portable Clip Notes document that can be reopened or shared.
- Delete This Note: permanently removes the note from the database after asking for confirmation.
- Preferences…: opens General, Appearance, Dictation, Markup, and Purchase/License settings.
- Take the Clip Notes Tour…: starts the animated introduction again.
- Manual…: opens this manual in your web browser.
Tour cards and lesson cards use shorter menus containing only the commands that apply to those temporary cards.
The main menu#
Click the Clip Notes icon in the Mac menu bar to open the main menu. From here you can create or open a note, search your notes, start a lesson or replay the tour, control speech input, check for updates, buy or license Clip Notes, open Preferences, read this manual, or quit the app.
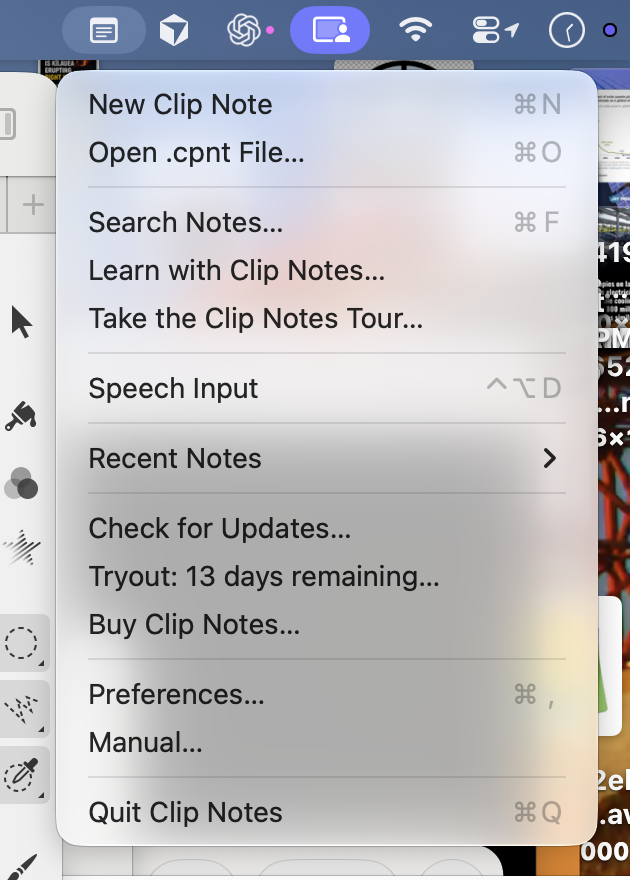
- New Clip Note: creates a new note in the default color and size. Shortcut: Command-N.
- Open .cpnt File…: imports a previously exported Clip Notes file and opens it as a note. Shortcut: Command-O.
- Search Notes…: opens the searchable list of saved notes. Shortcut: Command-F.
- Learn with Clip Notes…: opens the collection of colorful, step-by-step lessons included with the app.
- Take the Clip Notes Tour…: replays the animated introduction to notes, menus, Markdown, pictures, saved notes, Preferences, and other features.
- Speech Input: brings the most recent note forward and starts or stops the Apple speech method selected in Preferences → Dictation. If no note is open, Clip Notes creates one first. The shortcut shown at the right reflects your current speech setting.
- Recent Notes: opens a submenu containing up to ten recently changed notes. Select one to bring it back to the screen; the bottom of the submenu also shows how many notes are stored.
- Check for Updates…: asks Sparkle to check whether a newer version of Clip Notes is available.
- Tryout / License status…: shows the days remaining in the tryout, confirms that Clip Notes is licensed, or explains free mode. Select it to open Preferences → Purchase/License.
- Purchase/License Clip Notes…: opens the same Purchase/License tab. Purchase at the top opens the secure store; License below accepts your key or manages the current activation.
- Preferences…: opens the five-tab settings window. Shortcut: Command-comma.
- Manual…: opens this Clip Notes manual in your web browser.
- Quit Clip Notes: closes the application. Notes containing text are saved automatically when permanent saving is available. Shortcut: Command-Q.
Writing and formatting#
Rich text#
The default editor behaves like a familiar Mac text field. Right-click inside a rich-text note for Bold, Italic, Font…, and a useful set of Font Size choices; the normal Mac spelling, substitution, and clipboard commands remain in the same menu. You can also use the Edit and Format menus or familiar shortcuts such as Command-B and Command-I.
Markdown#
Choose ☰ → Markup in a note. Each note remembers its own mode:
- Off (Rich Text): the classic formatted editor.
- Edit Markdown: write and edit Markdown characters directly.
- Split View: edit the source and see the rendered result together.
- Preview: see the rendered result.
Clip Notes supports GitHub-Flavored Markdown, including headings, emphasis, links, lists, tables, code, blockquotes, formulas, and lightweight SVG illustrations. Choose the default mode for new notes in Preferences → Markup.
Markdown images can use an HTTPS address or an illustration bundled with a Clip Notes lesson. A relative file path such as manual-images/picture.png is not currently resolved because an ordinary note does not retain the folder location of a Markdown document.
A small Markdown recipe#
Create a practice note, choose ☰ → Markup → Edit Markdown, and enter this teaching example:
# Papaya guacamole

- 1 ripe avocado
- 2 tablespoons diced ripe papaya
- Lime juice and a pinch of salt
- A little grated ginger
- A tiny pinch each of turmeric and cardamom

Mash the avocado, fold in the fruit, then taste before adding more spice.

**Remember:** lime first, enthusiasm second.
Choose Split View to compare the source with its formatted result. The heading, ingredients, and bold reminder remain editable text. Return to Edit Markdown to change a quantity. This is a demonstration recipe; adjust ingredients to your taste.
Equations without making a picture#
In a Markdown practice note, try a display equation:
$$
\nabla \cdot \mathbf{E} = \frac{\rho}{\varepsilon_0}
$$
Choose Preview. The symbols describe the relationship between electric charge density and the divergence of an electric field. Return to Edit Markdown to change the source. The lesson library includes more worked scientific examples; you do not have to learn the notation before making a useful sticky.
Keeping text comfortable#
Use ☰ → Text Size for a quick size change, or right-click in rich text for Font Size and Font…. Control-T gives a longer idea more room. If you use Markdown, formatting characters remain visible in Edit mode; Preview shows their result. A URL or image reference still depends on its destination being available.
Colors paper and titles#
Use the note’s ☰ menu to change that note’s color or text size.
In Preferences → Appearance you can choose:
- A default color for new notes.
- Classic light paper, paper that matches the Mac’s Light/Dark appearance, or always-dark paper with light text.
- A title bar showing date and time, the app name, no title, or your own custom title for newly opened notes.
- A monochrome or yellow menu-bar icon.
In Preferences → General you can choose:
- Launch at login to have Clip Notes ready after signing in to your Mac.
- Whether notes always float above other windows.
- Whether clicking the date or time opens the calendar or alarm.
- Whether Clip Notes plays sounds.
- Show Onboarding Again to close Preferences and replay the animated welcome note and tour from the beginning.
Find the right Preferences tab#
| Tab | What belongs here |
|---|---|
| General | Updates, startup, sounds, replaying the tour, window behavior, calendar/alarm switches, and note search. |
| Appearance | Title Bar, Default Note Color, Paper in Light / Dark Mode, and Menu Bar Icon. |
| Dictation | Apple speech mode, the microphone button, the optional app shortcut, Speech Health, and permission guidance. |
| Markup | The default editing/preview mode for new notes. Individual notes can choose their own mode. |
| Purchase/License | Purchase, tryout status, activation, re-validation, and deactivation. |
Defaults apply to future notes where the control says so. A note's own Color and Markup choices belong to that note. To recover comfortable paper, choose Appearance → Always light paper (classic sticky) or Match Mac Light / Dark. To reduce distraction, turn off Sounds in General. You do not need to erase your settings or your library.
Finding saved notes#
Click the notes-list icon in a note title bar, choose Search Notes… in Preferences, or press Command-F.
The notes list opens to the left so it does not cover the paper:
- Click its X to close the list.
- Double-click a note to open it in another window.
- Use the checkboxes and pencil to open selected notes.
- Use the checkboxes and trash to delete one or several notes.
Close and delete are different. X hides a note window. Trash and Delete This Note remove stored content. Read the confirmation before deleting; there is no documented trash folder or undelete command for notes. Export important notes before a cleanup.
Try keeping a recipe, a poem, and a reminder with distinctive first lines. Search for a memorable word instead of trying to remember where you left the window.
Private and locked notes#
Choose ☰ → Make This Note Private to protect a note. Clip Notes asks for device-owner authentication—normally Touch ID on a supported Mac, or the Mac login password—and hides the note until it is unlocked.
Private notes are not offered to Siri or Spotlight. CopyPaste clipboard history is never indexed into Spotlight. A lock protects a note from casual viewing inside Clip Notes; continue to use a dedicated password manager for critical passwords, recovery codes, and financial credentials.
Privacy is an in-app viewing lock. Do not assume an exported .cpnt file is encrypted or keeps the note's private flag. Share an exported file only when you are comfortable sharing its contents.
Dictation Voice Control and Speech Health#
Choose Preferences → Dictation → Apple Speech Mode:
- Automatic (recommended): Clip Notes asks macOS Dictation to start. If macOS does not accept the request, Clip Notes explains how to use Voice Control or Speech Health.
- Apple Dictation: the microphone button starts or finishes standard macOS Dictation in the active note.
- Voice Control: Clip Notes focuses the note and leaves the always-listening microphone entirely to Voice Control. Say “Wake up” or “Dictation mode” when needed.
Apple makes standard Dictation unavailable while Voice Control is enabled because Voice Control supplies its own dictation. Clip Notes does not secretly change either Apple setting, keep an audio engine running, use a private Apple Dictation manager, or send a system-wide Escape key.
Open Speech Health… shows Clip Notes’ selected behavior, microphone permission, default sound input, and last speech request. Its buttons open Apple’s Dictation, Voice Control, and Sound Input settings. macOS does not publicly identify the application currently using the microphone, so Clip Notes says what it can verify rather than guessing.
Apple’s system-wide shortcut—such as double-Fn—is often the most convenient choice because it works in Clip Notes and other editable Mac fields, plays Apple’s start and stop tones, and remains under Apple’s control. Clip Notes cannot read or change that shortcut through a supported macOS API.
The optional Clip Notes-only shortcut defaults to Control-Option-D. You may choose Control-Option-Space or disable it so Clip Notes does not collide with Voice Control, yKey, or Transcriber. If another utility claims Hold Option or Double-Tap Option, choose a different shortcut in that utility so Option-click can keep making instant notes.
Privacy and connectivity#
Your ordinary notes are held in Clip Notes' local library. The included lessons and their search work locally. Online image addresses and links contact their destinations when opened or loaded. Downloading, update checks, online help, purchases, and license operations need a connection.
Apple manages the microphone and processing for Dictation or Voice Control. Review their permissions in System Settings → Privacy & Security and their own settings. Clip Notes' Speech Health links help you reach those controls. Clip Notes does not provide its own always-listening speech recorder.
Learn with Clip Notes#
Choose Learn with Clip Notes… from the menu-bar menu. Type a single word such as Interest, Loans, or Gravity, or ask an ordinary question. Search covers lesson titles, summaries, keywords, topics, objectives, and card text. Clip Notes finds reviewed lessons locally; it does not send the question to an online AI.
Lesson cards can contain Markdown, formulas, lightweight SVG pictures, exercises, and a memorable quotation. Use the card menu to keep a useful card as one of your own notes. Close cards individually, choose Close Entire Lesson, or Option-click any lesson card’s X.
The first experimental library contains ten lessons. After the tryout, Interest, Loans, and Gravity remain available as repeatable samples.
The separate Take the Clip Notes Tour… command is a short lesson about the app itself. Its temporary cards gather around the screen while you progress, but they are never added to your saved notes.
Calendar alarm and sounds#
The calendar and pendulum alarm are playful conveniences. Both are on by default and can be turned off separately in Preferences → General → Behavior.
- Click the date in a note’s title to show or hide the calendar.
- Click the time to show or hide the pendulum alarm.
- Use the Sounds switch at the top right of General Preferences to silence Clip Notes without disabling the calendar or alarm.
Clip Notes inside CopyPaste#
The direct-download edition of CopyPaste includes Clip Notes inside its app package. You do not need to install Clip Notes separately to use it there.
- Hold Option and click the CopyPaste icon in the menu bar to make a sticky without opening the clip menu.
- Or press Control-N, or choose Clip Note in the CopyPaste menu.
- Save to CopyPaste in a note’s ☰ menu adds the note to CopyPaste History when CopyPaste is running.
- Existing CopyPaste History items that are Clip Notes, and
.cpntfiles, open in Clip Notes.
While a CopyPaste note is open, no separate Clip Notes menu-bar icon appears. This is intentional helper behavior. A direct-download CopyPaste license also unlocks Clip Notes.
The Mac App Store edition of CopyPaste does not currently include the nested Clip Notes app. It continues to use CopyPaste’s built-in sticky-note path. You can also install and run standalone Clip Notes from Applications.
Files and sharing#
Clip Notes documents use the .cpnt extension. Choose ☰ → Export as .cpnt File… to make a portable copy. Open one with Command-O or by double-clicking it in Finder. The URL scheme is clipnote://.
Export and reopen a practice note#
- Open the reminder you made in Quick start.
- Choose ☰ → Export as .cpnt File….
- Choose a recognizable filename and a folder you can find again. If a file already exists, review the save dialog before replacing it.
- Choose Open .cpnt File… and select the exported file.
Expected result: an imported note opens with the exported text, rich-text data when present, title, and paper color. Import creates a note; it does not merge with the original.
The file format does not preserve every library attribute: private status, note identity, window placement, and the chosen Markdown mode are not exported by the current .cpnt writer. For a Markdown note, keep the source text and reselect the appropriate Markup mode after importing.
Backups and moving Macs#
Export especially important notes before reinstalling, moving Macs, or deleting notes. Use the status ball in a note to see the library's actual location instead of assuming a fixed folder. Include the library in your normal Mac backup, and close Clip Notes before making a manual copy of its database files. A single .cpnt export is a portable note, not a backup of the whole library or its privacy settings.
Shortcuts Siri and links#
Clip Notes provides actions for Apple's Shortcuts app on supported Macs. Open Shortcuts and search its action list for Clip Notes. A normal non-private note is a selectable item; private notes are excluded from these searches.
| Action | Input and result |
|---|---|
| New Clip Note | Optional Title and Text fill a new note. Returns a confirmation string. |
| Open Clip Note | Takes a selected Note and opens it; private notes cannot be selected this way. Returns a confirmation string. |
| Find Clip Notes | Takes Search Text and returns matching non-private note items, up to 15. |
| Search Clip Notes | Opens Clip Notes' search window and returns a confirmation string. |
| Dictate in Clip Note | Requests speech input in the latest note, creating a note if needed. Apple settings and the selected speech mode still determine what starts. |
| Open Clip Notes Preferences | Opens Preferences and returns a confirmation string. |
| What Clip Notes Can Do | Returns a short text description of Clip Notes and the full manual address. |
A reusable packing note#
- In Shortcuts, make a new shortcut named Packing note.
- Add New Clip Note.
- Set Title to
Packingand Text toCharger, glasses, book, and tickets. - Run the shortcut with Clip Notes available on the Mac.
Expected result: a new note opens containing your list. The action returns confirmation text; it does not return a portable .cpnt file. Repeated runs make new notes. Close the practice notes when finished, or delete them deliberately from Clip Notes.
If the action cannot find the app, open Clip Notes and try again. If a note is private, open it directly in Clip Notes and authenticate rather than asking Siri to bypass the lock. Siri phrases and Shortcuts presentation depend on macOS; the explicit action names above are the most useful starting point.
Links from other tools#
The clipnote:// scheme lets a launcher open Preferences or create a note. These examples use invented demonstration text:
clipnote://new?title=Packing&text=Charger%2C%20glasses%2C%20book
clipnote://preferences
Encode spaces, punctuation, and non-ASCII text as URL query values when building links. Opening the first link creates a note, so avoid invoking it repeatedly by accident. Links contain readable text; keep passwords and private information out of URLs and shared shortcut definitions.
Licensing and purchase#
Try Clip Notes#
The standalone app starts with a 15-day, full-featured tryout. No account, ads, or payment method is required. Preferences → Purchase/License shows how many days remain. The tryout starts on first launch.
After the tryout:
- Existing saved notes remain safe and frozen.
- Notes and edits still work during the current session but disappear when you quit.
- Preferences return to their defaults on the next launch.
- Interest, Loans, and Gravity remain available as sample lessons.
Buy Clip Notes#
- Click the Clip Notes icon in the menu bar and choose Purchase/License Clip Notes…. The tryout/license-status item opens the same tab.
- Under Purchase, click Purchase Clip Notes… to open the secure checkout. Review the currently offered plans, prices, and terms there before purchasing.
- Keep the receipt email from Lemon Squeezy. It contains the license key you will use to activate the app.
You can also open the secure Clip Notes purchase page directly.
Activate your license#
- Open Preferences → Purchase/License, using either the tryout/status item or Purchase/License Clip Notes… in the main menu.
- Paste the license key from your Lemon Squeezy receipt.
- Click Activate. Clip Notes confirms that this Mac is activated and restores permanent saving and the complete lesson library.
The License section shows the licensed name and email, the masked license key, and the license type or expiry information. Click Re-validate to check the saved license again. An internet connection is required to buy, activate, re-validate, or deactivate a license. Do not assume an unlimited offline entitlement; retain your receipt and use Re-validate when the app requests a check.
If you use the direct-download edition of CopyPaste, its license also unlocks the included Clip Notes app automatically.
Purchase choices and recovery#
| Choice | How Clip Notes gets access |
|---|---|
| Standalone tryout | All features for 15 days, followed by the temporary-session behavior described above. |
| Standalone license | Activate with the key in the Lemon Squeezy receipt. The app recognizes subscription and lifetime licenses; the current store defines the plans actually offered. |
| Qualifying direct-download CopyPaste | The included helper recognizes CopyPaste's license. This is different from CopyPaste's Mac App Store edition. |
To move a standalone activation, export or back up important notes, then click Deactivate this Mac on the old Mac before activating on the new one. Wait for confirmation; an unsuccessful deactivation leaves the local license intact so you can retry. Deactivation releases this Mac's activation. It is separate from canceling a subscription or requesting a refund.
If you have lost the key, find the Lemon Squeezy receipt for the purchase or contact Plum Amazing support with the purchase email and order information. Do not post the full key in a screenshot or public message. Device limits, renewal terms, refunds, and upgrade eligibility come from the purchase terms and support; this manual does not invent a universal allowance.
Updates#
Choose Check for Updates… from the Clip Notes menu or General Preferences. Clip Notes checks the signed Sparkle update feed and tells you whether a newer version is available. Release notes are also available at plumamazing.com/clip-notes/changelog.
Read the version and build at the bottom of Preferences when comparing a download with a manual or reporting a problem. CopyPaste's included helper and a separately installed app can be different builds. After an update, open the copy you intend to use and check again. Back up important notes before moving between older and newer builds.
Troubleshooting#
Option-click does not make a note#
Confirm that Clip Notes is running and that you are clicking its menu-bar icon while Option is already held. If another utility watches a held or double-tapped Option key, change that utility’s shortcut and try again.
Speech does not start#
Open Preferences → Dictation → Open Speech Health…. Check the selected speech mode, microphone permission, and sound input. Voice Control and standard Dictation cannot run at the same time; choose the mode that matches the Apple feature currently enabled.
A note is missing from the list#
Completely empty notes are intentionally discarded. During an expired tryout, notes and edits made in the current session are temporary until the app is activated.
More than one menu-bar icon appears#
Quit all old development or copied builds, then open the copy in Applications. Current Clip Notes prevents a second instance from remaining open.
A Markdown image is blank#
Check whether its address is HTTPS and available online. An ordinary note cannot resolve a relative path beside a Markdown file. Try the address in a browser, or keep the text usable without the picture. The included lesson illustrations have their own bundled image provider.
The note disappeared, but I did not delete it#
Look in Recent Notes or Search Notes…. X closes a window; it does not erase a filled note. A lesson or tour card is temporary unless you kept it. During an expired tryout, new session content is not saved across quitting.
Activation or deactivation failed#
Check the connection and the key from the correct product receipt, then read the status message in Purchase/License. Retry Re-validate for a saved key. If deactivation cannot be confirmed, contact support before deleting local license information; that preserves the record needed to release the activation.
An imported note looks different#
The .cpnt format carries text, rich text when present, title, and color. Reselect a Markdown mode if necessary. The file does not carry the private lock or window placement. Keep the original file while you check the imported result.
Keyboard shortcuts#
| Shortcut | What it does |
|---|---|
| Command-N | Create a new Clip Note. |
| Command-O | Open a .cpnt file. |
| Command-F | Search saved notes. |
| Command-, | Open Preferences. |
| Command-Q | Quit Clip Notes. |
| Command-Z | Undo the last text edit. |
| Command-Shift-Z | Redo the last undone edit. |
| Command-B / Command-I | Bold / italic in the rich-text editor. |
| Control-T | Transform the active sticky to half-page size, or restore it. |
| Control-Option-D | Default optional Clip Notes speech shortcut. |
| Command-W | Close the current lesson card. |
Option-click the menu-bar icon makes a new note. Option-click a lesson card's X closes that lesson one card at a time. These are app gestures; Apple's Dictation shortcut is configured separately in macOS.
A small glossary#
| Term | Meaning here |
|---|---|
| Clip Note | An ordinary editable note in your library. |
| Sticky / half-page | Two sizes of the same note, switched with Control-T. |
| Drawer / notes list | Saved notes shown beside the active note. |
| Markdown | Plain text with formatting notation. Markup is the label of the mode menu and Preferences tab. |
| Lesson card | A temporary teaching card; Keep This Card in My Notes makes a personal copy. |
.cpnt |
A portable Clip Notes file; it is not a complete library backup. |
| Private | An in-app lock requiring device-owner authentication. |
| Tryout / free mode | Full access for 15 days, then temporary session editing until activation. |
Help and support#
- Manual: plumamazing.com/manual/clip-notes
- Product page and download: plumamazing.com/clip-notes
- Support: plumamazing.com/support
- Release notes: plumamazing.com/clip-notes/changelog
Clip Notes is made by Plum Amazing.
When asking for help, include your Clip Notes version/build, macOS version, whether it is standalone or running inside CopyPaste, the steps you took, and what you expected versus what happened. A cropped screenshot can help. Hide note contents, license keys, email addresses, and other private details that support does not need.
Revision history#
| Manual date | App scope | What changed |
|---|---|---|
| October 10, 2026 | Clip Notes 1.0.4 for Mac | Adopted the Plum Amazing manual standard and web reader; corrected Preferences/purchase paths; added first-success exercises, Markdown examples, Shortcuts and link reference, file/privacy limits, backup and license recovery guidance. Help controls and the Shortcuts help action provide the current manual. |
| September 11, 2026 | Clip Notes 1.0.3 for Mac | Expanded the original manual with the welcome tour, lesson library, speech settings, menus, screenshots, and licensing. |