Overview
Create, Practice, Hear, Archive and Give Speeches – Speechmaker is software to make your iPhone/iPad or Android device into a mobile podium, notebook, archive of speeches and professional teleprompter for public speaking.
In addition to speeches use it to hold, practice and read poems, lyrics, scripts, comedy, lectures, sermons, plays, etc.
SpeechMaker is very popular with students, teachers, politicians, directors, poets, lecturers, ministers, authors, playwrights, speechwriters, scriptwriters, toastmasters, comedians, singers and actors. SpeechMaker gives all kinds of orators everything needed to create, practice, hear and give speeches.
See and hear how you sound before delivering that important speech by using audio or video recording. Get a feeling for the cadence and the flow of your speech, poem, lecture, etc.
Search for keywords and find speeches in the built in database of thousands of famous speeches. SpeechMaker comes with 1000+ speeches and can archive more which can include additional info like title, author, date and audio/video recordings.
SpeechMaker Features
- Buy once to run on both iPhone/iPad or Android phone/tablet.
- Buy once and your whole family can share it using Apple’s Family Share.
- Beautiful UI and flat graphics for iOS 7 and Android
- Dictate your speech to Siri to enter directly into Speechmaker.
- Speak out loud use option Siri voices, gender, language and simultaneously see each line of the speech highlighted as it autoscrolls.
- Import text, rtf, and pdf via DropBox, Google Drive, and Copy and Paste.
- Export speech text via Email.
- Import and export audio and video via Dropbox and Google Drive
- Audio/Video recording allows you to get feedback as you practice your speech.
- Use like a teleprompter to control, autoscroll your speech and project on larger screens.
- Select from one of 36 different languages and Siri voices
- With the flip of a button see verbs, nouns, adjectives and other parts of speech highlighted in different colors
- Control the look of a document by changing, background color, fonts, scroll speed, size, etc.
- Buttons and gestures to start, stop and control scroll speed
- Touch gestures:
- pinch or zoom to change font size
- grab and move instantly to any part of a speech
- + tap the right side to speed scrolling. tap the left side to slow scrolling
- At a glance timing for a speech shows time elapsed, time remaining and estimated time.
- Display on AppleTV connected HD monitors for TV stations, studios, auditoriums, podcasters, lecture halls and plays.
Read, correct, give, play and record speeches anytime and anywhere. No need to rely on notes on napkins or index cards.
Keep your speeches with you at all time, secure and available to use at any moment. Easily change and give speeches at the last minute.
Getting Started
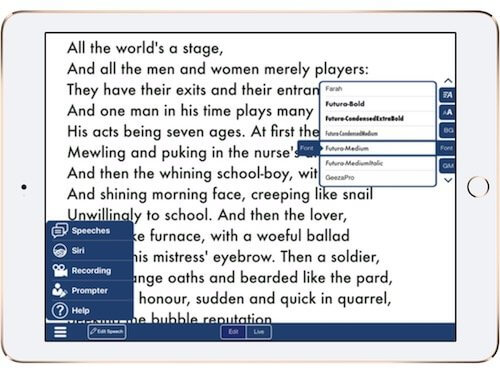
Below is a screenshot of SpeechMaker. It works in portrait and landscape mode on both iPhone and iPad. It has 2 main options, you can enter either Live Mode or Edit Mode.
Live Mode for giving Speeches or Edit Mode for editing speeches. All the different features/settings can be found under one or the other.
These two modes, Edit and Live, are key to working with SpeechMaker. You will find yourself switching back and forth by tapping one or the other.
Hit the Live button to give a real or practice speech. In Live Mode see the timers and be able to Autoscroll, Record audio or video or hear the speech spoken aloud by Siri.
Tap the Edit button to edit the speech, change the font, size, voice, etc. and also change various default settings.
Live Mode
Tap the Live button is when you want to give a speech. In the bottom navigation bar you will see these buttons from the left. The first pair is Edit/Live. When one is on the other is off.
![]()
When Live is selected then you will see these buttons in the bottom nav bar:
Edit – this button is unselected. Tapping it takes you to the Edit Mode. Edit allows editing all kinds of settings voice, font, size, background, etc.
Live – this should be the button currently selected if not tapping it takes you to Live Mode. Live is like a headsup display for giving a speech. Timers at the top.
Siri – selecting this starts siri highlighting lines of text and speaking aloud the currently selected speech. Siri will countdown to start.
Rec – short for recording gives you a choice of audio or video recording.
Autoscroll – automatically scrolls the speech at a particular speed.
TIP: Change the scroll speed manually by tapping anywhere on the left side for slower and on the right side for faster.
![]()
In Live mode the ‘Live Timers’ will appear in the top nav bar. Starting from the left the first shows ‘Estimated Time’. The next time ‘Elapsed Time’ and the on the right top ‘Time Remaining’.
Edit Mode
When you choose Edit mode you see the bottom nav bar (above).
![]()
There you have again the choice of Edit or Live, Edit Speech and the icon that looks like 3 horizontal lines opens a side menu which looks like this (below) and allows selecting Speeches, Siri, Recording, Prompter, and Help.
The middle button is the Edit Speech button which edits the speech you have currently selected. To create a new speech select speeches from the slide in panel below. Another option to enter a new speech or edit and old one is to dictate into SpeechMaker using Siri by hitting the microphone button next to the spacebar on the virtual keyboard.
Two new buttons are from the left the icon that looks like 3 horizontal lines slides open a side menu which looks like this.
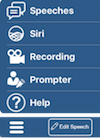
These 5 are discussed below.
Speeches
The Speeches panel (below) is available in Edit Mode. Here you can select a speech with a tap, create, import, export and delete a speech. Create, Import, Export and Delete are discussed more below.

Create – allows you to create your speech. Remember you can hit the dictation key to the left of the keyboard.
Import – speeches from google or dropbox. 4 files can be imported, text, RTF, PDF and HTML.
Share – via email or Facebook. If you want more let us know.
Delete – selecte and tap to delete a speech.
To the right of each speech (above) tap on the blue (i) button to the right of each title to see the dialog below which allows editing the author, orator, location, date and time details (below).
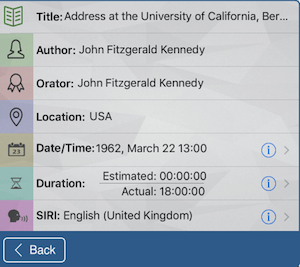
Choose the blue (i) button to the right of Date/Time, Duration or Siri to change the settings for those.
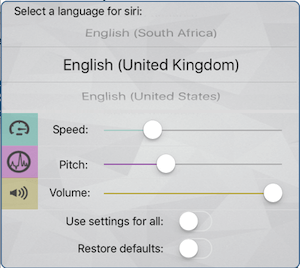
Select the blue (i) button to the right of SIRI to see the dialog below to change the language, speed, pitch and volume. These settings can be made for that one speech or the default for all speeches by setting the ‘Default for all’ button.
Select the blue (i) button to the right of SIRI to edit settings for Duration and Date in the same way.
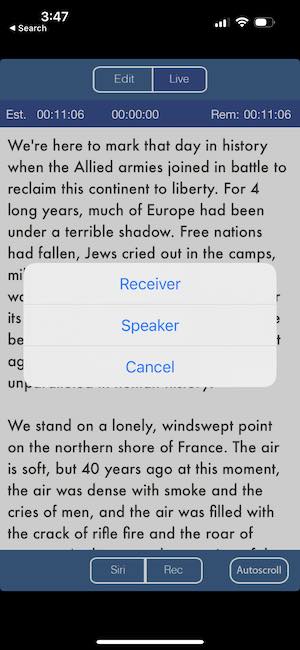
Audio
To route the audio to the speaker, headset or bluetooth do this. When the app is first opened it opens to the ‘Edit’ view. At the top tap on ‘Live’ and it looks like this below. If it doesn’t quit the app and restart. Tap receiver to send to your headset, earphones or bluetooth. Select speaker for the iPhone’s speaker.
SIRI
Siri can be set for an individual speech in the above dialog but can be called up for a speech from the slide in menu too.
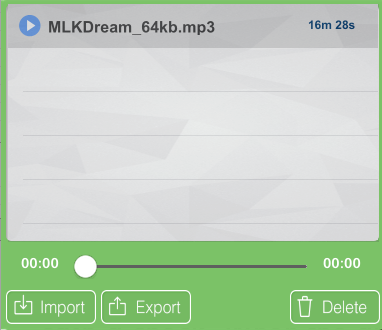
Import audio in mp3 or .caf format.
Export your audio recording thru email select the audio and hit the export button.
Rec
Rec or the Record button in Live view will also do a countdown then start autoscroll and will record audio. When you hit stop it will save the file and put in the Soundwave dialog for you to play, export or delete.
Click on the record audio button to start recording and autoscroll simultaneously. Speeches are titled:
01.11.10 ? 15-20-58.caf
This stands for the date and time of the start of recording. The extension .caf is an apple sound file format.
Prompter
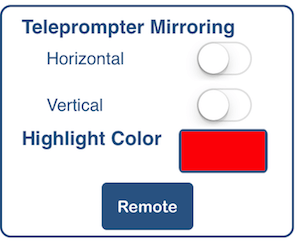
The teleprompter settings slide in from the left and allow:
Horizontal – mirrors the text horizontally.
Vertical – mirrors the text vertically.
Changing the highlight color – that is the highlight color of text during autoscrolling in Live Mode.
Autoscroll

In the Live view if you hit the Autoscroll button the speech will start scrolling at the speed you chose. To increase the speed tap on the right. To decrease the speed tap on the left side of the screen. This icon will appear on the screen to give you scroll speed feedback.
Speech Controller
In ‘Edit Mode’ you see the Speech Controller side menu seen on the right side of the speech. This menu can be moved up or down by dragging the top and bottom arrows. See the screenshot below.
Each of the buttons (show on the right on your iOS device) opens like a drawer.
![]()
1. Speed of scrolling
2. Font size
3. BG
4. Font
5. GM
1. Speed of scrolling – tap & drag to set default scroll speed for speech in Live Mode.
2. Font size – drag to set font size.
3. BG – select color of background.
4. Font – select the font.
5. GM – grammar. Make the parts of speech visible.
Tap each buttons to try them out. Tap to open, Tap to close.
The parts of speech is educational and pretty cool, please make sure to try that feature. Great for students.
Lastly the arrows at top and bottom end allow you to tap and drag those tools up and down on the page to adjust as you like.
Import
Click the Import button. Click Dropbox and/or Google Docs to setup your credentials.
Import via Dropbox
Within Dropbox this creates a folder in:
Apps:SpeechMaker
You can import and export files in this folder. Drag your text, PDF, RTF or HTML files into this folder.
Then go again to the panel below again click dropbox and select the files you want to import.
Import via Google Drive
Once logged in it lists all the .rtf, .pdf, .htm/html and .txt files in google drive folders/subfolders. Select the files you want to import.
Export
Select a speech then touch the Export button above to share the speech via email HTML.
Gestures
In Live Mode:
- Touch the right side to speed up autoscroll. See this icon.
- Touch the left side to slow down autoscroll. See this icon.
- Double touch the center area to pause or go.
- Flick the speech up or down to move that direction quickly.
- Pinch to reduce font size.
- Zoom to expand font size.
Hot Keys
On attached bluetooth keyboard
Up/Down keys scrolling works while editing speech.
Suggestions
- Scroll the script don’t let it scroll you – Read naturally. Adjust the autoscroll to your reading speed.
- Move, breathe and relax and enjoy speaking to people.
- Practice your speech.
- Passion and emotion are good. This is the energy that feeds your speech.
- Posture is important. Stand up straight.
- Use your hands.
- Place cues in your script to breath, point, relax, whatever you want to remind yourself of when giving the speech.
FAQ
Q: Teleprompters cost $750 and more. Is there a cheap way to use SpeechMaker as a teleprompter?
A: Excellent question! For those who don’t know a teleprompter or cue is a device used in a television studio that allows a person to look directly at the camera and to read the scrolling text off a screen. This is what you see the president using so he can remember his speech and maintain eye contact with an audience without looking down at cue cards. USing a teleprompter can make your podcast, product or other video look much more professional. Now, anyone can buy a teleprompter or make it yourself for use with your smartphone or tablet. Click here for one of many do it yourself (DIY) videos on making your own teleprompter.
Q: Do you have any suggestions for minimizing eye movement when using a teleprompter?
A: Yes, it’s all about the distance from the reader’s eyes to the camera. The greater the distance the less eye movement. The larger the distance the larger the screen and the font needs to be. Use a large typesize.
Q: I see that the audio is saved in a .caf which is an apple sound file format. How do I transfer and play this on my Mac/Win computer?
A: google caf to mp3 or mp3 to caf or whatever to find the latest free tool to do that conversion.
Version Changes
Support
If you have a suggestion or problem we want to hear from you. Contact us
Thanks for using SpeechMaker
The folks at plum amazing