A Plum Amazing guide for Mac
PixelStick Pro
Learn the ruler, calibration, colors, screenshots, and Shortcuts, from your first measurement to repeatable workflows.
App version 3.0.8 Updated 2026-11-02
Ruler diagram. Place the circle and diamond on the two edges you want to measure.
Measure something on your screen, understand what the numbers mean, then make the ruler work in your own units. This manual also covers colors, screenshots, keyboard control, Apple Shortcuts, and scripting.
For PixelStick Pro 3.0.8 (20). Download PixelStick Pro for update-safe Keychain recovery and the earlier support, multi-display drawing and optional same-Mac activation fixes described here. If you have an earlier build, choose Help → Check for Updates… or download the current version.
Choose a starting point:
- New to PixelStick: start with Quick start, then Measurement panel. You can measure without learning calibration first.
- Comfortable on a Mac: go to Calibration, Color and loupe, or Screenshots.
- Building a repeatable workflow: start with Shortcuts and its complete automation reference. Each topic begins with the everyday task, then explains the details.
1. Overview#
This manual is for PixelStick Pro, the Swift and SwiftUI app. The original PixelStick manual is available for users of the earlier app; you do not need to read it before using Pro.
PixelStick is a universal on-screen ruler for macOS. It is a relative ruler: it works like a map that relates an inch on the page to a mile on the ground. Calibrate once, and the same drag can read inches, light years, fathoms, microns, or kilometers. Drag handles A (anchor), C (center), and Z (end) to measure in pixels, then calibrate once so the same drag reads in the real-world unit you define. It works over any app: maps, microscope images, astronomy photos, PDFs, design tools, and more.
PixelStick also tastes individual pixel colors and decants them into Color History, where each saved swatch reveals its hex or another supported color-format value. Use the magnifier to find the pixel you want, copy its color into another app, or save a palette for later. The ruler measures distances and angles; the eyedropper collects colors; the screenshot frame captures a region of your screen. They work together without making you import an image first.
Calibration in one sentence: measure a known distance on screen, tell PixelStick what that distance represents in the real world, save the profile - then every measurement uses that scale.
Requirements: macOS 15.0 or later (current direct-download build). Allow Screen Recording for tools that read screen contents: the magnifier, eyedropper, screenshots, and Scan Legend. In newer macOS versions the setting may be called Screen & System Audio Recording. Open System Settings → Privacy & Security, enable PixelStick Pro, and relaunch if macOS requests it. Basic ruler geometry does not require reading the screen. Starting with 3.0.7, dragging A, C or Z uses normal Mac mouse input and does not require Accessibility permission. Separate global keyboard or automation workflows may need their own permissions.
Working with other apps: The ruler overlay is click-through in empty areas. Drag the circle A, square C or diamond Z to move the ruler; that gesture belongs to PixelStick. Click or drag elsewhere to work in Finder or the app underneath. PixelStick handles each ruler drag from its first click, so Finder should not select or move items at the same time.
PixelStick is excellent for designers, navigators, mapmakers, biologists, astronomers, meteorologists, cartographers, and graphic designers - or anyone who uses a microscope or telescope, or simply wants to measure a distance, angle, or color on their screen in any window or application.
Photoshop has distance, angle, and color tools too - but they only work inside Photoshop. PixelStick works everywhere on your Mac, in any app, anytime - handy, fast, and inexpensive.
Try this first: measure the width of a button in any app. Put the circle at one edge and the diamond at the other. Nothing needs to be imported into PixelStick.
A small detour: art, proportion, and your screen#
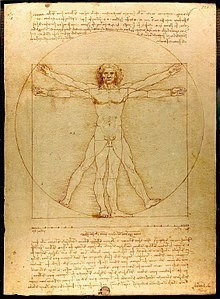
Looking closely, across the centuries
Leonardo's Vitruvian Man brings a human figure and geometric guides together on one sheet. It invites the eye to compare lengths and proportions. A ruler can help you ask the same kind of question of a drawing, a map, or a design on your screen.
Try a ratio: measure the width of a rectangle, then its height. Divide width by height. A rectangle 300 pixels wide and 200 pixels high has a ratio of 1.5, or 3:2. Enlarge both dimensions equally and the ratio stays the same.
You do not need a real-world scale to compare proportions. You do need one when your question changes from how much longer? to how many miles?
Drawing reused from the earlier Plum Amazing manual. Artwork and historical context: Gallerie dell'Accademia, Venice.
2. Quick start#
- Launch PixelStick - the ruler appears on screen with handles A, C, and Z.
- Drag A and Z to measure a distance.
- Read Length (pixels), Delta (x/y), and Angle in the PixelStick measurement panel.
- Click the gear icon in the panel (or PixelStick → Preferences…) to open settings.
- To measure in real-world units, expand Calibrate at the bottom of the panel, choose a scale or calibrate, then read Scaled in the panel.
Your first measurement, from start to finish#
- Open a window containing something with clear edges, such as a button or image.
- Drag the circle A to the left edge and the diamond Z to the right edge. The square C moves the whole ruler while keeping the endpoints together.
- Hold Shift while dragging if you want a horizontal, vertical, or 45° line. For a strict constraint, use the angle lock in the panel.
- Read the number beside Length. The suffix px means screen pixels; pt means macOS layout points.
- To place an endpoint precisely, right-click (or Control-click) that handle, release the pointing device and Control key, and tap an arrow key. You can select C the same way to move the entire ruler. Press Esc when you finish.
- To copy a measurement, use the Copy Measurement action described in Shortcuts. To get the ruler out of the way, hide it with Preferences → General → Show ruler and guides.
You have now used the ruler, the panel, an angle constraint, and fine placement. Calibration can wait until you need miles, micrometers, or another unit.
Three handles, three jobs#
| Handle | Shape | Use it to |
|---|---|---|
| A | Circle with crosshair | Place the first endpoint or anchor |
| C | Square with crosshair | Move the ruler as a whole |
| Z | Diamond | Place the second endpoint |
The handles are named for the ends and center, not for particular directions. A ruler can point upward, downward, or diagonally.
3. Measurement panel#
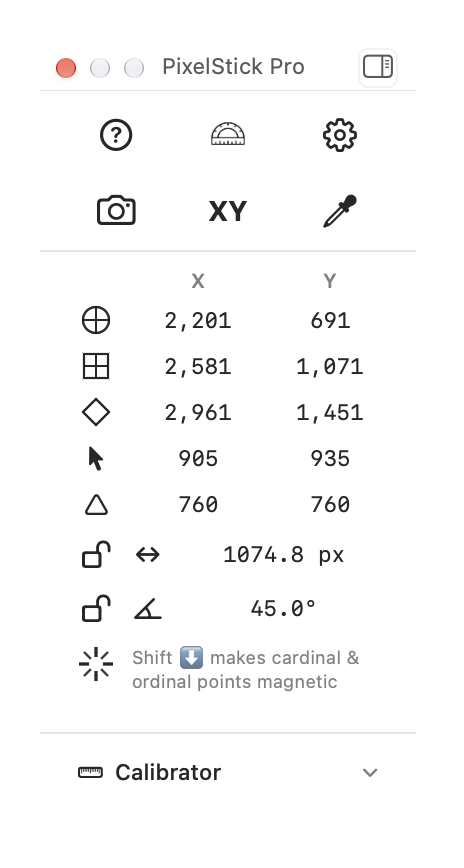
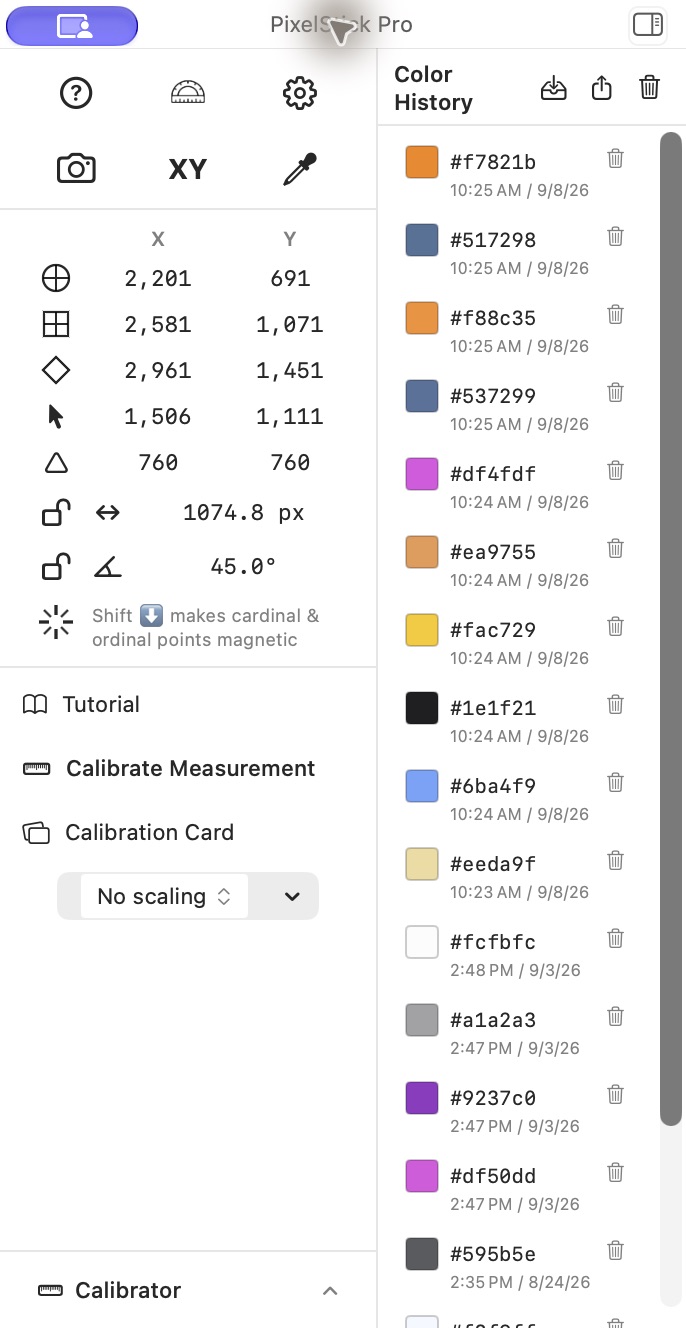
The floating PixelStick Pro panel shows live readouts and tools. Drag the title bar to move it. The sidebar button on the right of the title bar opens or closes the color-history drawer.
The panel fits its measurement readouts, including Scaled when you choose a scale. Opening Calibrator makes room for its controls; closing it returns to the smaller panel. On a small screen, the main controls can scroll when they cannot all fit. A long color history scrolls within its own drawer.
| Control | What it does |
|---|---|
| ? | Opens the online manual |
| Ruler + protractor | Shows or hides the length and angle labels next to the ruler |
| Gear | Opens Preferences |
| Camera | Screenshot region capture (Snap Frame) |
| XY | Shows or hides the floating cursor X/Y readout on screen. The X and Y columns in the panel always stay visible. |
| Eyedropper | Tastes individual pixel colors and decants them into Color History, where you can reveal and copy the hex or another supported color-format value. Click again, Esc, or right-click to exit. |
| X / Y table | Four rows of coordinates: left handle (circle), center (square), right handle (diamond), cursor (arrow). Then delta (triangle) - change in X and Y from left to right. Numbers are the center of each handle. |
| Length (lock + arrows) | Distance between the handles. Click the lock to keep that length while you drag. |
| Angle (lock + arc) | Heading of the ruler. Click the lock to keep that angle. |
| Hold Shift | While dragging a handle, Shift pulls the stick toward cardinal (0° / 90°) and ordinal (45°) angles - magnetic, not a lock. |
| Calibrator | Expands calibration tools: Tutorial, Calibrate Measurement, Calibration Card, scaling menu |
Hover an icon for a tooltip. Lengths use at most five significant digits so they are easy to copy by hand.
Keep a length or angle while moving the ruler
Click the padlock beside Length or Angle to keep that measurement while placing A or Z. Click the same padlock again to release it.
- Length locked: rotate the ruler around the opposite endpoint while keeping its distance. This helps compare equal distances in different directions.
- Angle locked: move an endpoint along the ruler's existing direction to change its length without rotating it. An endpoint stops at the opposite endpoint rather than crossing it and reversing the heading.
- Both locked: A and Z stay in place. Drag C to move the entire ruler without changing its length or angle.
- Shift and keyboard nudges: Shift's magnetic snapping does not override an explicit angle lock. The same measurement locks apply when you right-click or Control-click a handle and use the arrow keys to nudge it.
Try it: place the ruler along a diagonal edge, lock its angle, then drag Z. It follows that diagonal. Release the angle lock and lock the length instead: Z now travels around A. Release either lock when you want to measure freely again.
Precision: endpoints land on whole macOS screen points. A length lock can therefore show a small rounding difference as you rotate the ruler, especially in pixel mode on a Retina display. The right-click handle lock in the magnifier chapter selects a handle for keyboard nudging; it is different from these measurement locks.
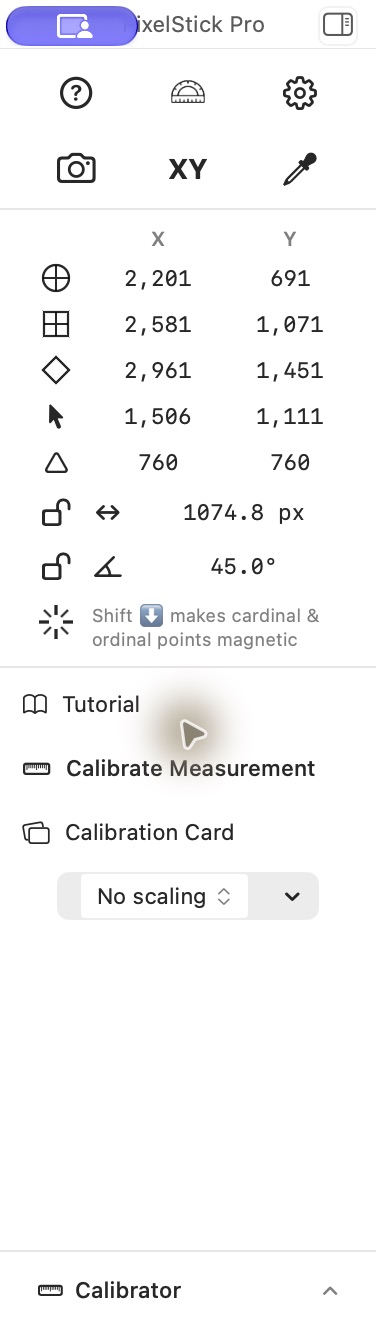
Calibrate footer: Tap Calibrator to expand the assistant. The panel grows to show scaling controls without hiding the main readouts. Tap again to collapse.
Scaling menu: Choose No scaling, a saved profile under My Calibrations, or an approximate preset (e.g. Google Maps). For presets with multiple zoom levels, pick the level that matches your browser zoom. Presets are approximate - Calibrate against an on-screen scale bar for accuracy.
4. Universal calibration: measuring in real-world units#
This is PixelStick's core feature for maps, microscopy, astronomy, cartography, and any specialized measurement.
PixelStick Calibration Card#
The Calibration Card is how PixelStick Pro teaches the relative ruler: one known length on screen becomes the scale for everything else - like a map where an inch on the page is a mile on the ground.
PixelStick includes a Calibration Card - a reference image with labeled bars (1 inch, 2 inches, 5 cm, 10 cm, 50 µm, vertical and diagonal bars, and a verification section).
Open it: Help → Calibration Card…, from the panel (Calibrator → Calibration Card), or the link in the measurement panel.
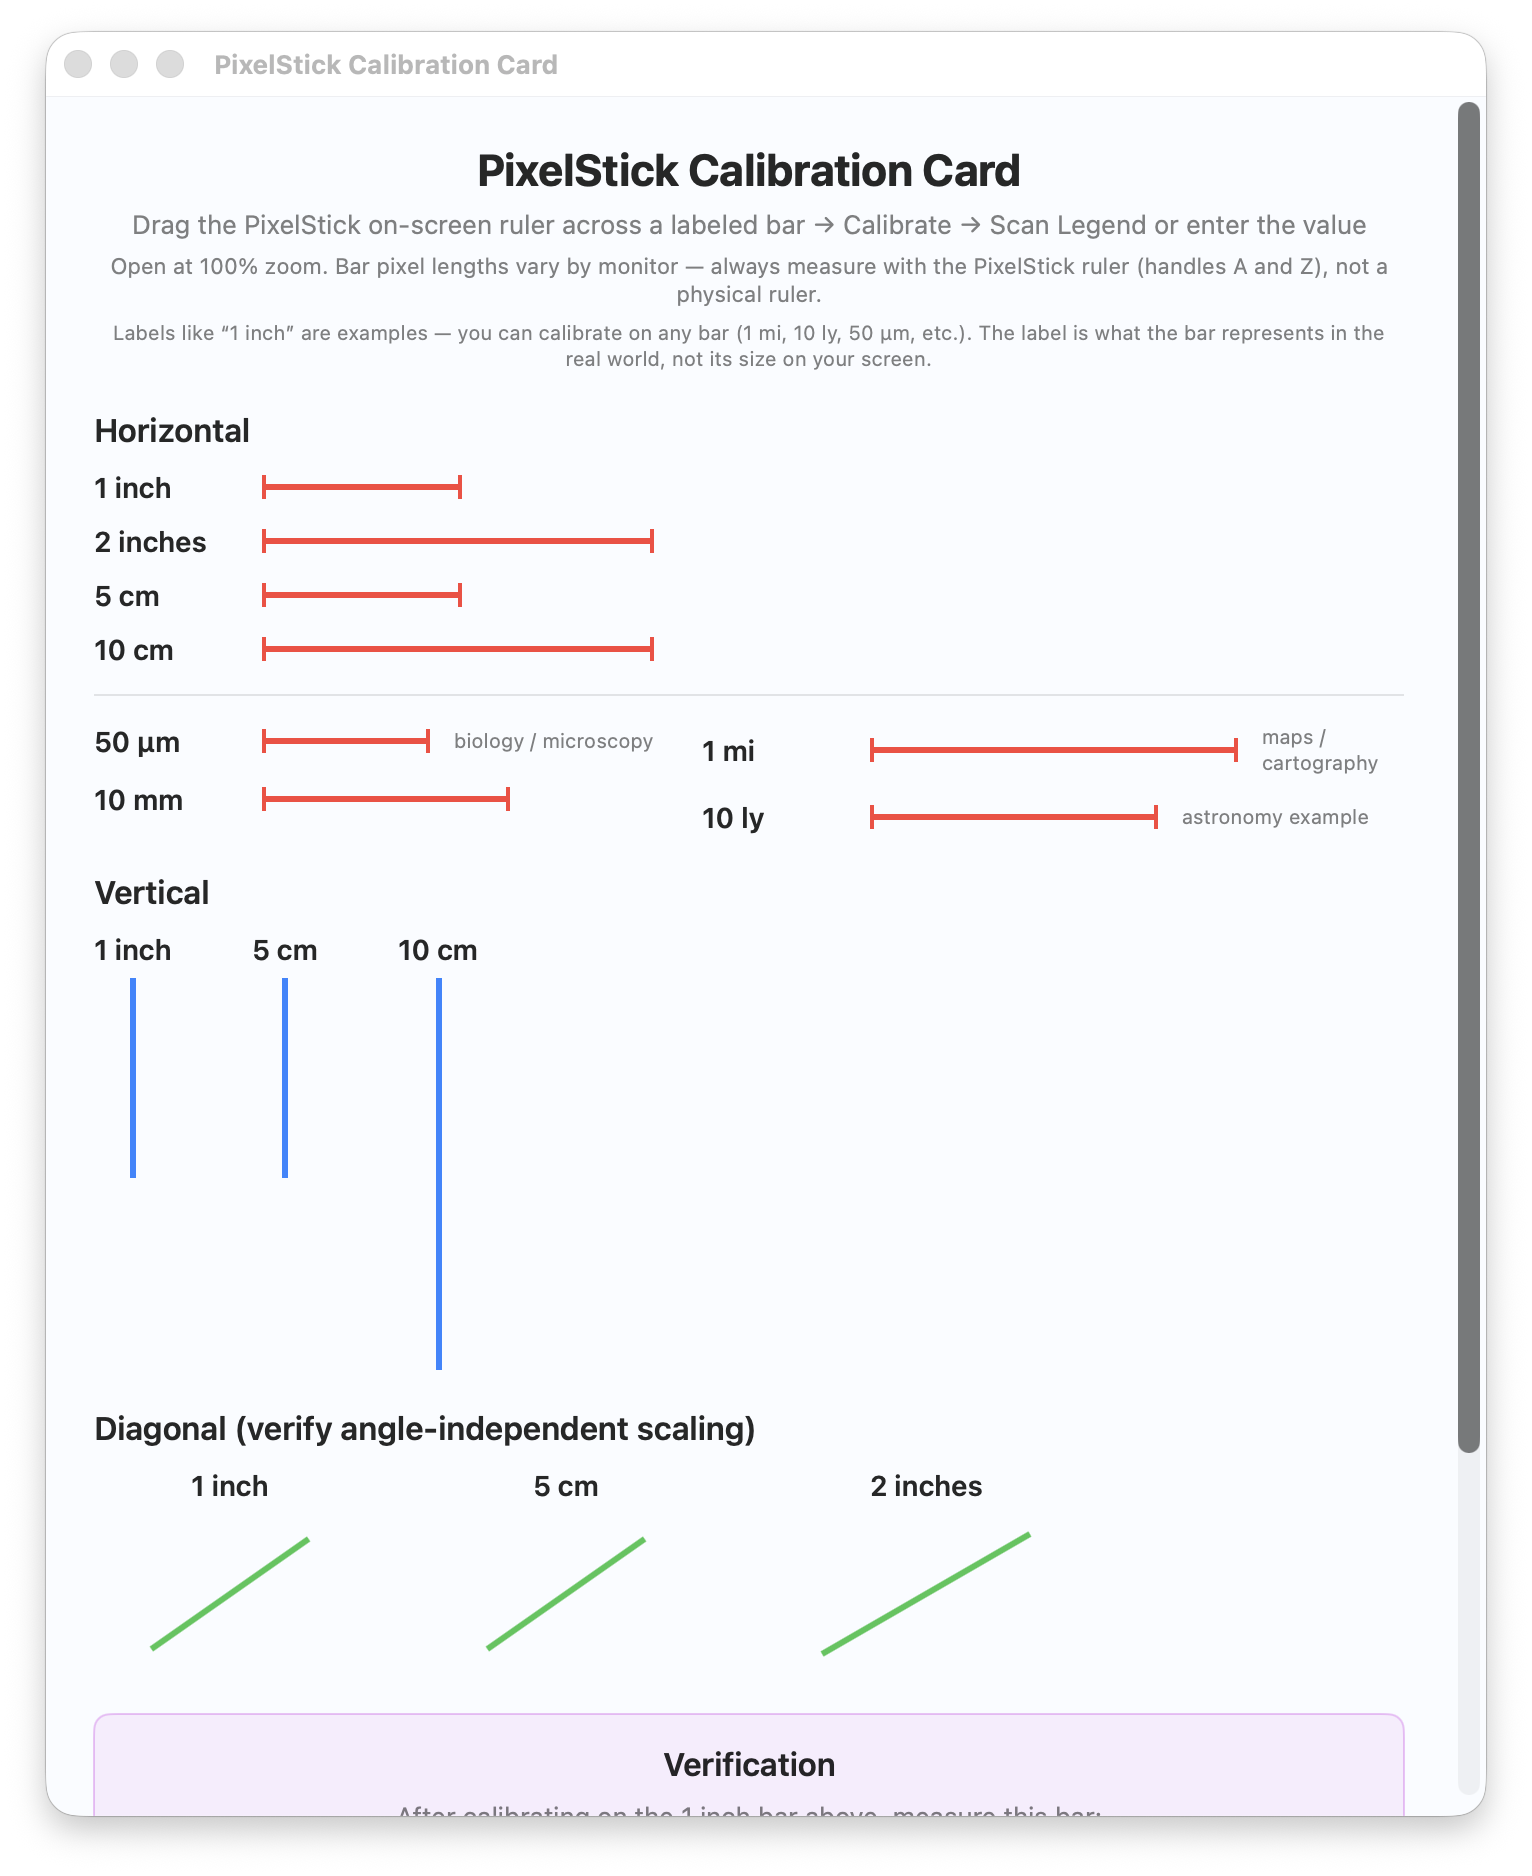
How to use it:
- Open the card at 100% zoom.
- Drag the PixelStick on-screen ruler (not a physical ruler) across the 1 inch bar.
- Calibrate Measurement → Scan Legend (or enter
1/in). - Save the profile.
- Measure the 2 inches verification bar - should read ≈ 2.00 in.
The card does not need to be physically 1 inch on your monitor. “1 inch” is an example label - you could use 1 mi, 10 ly, 50 µm, or any other bar on the card. You measure the bar in pixels with the PixelStick ruler and tell PixelStick what the label represents. This works on any display.
An SVG version is in the app bundle (PixelStick_Calibration_Card.svg) for printing or sharing.
Create your own cards: the complete design instructions are below in Create a calibration card. Help → Calibration Card Tutorial also opens the tutorial in the app.
Scan Legend (Vision OCR + Apple Intelligence)#
PixelStick can read scale bar labels automatically.
How it works
- Drag the PixelStick ruler across a labeled scale bar (on a map, PDF, microscope image, or the Calibration Card).
- Open Calibrate Measurement and click Scan Legend.
- PixelStick captures a small region along the ruler (not the whole screen), excluding overlay chrome but including the Calibration Card if it is visible.
- Vision OCR reads text in that region. Processing time depends on the Mac and the captured image.
- On Macs with Apple Intelligence (macOS 26+), an on-device model may parse complex legends like
1 inch = 2 miles. Otherwise regex handles common formats (1 mi,50 µm,1 inch, etc.). - Review the pre-filled value and unit, then save.
Calibration Card open on screen? Yes - Scan Legend works with the card visible. Place the ruler across a bar so the label text sits near the ruler line; the card window can stay open anywhere on screen. You do not need a special position.
Common issues
| Symptom | What to try |
|---|---|
| “No text found” | Drag the ruler directly over the label; increase label size/contrast |
| Wrong unit detected | Enter value manually; OCR misread decorative fonts |
| Result shows pixels | Re-scan; label may have been missed - regex rejects pixel-only results |
| Slow scan | First scan after launch may wait for Screen Recording permission; later scans are faster |
| Permission dialogs stacking | Grant Screen Recording once in System Settings, then relaunch - PixelStick caches permission state |
On Macs without Apple Intelligence, regex parsing handles common formats (1 mi, 50 µm, 500 ft, etc.).
The one workflow for everything#
- Open your image on screen (browser, Preview, microscope software, PDF, etc.).
- Drag the ruler across a known distance - a scale bar, legend segment, calibration marking, or labeled dimension.
- Expand Calibrate in the panel and choose Calibrate Measurement (or Calibrate… from the scaling menu).
- Enter the real-world value manually, or click Scan Legend to detect it automatically.
- Give the calibration a name (e.g. "Cell culture 40x", "NOAA chart 1234").
- Click Save Calibration.
- Measure anything on that image - distances now display in your chosen unit under Scaled in the panel.
When you zoom the image or switch to a different photo, recalibrate or select a different saved profile.
Saved calibration profiles#
- All calibrations appear under My Calibrations in the scaling menu.
- Use Manage Calibrations... to edit, rename, or delete profiles.
- Your active calibration persists across app restarts.
Choosing units#
PixelStick supports any unit. The calibration dialog offers suggestions grouped by domain:
| Domain | Example units |
|---|---|
| Metric | mm, cm, m, km, µm, nm |
| Imperial / US | in, ft, yd, mi |
| Astronomy | arcsec, arcmin, AU, ly, pc, kpc |
| Maritime | fathom, nmi, cable |
| Biology / Medical | µm, nm, mm |
You can also type a custom unit in the Or custom unit field.
Optional: show a second unit#
In the measurement panel, use the Units menu to display the same measurement converted to another compatible unit (e.g. measure in light-years, also show parsecs). Choose None to hide the secondary value.
Worked examples#
Galaxy image (astronomy)
- Open a galaxy photo with a scale bar (e.g. "10 kpc").
- Drag the ruler across that scale bar.
- Calibrate: value
10, unitkpc, name "NGC 1300". - Measure spiral features in kiloparsecs (or set Units to
ly).
Cell slide (microscopy)
- Open a microscope image with a 50 µm scale bar.
- Drag the ruler across the scale bar.
- Calibrate: value
50, unitµm, name "40x objective". - Measure organelles in micrometers.
Map (cartography)
- Open a map (Google Maps, PDF chart, scanned NOAA chart).
- Drag the ruler across the "1 mile" legend segment or scale bar.
- Calibrate: value
1, unitmi, name "Local map". - Measure distances in miles, feet, or fathoms.
Scanned printed map (alternative) Use the map's printed scale bar in the scanned image, and enter the distance that bar represents. A statement such as "1 inch = 2 miles" refers to the original print size. It does not by itself tell you the scale of a resized scan on your display. Prefer a labeled bar or another known distance in that same image.
Map presets (shortcut)#
For Google Maps, preset zoom levels are available under Presets in the scaling menu. These are approximate - match browser zoom to 100% for best results. For accurate measurements, always calibrate against the map's own scale bar.
Note: Presets are computed for the map equator at 100% browser zoom. Calibrate for precision.
Check a calibration before trusting it#
A profile records a relationship between the displayed image and a known distance. Its name alone does not make that relationship valid for a new view.
- Calibrate against one labeled distance.
- Measure a different known distance in the same image, preferably a longer one.
- Compare the result with its label. If it differs, check endpoint placement, the typed value and unit, and whether the image changed size.
- Repeat after zooming, resizing the image, or moving it to a display with a different scale.
For a map, measure near the scale bar and in the same view. A map projection, perspective in a photograph, or uneven stretching can make one scale inappropriate elsewhere in an image. PixelStick measures the displayed image; it cannot remove those distortions.
Why zoom changes your measurement#
Imagine a microscope image whose 50 µm reference bar spans 100 screen pixels. Each screen pixel represents 0.5 µm. A cell spanning 60 screen pixels therefore measures 30 µm.
Now enlarge the image to 200%. The reference spans 200 pixels and the same cell spans 120 pixels. The cell has not grown. Your original profile would report 60 µm because it still assigns 0.5 µm to each pixel. Calibrating again gives 50 ÷ 200 = 0.25 µm per pixel, and the cell reads 30 µm again.
Learning lab · illustrative model
One cell, a changing view
Change the image size, then use the reference again. These controls demonstrate the idea; they do not operate PixelStick.
Profile scale0.5 µm / px
Cell measurement30 µm
Numbers model screen pixels in a uniformly enlarged example image. The drawing's displayed size depends on your browser; use the labels for this lesson.
In PixelStick: after changing the image's zoom, put A and Z across its reference bar, choose Calibrate Measurement, and enter that bar's value and unit again. Check another known distance before continuing. A saved profile is useful only while its scale still matches the displayed image.
A quick puzzle: what happens at 150%?
The reference becomes 150 pixels long and the cell becomes 90. Keeping the old 0.5 µm/px profile gives 45 µm. Recalibrating gives 50 ÷ 150 µm/px; multiplied by 90 pixels, that gives 30 µm. Both distances grew by the same factor, so their ratio stayed the same.
Create a calibration card#
A reference card is useful for teaching the method, documenting a known scale, and sharing a repeatable setup with colleagues. A practice card's label is a value you assign. A scientific image's label must come from that image or its known calibration.
Use an SVG, PDF, PNG, or HTML file with a plain background. Include:
- One clear label per bar, such as 50 µm or 1 mi.
- Large, horizontal text with good contrast. A simple sans-serif font is easier for Scan Legend to read.
- A line with clear marks at both ends, so everyone places the ruler consistently.
- A second bar exactly twice as long with twice the labeled value, for verification.
- Optional vertical and diagonal bars to practice measuring in different directions.
The bar does not need to be a physical inch on your monitor. Measure its displayed length with PixelStick and assign its stated value. All bars on a card intended to share one profile must use the same value per pixel. Bars for unrelated example scales need separate calibrations.
For example, a 100-pixel bar labeled 50 µm and a 200-pixel bar labeled 100 µm make a consistent pair. Do not label equal-sized bars with different values and expect one calibration to validate both.
An editable SVG example: save this as my-calibration-card.svg, open it in Preview or a browser, calibrate on 50 µm, and verify on 100 µm.
<svg xmlns="http://www.w3.org/2000/svg" viewBox="0 0 420 150">
  <rect width="420" height="150" fill="white"/>
  <g font-family="Arial, sans-serif" font-size="20" fill="#222">
    <text x="20" y="48">50 µm</text>
    <text x="20" y="108">100 µm</text>
  </g>
  <g stroke="#b82045" stroke-width="3">
    <path d="M150 30v24 M150 42h100 M250 30v24"/>
    <path d="M150 90v24 M150 102h200 M350 90v24"/>
  </g>
</svg>
Keep the whole card at one zoom level while testing. Send the card file to colleagues and agree on a useful profile name, such as Lab scope 40x at 100%. Each person calibrates against the displayed reference on their own workstation.
5. Measurement and guides#
- Ruler: drag A, C, and Z handles to measure distance and angle.
- Locks: click lock icons in the panel to constrain length or angle while dragging.
- Shift key: hold Shift while dragging A or Z. The line is strongly attracted to horizontal, vertical, and 45° (cardinal and intercardinal) angles. It holds within about 5° of those stops, the pull eases off until 15°, then the handle follows the cursor.
- Handle lock (fine placement): right-click or Control-click A, C, or Z, release the pointing device and Control key, and nudge with the arrow keys. See §6 Handle lock.
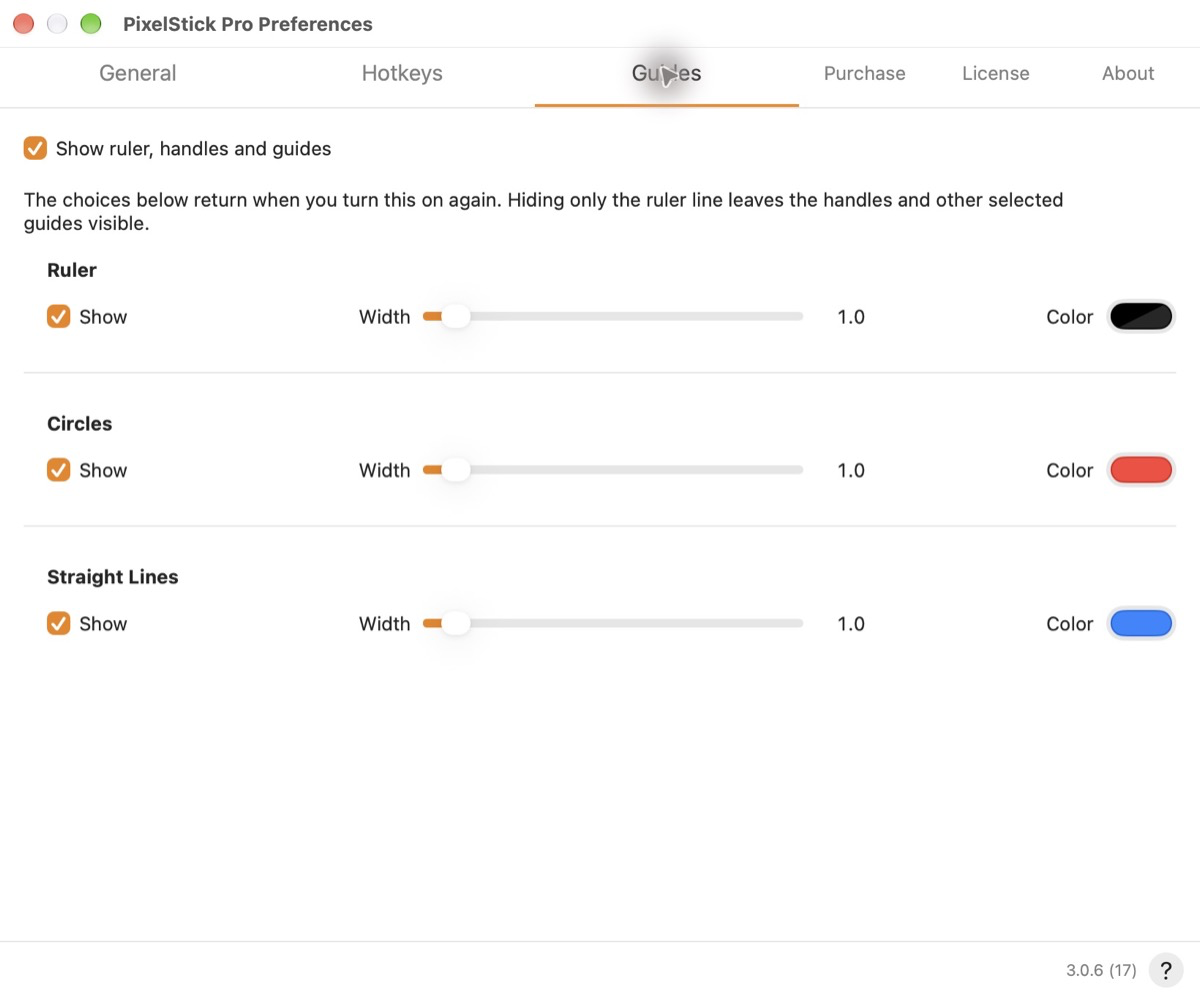
- Guides: enable straight and circle guides in Preferences → Guides (color, width, on/off).
A floating label near the ruler shows Length, Scaled value (when calibrated), and angle while you measure.
Across multiple displays: one ruler can cross your screens. Each display draws its own visible part of the ruler and guides, while A, C and Z remain the same measurement. Connecting, disconnecting or rearranging displays preserves the endpoints’ desktop positions when those locations remain available. After changing image zoom or moving to a display with different scaling, verify your calibration against its reference. If the ruler ends up on a disconnected display, use Reset Position to bring it to the main display.
How PixelStick counts pixels (coordinate system)#
PixelStick uses the macOS coordinate system: x increases to the right and y increases upward. The main display's origin is its bottom-left corner. Other displays can have negative coordinates, depending on their arrangement in System Settings.
By default, the ruler panel, near-ruler label, and cursor readout show screen pixels - the same units as a saved screenshot or Preview. On a Retina display, counts are typically 2× the on-screen layout size (macOS points).
Preferences → General → Units (optional) → Measure ruler in points (macOS layout) switches the ruler to points for UI developers who work in layout units. Most users can leave this off.
When you see two numbers together like 230, 114, that is (x, y). The panel appends px or pt on Length so you know which mode is active.
Length vs. Delta (why the two numbers can differ)#
PixelStick reports both a Length and a Delta, and they answer slightly different questions:
- Length is the straight-line distance between the endpoint centers.
- Delta simply subtracts the coordinates (
x2 − x1,y2 − y1).
Example: if the endpoints are at (10, 20) and (110, 20), Delta is (100, 0) and Length is 100. For endpoints at (0, 0) and (3, 4), Delta is (3, 4) and Length is 5. Length does not add an extra pixel for an inclusive count. Rounded coordinate readouts can differ slightly from a length calculated from unrounded positions.
Angles & baseline#
By default, the angle describes the direction from A to Z, measured from the horizontal. Right is 0°, upward is 90°, and downward is −90°. A line pointing left can read 180° or −180°. Moving C changes the ruler's position without changing its length or angle.
To measure the angle between two features, choose a reference first:
- Place A at the point where the features meet, then align Z along the first feature.
- Choose Ruler → Set Baseline. The dashed line holds that direction and the angle readout becomes 0°.
- Keep A in place and move Z along the second feature. The panel now subtracts the reference angle and shows the signed difference. The near-ruler label, cursor readout and Copy Measurement action use the same reference.
- To choose a different reference, align the stick with it and choose Set Baseline again. For ordinary horizontal readings, set the baseline with Z directly to the right of A.
Example: a first edge points at 45° from the horizontal. Set the baseline there, then move Z to an edge at 75°. The readout shows 30°: 75 − 45 = 30. The length is still the distance from A to Z. A zero-length stick has no direction, so Set Baseline is unavailable until its endpoints are apart.
Map Mode is a checked toggle under Ruler. It expresses the angle clockwise from the same reference, from 0° up to but not including 360°. With no baseline, that reference is rightward horizontal. With a baseline, it is the direction of the stick when you chose Set Baseline. It does not automatically find geographic north.
| Teaching example | Ordinary signed angle | Map Mode |
|---|---|---|
| No baseline; stick points up and right | 45° | 315° |
| No baseline; stick points down and right | −45° | 45° |
| Baseline set upward; stick points right | −90° | 90° |
| Baseline 45°; stick now at 75° | 30° | 330° |
For a north-up map, point the stick toward north and Set Baseline, then enable Map Mode. East will read 90°, south 180°, and west 270°. On a rotated map, use its actual north reference. These are angle examples, not a screenshot or an automatic map-reading tool. Map Mode changes the direction convention; it does not change length, scale or calibration.
The baseline and Map Mode are saved with your preferences and restored on the next launch, subject to the preference-saving limits described in Purchase and license. Reset Position moves the ruler; it leaves this angle reference in place. The advanced geometry JSON actions and URL API continue to return the raw signed screen angle, so scripts can apply their own reference explicitly.
Right-click menu (on the ruler)#
Right-click or Control-click a handle (circle, square, or diamond) selects that handle for magnifier nudge - see §6 Handle lock. The selection is separate from the panel’s length and angle locks.
The former ruler-line context menu is no longer used in this update: the line and empty areas pass clicks through to the app underneath. Use the Mac menu bar instead. Ruler contains Map Mode, Set Baseline, Invert Colors and Reset Position; Edit contains Undo Move and Redo Move. The app menu contains Hide and Quit. Right-clicking a handle selects it for nudging, rather than opening a menu.
| Item | What it does |
|---|---|
| Undo Move / Redo Move | Restore the endpoints before a completed move, or reapply that move |
| Invert Colors | Flip the guide/reference colors for contrast; also Ruler → Invert Colors or ⌘I |
| Map Mode | Toggle clockwise angles from the current reference; the checkmark means it is on |
| Set Baseline | Save the stick's direction, draw the reference line and zero the displayed angle |
| Reset Position | Center a compact diagonal ruler and bring the panel back to the main screen |
| Hide / Quit | Hide or quit PixelStick |
Undo a move: drag A, Z or C, release the mouse, then choose Edit → Undo Move or press ⌘Z. One completed drag counts as one move, even if you dragged through many intermediate positions. Each handle-lock arrow adjustment is also a move. Edit → Redo Move or ⇧⌘Z puts it back. A new move after undo clears the redo branch. Position history holds the latest 100 moves in this session; it does not undo colors, baseline changes, calibration or preference edits. Programmatic positioning or a changed screen layout establishes a new starting point.
Find a lost ruler: choose PixelStick Pro → Reset Position, Ruler → Reset Position, the context-menu command, or Preferences → General → Reset Position. These are the same reset, previously labeled Reset Ruler. You can undo the position reset too. ⌘R is its shortcut in both menu-bar locations and the right-click menu. ⌘M keeps its normal macOS Minimize meaning; Map Mode has no assigned keyboard shortcut.
Try moving C, undoing once and redoing once. Length and angle should stay the same while the endpoints return to their earlier places. Invert Colors changes how the guides look; it does not invert a sampled color or an exported screenshot.
6. Color and loupe#
- Eyedropper (panel): extract a pixel color from anywhere on screen and bottle that color in Color History when history recording is enabled. The ruler overlay stays click-through so you can still use Finder and other apps; click on screen to sample (clicks on the measurement panel are ignored). Tap the eyedropper again, press Esc, or right-click to exit.
- Color history: appears in the panel side drawer; click a swatch to copy that color. Your chosen color format and history persist across launches.
- WCAG contrast: in the eyedropper drawer, set Text and Bg from sampled colors to see contrast ratio and AA/AAA pass badges.
- Saved palettes: save the current history as a named palette; load or export as GIMP (
.gpl), JSON, CSS variables, or Adobe ASE. - Magnifier (loop): dragging a ruler handle (A, C, or Z) always shows a magnified loop beside that handle. The center cell is the exact pixel where that endpoint will land. Preferences → General → Show magnifier near cursor also follows the pointer when you are not dragging. Show magnifier while using eyedropper follows the pipette tip.
- Pixel box (keys 1-9): these are not optical 1×-9×. Each key chooses how many real screen pixels fill the loop. Key 9 is a 3 × 3 box (the center cell is one pixel). The bar on the loop shows Key, the box size, and the hex of the center pixel.
- Rim beads: the green bead at the top of the circle is the same pixel-box control as keys 1-9; slide it along the rim to zoom in or out. The blue bead on the lower right grows or shrinks the loop itself. Pause the pointer for a moment, hold Option, or use handle lock so the loop stays put, then drag a bead. Click-through is unchanged except on the beads.
- Magnifier shape, position and distance: open Preferences → General. Choose Round or Square under Magnifier shape; both keep the landing mark, pixel grid, green zoom bead and blue size bead. Magnifier position chooses Automatic, Upper right, Upper left, Lower right or Lower left relative to the handle/pointer. Magnifier distance adds spacing from 0 to 300 pt. These are screen points, so the visual spacing remains consistent on Retina displays. The settings apply while dragging, in handle lock and with the eyedropper, and are saved subject to the normal preference-saving limits.
- Show grid on screen adds grid lines on the overlay. In Preferences → General, choose Grid density → Fine (20 pt), Medium (50 pt) or Sparse (100 pt). Grid spacing lets you choose 10–4000 pt with the slider or type an exact whole-number value in the field and press Return. This switches the density to Custom. Invalid or out-of-range text leaves the current grid unchanged and shows a message. Choosing Custom alone keeps your current spacing. Fine preserves the earlier grid's appearance. Larger spacing means fewer lines. The loop always draws its own pixel grid.
- Color formats: choose a format in the eyedropper drawer, then copy with its copy button, Shift-click on the color value, or Copy Last Color in Shortcuts. Formats include RGB, hex, HSL, CSS, CMYK, and code for SwiftUI, AppKit, UIKit, and Kotlin. Use the format your destination expects.
If the magnifier covers your subject: try a distance of 80–120 pt and choose the opposite side of the object you are measuring. Drag A or Z over the same feature again and compare. Automatic preserves the usual upper-right preference. Near a screen edge, the magnifier can switch sides or reduce the available spacing to stay on screen; your preferred position is a preference, not a promise that the window can extend past the display. Shape and spacing change the view around the measurement, not the sampled pixel or the measurement itself. Try both shapes with Key 9, then use the blue bead to choose a comfortable window size.
Make the screen grid quieter: enable Show grid on screen, then compare Fine and Sparse over the same image or document. Notice that the ruler's length and angle stay the same while the grid becomes less busy. Try typing 75 for a middle ground, or 192 for a wider grid. Press Return to apply the number. Large values can leave only a few visible lines on a small display. The spacing is in macOS screen points, independent of your calibrated ruler units or the points/pixels measurement choice; a grid square is not automatically an inch, kilometer or microscope unit. This changes the full-screen grid, not the number of pixels in the magnifier. Your density and spacing are saved subject to the normal preference-saving limits.
Pick a color and use it in another app#
- Click the panel's eyedropper. If macOS asks, allow screen capture.
- Point at the color you want. The magnifier helps you find the exact pixel.
- Click once to sample it. The eyedropper stays on so you can collect more colors.
- Press Esc when you finish picking. Choose the required color format and copy the value from the drawer.
- Switch to your design app, editor, or document and paste.
For CSS, a hex value such as #336699 is useful. For a native app, choose its code format. A sampled edge can contain blended pixels from antialiasing; choose the flat interior if you want the object's solid fill.
Check text against its background#
The WCAG Contrast controls appear in the color drawer while the eyedropper is active.
- Sample the text color, then click Text to use the current color as foreground.
- Sample the background color, then click Bg.
- Read the ratio and the separate AA, AA Large, AAA, and AAA Lg badges.
- Change your design's colors, sample again, and compare.
This compares the two selected colors. For a gradient or photograph, repeat on the least favorable background behind the text. The badges assess contrast only; they do not check the rest of an interface's accessibility.
Save and export a palette#
Open the history drawer with the title-bar sidebar button. Its save/import control stores the current history as a named palette. In Saved Palettes, load a palette back into history or export it.
| Format | Useful for |
|---|---|
GIMP .gpl |
Applications that import GIMP palettes |
JSON .json |
Scripts and structured color records |
CSS .css |
Stylesheets with named color variables |
Adobe .ase |
Applications that import Adobe Swatch Exchange |
Choose a destination in the save dialog. Removing a history swatch removes that entry; clearing history removes the current list, so save a palette first if you want to keep it. Preferences → General → Eyedropper color history pauses recording without deleting existing swatches.
For color-critical work: screen sampling reads the displayed result, which can differ from a source file's original values. Display profiles, wide-gamut colors, transparency, and application rendering all matter. The scripting APIs report the sample's color-space label; numeric RGB and hex conversion use sRGB. Check the destination's color expectations before treating a screen sample as a production color specification.
A palette from something you love#
#51345C#C96655#F3DEB8The three swatches above are a teaching example. Make your own with a photograph, a painting, or a well-loved website:
- Open your chosen image and sample one dark color, one vivid color, and one light color with the eyedropper. Pick flat areas where possible; a photograph will often give you several nearby shades.
- Save the history as a named palette, such as Evening garden. If you already have swatches you want to keep, save those before starting.
- Try the light color as a background, the dark color as text, and the vivid color as an accent in your design app.
- Sample your finished text and background and use the WCAG Contrast controls. A pleasing palette still needs readable combinations.
- Export CSS for a webpage or ASE for an app that imports Adobe swatches. Keep the palette name so you can return to it.
Look closely: where you click matters. A letter's soft edge, a reflection, or a shadow may supply a different color from the one you meant to collect. The magnifier helps you choose; the contrast checker helps you check the result.
Handle lock - fine nudge and big nudge#
For fine placement you should not have to hold a modifier and chase the mouse. Handle lock parks the magnifier on A, C, or Z so you can sit back and tap the arrows.
- Right-click (or Control-click) the circle (A), square (C), or diamond (Z). A trackpad secondary click works like a right-click.
- An orange ring marks the selected handle. The magnifier stays on that handle. Release the pointing device and Control before using the arrows.
- Arrow keys move it one macOS screen point (fine nudge). Shift-arrow moves 10 points (big nudge). Selecting C moves A and Z together, preserving the ruler’s length and angle. Keys 1-9 still change the pixel box so you can see the landing square clearly.
- Press Esc, or right-click or Control-click the same handle again, to leave. Select a different handle to switch.
Points and pixels: a screen point is a macOS layout unit. On a display with a 2× backing scale, a one-point nudge spans two backing pixels. It is not necessarily one pixel in the source photograph: image zoom and display scaling also matter. The panel’s length and angle locks still constrain A and Z during nudges; release those locks if you need free movement in both directions.
Handle lock works even if Show magnifier near cursor is off - the loop comes up for this mode so you can do the fine work without holding a key.
The loop is excluded from ordinary macOS screenshots so it cannot photograph itself. This is expected if a capture shows the ruler without its magnifier.
7. Screenshots#
- Use the camera icon in the panel (or press Shift + S when PixelStick is active) to capture a region of the screen.
- Formats: PNG, JPEG, TIFF, and more (see Preferences).
- Play Shutter Sound (General preferences) controls the capture sound.
Capture and save a region#
- Click Camera or use Capture Screenshot Region in Shortcuts for a clean capture. To include the currently visible ruler and guides, hold Option while clicking Camera, then release Option.
- Position and resize the Snap Frame around the area you want.
- Read its width and height to check the size. Choose image pixels, points, or both in General preferences if needed.
- Click Snap. In the save dialog, choose the name, destination, and format.
- Open the saved file in Preview to confirm the result.
The frame stays open so you can take another capture. Close its red button, or press Esc, to finish. If Camera temporarily hid the ruler and guides, they return in the same positions; you do not need Reset Position. Anything you had hidden beforehand stays hidden. Option-click capture includes the ruler overlay, while keeping the panel, magnifier and frame controls out of the image.
PNG preserves sharp interface edges. JPEG is useful for photographs when a smaller file matters. The save service also supports TIFF, GIF, HEIC/HEIF, and WebP. If the system cannot encode WebP, PixelStick falls back to PNG; check the saved extension. The programmatic Capture Region action always writes PNG.
Snap Frame dimensions (points vs pixels)#
While you resize the capture frame, PixelStick shows width × height at the top of the frame. By default this is image pixels - the size of the file you save. That matches what Preview, Photoshop, and other tools report.
macOS uses two related measures on screen:
| Measure | What it is | Example (Retina display) |
|---|---|---|
| Points | Layout size - how big the frame looks on screen | 400 × 400 |
| Image pixels | Actual pixels in the saved screenshot | 800 × 800 |
On a Retina display, macOS draws at 2× (each point is two pixels wide and tall). A 400 × 400 point frame therefore produces an 800 × 800 pixel image. On a non-Retina display, points and pixels are usually the same number.
DPI (e.g. “72 pixels/inch” in Preview) is print metadata only. It does not change how many pixels the image has - only the assumed size if you print it.
Preferences → General → Snap frame dimensions lets you choose:
- Image pixels (saved file) - default; matches your exported PNG/JPEG.
- Points (on-screen layout) - useful when matching app UI layout or macOS window sizes.
- Both (points and pixels) - shows both values for comparison (e.g.
400 x 400 pt · 800 x 800 px).
This is separate from the ruler, which uses your calibrated units (inches, millimeters, custom scales) after you calibrate.
Ruler units (optional)#
Under Preferences → General → Units (optional):
- Measure ruler in points (macOS layout) - Off by default. Length, delta, and coordinates use screen pixels (matches screenshots).
- On - switches the ruler panel, near-ruler label, and cursor readout to points (layout units).
If you used an older PixelStick: the preference at the top of General was called Use macOS coordinates (points). It is the same setting, renamed and moved here. Your saved choice was kept - if you had that box checked, Measure ruler in points is still on and you are still in points mode. The panel now labels Length with pt or px so the units are explicit. Screen-pixel mode is also wired correctly now (older builds often showed point counts even when that preference was off).
8. Preferences#
Open via the panel gear icon or PixelStick → Preferences….
| Tab | Contents |
|---|---|
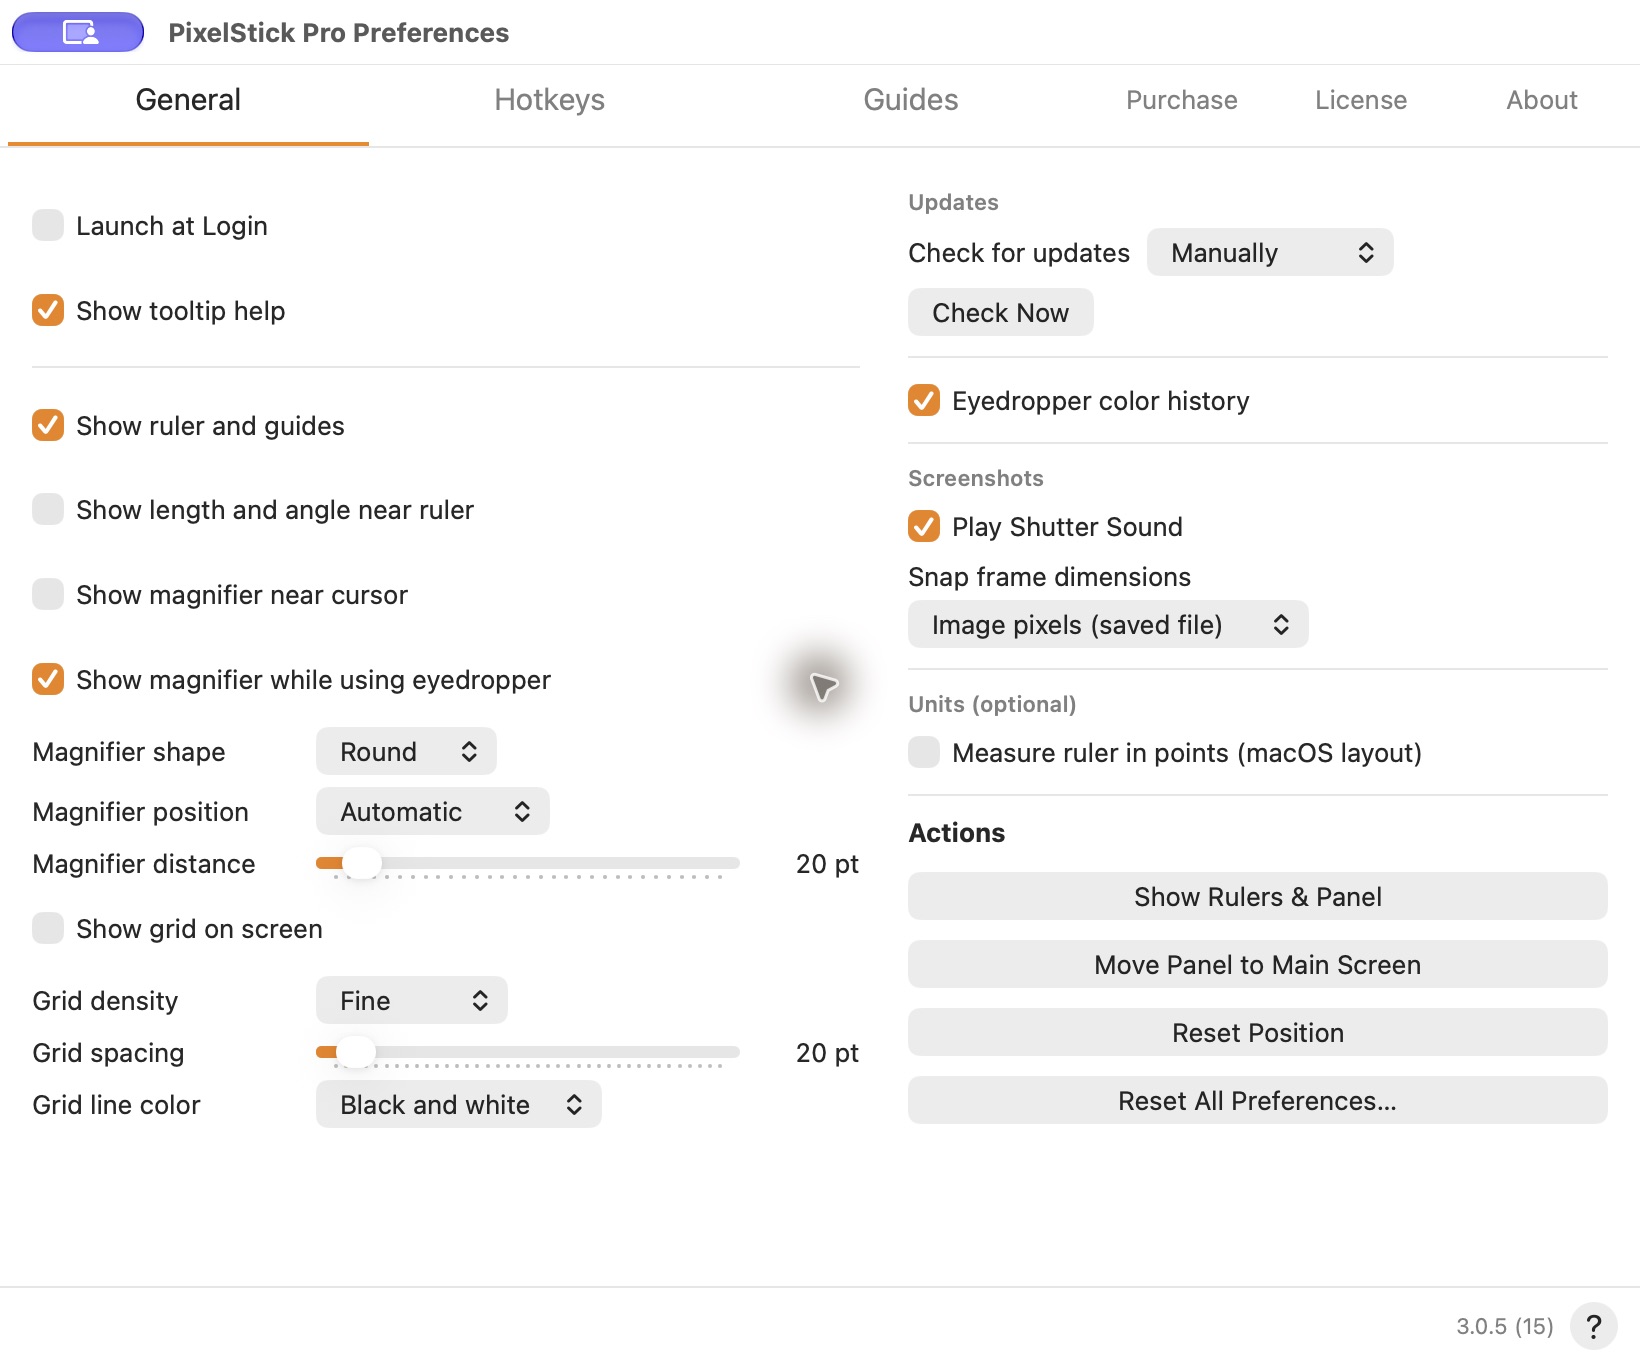
| General | Launch at login; show/hide ruler, loupe, grid, cursor readout; Magnifier shape, position and distance; Grid density, spacing and color; Screenshots (shutter sound, snap frame dimensions); Units (optional) - measure ruler in points; bring UI to front; move panel; Reset Position; reset all preferences |
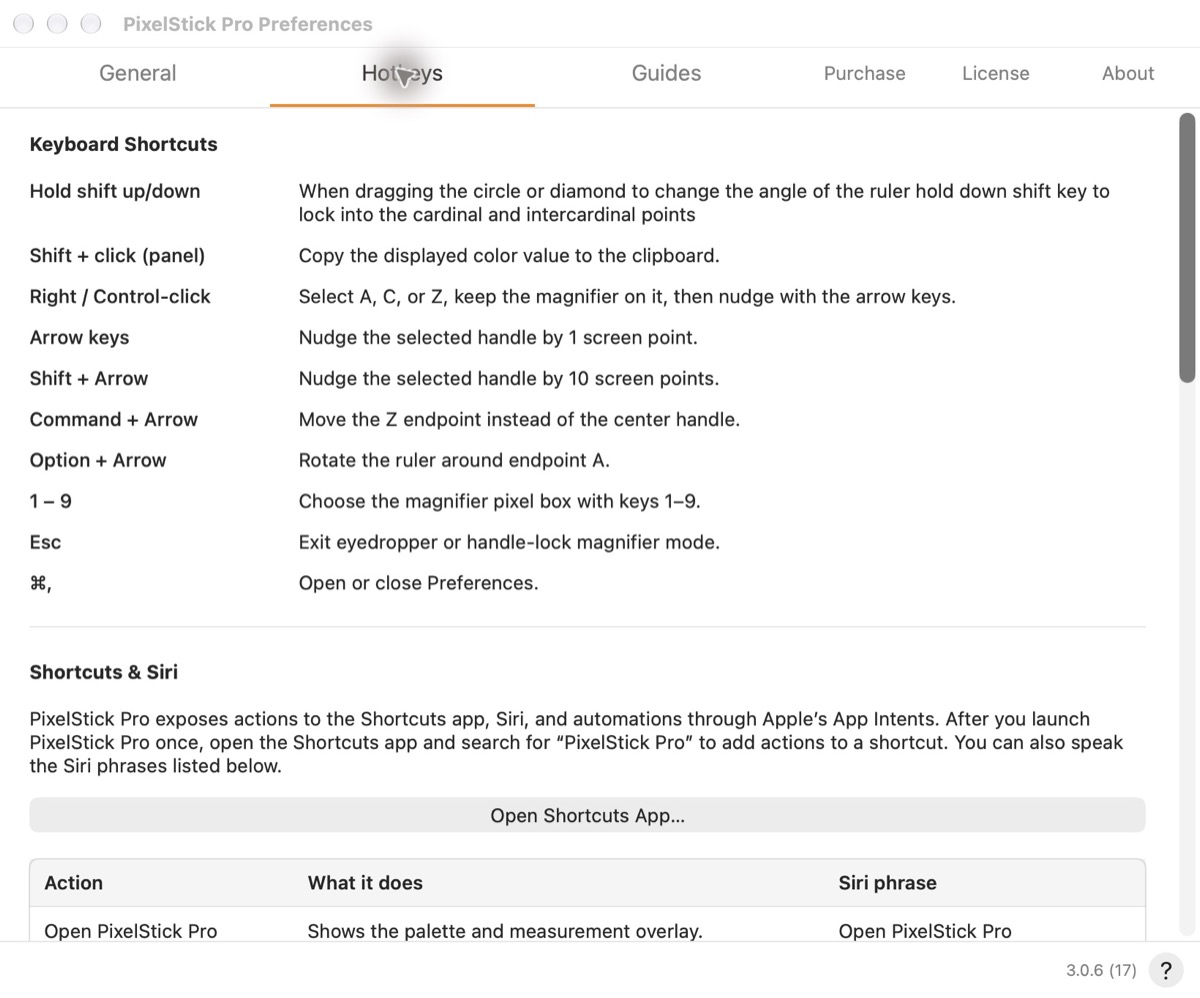
| Hotkeys | Keyboard shortcuts; Shortcuts & Siri intent reference (table + example workflows) |
| Guides | Ruler, circle, and straight guide visibility, width, and color |
| Purchase | Regular and Pro tier pricing cards (direct-download builds) |
| License | Lemon Squeezy activation, legacy owner upgrade (direct-download builds only) |
| About | Installed app version and build |
Visibility without losing your setup: General → Show ruler and guides, and the master switch at the top of Guides, hide or show the ruler, A/C/Z handles, circles and straight guides together. Hiding them preserves the individual choices and positions. The indented Ruler, Circles and Straight Lines options apply when that master switch is on. Turning off only Guides → Ruler → Show hides the measurement line while leaving the handles and other selected guides available.
Hover any control in General for a short tooltip. In 3.0.5, Show tooltip help is on by default. Turn it off to hide hover explanations throughout the app; turn it back on in General whenever you need them. This does not remove control labels or accessibility descriptions.
Version 3.0.5 arranges General in two columns: ruler, magnifier and grid controls on the left; Updates at the top right, followed by color history, Screenshots, Units and Actions. In direct-download builds, Check for updates offers Manually, Every day, Every week or Every month (30 days), plus Check Now. Your existing automatic-check choice is preserved. Automatic checks look for a new version; they do not enable automatic installation. App Store builds use the App Store's update system.
Reset All Preferences resets settings on this Mac. It does not deactivate your license or delete calibration files. To free a license seat, use Deactivate on the License tab instead.
9. Shortcuts#
A keyboard shortcut is a key or key combination. A shortcut in Apple's Shortcuts app is a small workflow made from actions. PixelStick supports both; you do not need to write code to use either.
Keyboard and mouse reference#
| Control | What happens | When to use it |
|---|---|---|
| Shift while dragging A or Z | Attracts the ruler to horizontal, vertical, and 45° directions | Quick alignment; use the panel lock for a fixed angle |
| Right-click or Control-click A / C / Z | Selects that handle and parks the magnifier | Accurate placement without holding the mouse |
| Arrows in handle lock | Move the selected handle one macOS screen point | Fine adjustment |
| Shift + arrows in handle lock | Move the selected handle ten macOS screen points | Faster adjustment |
| 1-9 | Select the magnifier's real-pixel box | Inspect the landing pixel; Key 9 shows a 3 × 3 box |
| Green / blue rim beads | Change the pixel box / magnifier size | Pause, hold Option, or lock a handle before dragging a bead |
| Right-click the ruler line | Open the ruler's context menu | Undo, redo, reference baseline, hide, or quit |
| Command + click | Move the ruler as a whole | Reposition a measurement |
| Command + arrow | Move Z in the ordinary focused-ruler keyboard mode | Adjust the end without moving the center |
| Option + arrow | Rotate about A in the ordinary focused-ruler keyboard mode | Change direction around an anchor |
| Shift-click the color value | Copy the displayed color | Paste a color into another app |
| Shift + S | Open Snap Frame when PixelStick is active | Capture a region |
| Command + comma | Open or close Preferences | Change settings |
| Command + Z / Shift + Command + Z | Undo Move / Redo Move | Recover a completed ruler move or handle-lock nudge |
| Command + I | Invert Colors | Improve guide/reference contrast |
| Command + R | Reset Position | Center the ruler and recover its panel; the same shortcut in both menus |
| Ruler → Map Mode | Toggle clockwise angles; no keyboard shortcut | Read a heading from your chosen reference |
| Command + H | macOS hides the active app's windows | Hide PixelStick when it is the front app; see the whole-app shortcut below |
| Esc | Leave handle lock or eyedropper, or cancel a supported panel | Return to ordinary interaction |
| Command + Option + Control + Shift + Esc | Emergency escape: close overlays and hide the ruler | Recover if an overlay obstructs your work |
Keys that control the ruler depend on its focus and interaction mode. For the simplest predictable arrow behavior, right-click or Control-click the handle first, then release Control. Handle-lock arrows take priority over ordinary focused-ruler keyboard controls.
Create your first Apple shortcut#
Let's make Copy PixelStick Measurement. It is useful for a design specification, support message, or lab note.
- Launch PixelStick Pro once so macOS can discover its actions. Show the ruler and place it on something you want to measure.
- Open Shortcuts from Applications, Spotlight, or PixelStick Pro → Preferences → Hotkeys → Open Shortcuts App….
- Create a new shortcut with the + button or File → New Shortcut.
- Name it Copy PixelStick Measurement.
- In the action search, search for PixelStick Pro or Copy Measurement. Add PixelStick's Copy Measurement action.
- Optionally add Apple's Show Notification action with a message such as Measurement copied.
- Click Run. Switch to a text document and paste to see the length, delta, and angle.
This works on the current ruler. It does not ask you to place the handles or wait for a new measurement.
Make it easy to reach: open the shortcut's details and use Pin in Menu Bar or Add Keyboard Shortcut, where available in your macOS version. Choose a key combination that does not conflict with your design app. You can also ask Siri to run the shortcut by its name.
Recipe: prepare the ruler, then copy a measurement#
Create two small shortcuts so the human part has a clear place in the workflow.
Prepare PixelStick
| Order | Action |
|---|---|
| 1 | Open PixelStick Pro |
| 2 | Center Ruler |
Run it, then position A and Z yourself. When the measurement is ready, run Copy PixelStick Measurement, built above.
Why two shortcuts? Actions normally run one after another. Putting Copy Measurement immediately after Center Ruler copies the centered ruler before you have measured anything. A note saying “adjust the ruler here” is not a pause action. Separate preparation and collection work reliably without relying on a timed delay.
What is copied: Length with px or pt, Delta X/Y, and an angle. The copy action does not include the separate calibrated Scaled value. Include the calibration name and scaled result in your note when those matter.
Recipe: keep a research measurement log#
Goal: keep a measurement beside enough context to find and understand it later. PixelStick supplies the ruler values; your own Apple shortcut supplies the specimen labels and saved record. This is a recipe to build, not a supplied shortcut or a built-in research database.
Use Prepare PixelStick, described above, then position A and Z on the landmarks yourself. Create a second shortcut named Record Research Measurement:
- Add Get Current Measurement. Preserve its returned JSON text in a variable named Measurement JSON.
- Add Apple's Ask for Input actions for an image or specimen ID, the two landmarks, and a short calibration/zoom note. Use a stable identifier such as
CAT-014-frame03so you can find the original image later. - Add Current Date and Format Date. Include a timezone in the chosen format if people in different places will share the records.
- Add Text, inserting those answers, the date and Measurement JSON using Shortcuts' variables. A simple record can look like the teaching example below.
- Add Apple's Append to Text File and choose a research-log file in a folder you control. Check the action's destination and file-access prompts in your macOS version. Run the shortcut once, open the log, and confirm that a second run adds a record rather than overwriting the first.
Record: CAT-014-frame03 / eye-to-muzzle / trial 1
Source: original image filename or dataset identifier
Recorded: [date and timezone]
Context: [image zoom, screen/display, calibration reference and unit]
PixelStick Pro: [version/build from About]
Measurement: [Measurement JSON variable]
Scaled value, if needed: [record separately from the panel]
The values in brackets are fields you fill or insert, not automatic metadata returned by PixelStick. Preserve the source image independently: a screen capture is useful working evidence, not a substitute for the original image, its acquisition data, or its reuse permission. Add a figure or table reference to the log when preparing your paper. Cite the actual app version used and describe your calibration and landmark-selection method; an App Intent does not write a scientific citation for you.
For a companion image, Capture Region can save a PNG of a known screen rectangle and return its path. Give each image a unique name using the same record ID, and retain that path alongside the measurement. The directory must exist. Capture Screenshot Region instead opens the interactive frame and does not return the saved file to your shortcut.
Precision matters: Get Current Measurement reports the active ruler's px or pt values and a raw signed angle from horizontal. It does not return the separate calibrated real-world value, saved-baseline-relative angle, or Map Mode heading. Record those displayed results separately when your method uses them. Keep image zoom fixed after calibration and verify one known distance before collecting a series. The coordinate and Retina cautions in Read an action's JSON result apply to programmatic point inputs. Screen color samples describe the displayed image, not calibrated instrument readings.
Recipe: collect colors and copy one#
- Create Start PixelStick Colors with Open PixelStick Pro, then Toggle Eyedropper.
- Before running it, make sure the eyedropper is off. A toggle reverses the current state.
- Run it, click the colors you need, and press Esc to stop picking.
- Create Copy PixelStick Color with Copy Last Color. Run it when your color is ready, then paste in the destination.
Choose the desired color format in PixelStick first. Copy Last Color copies that formatted value, not always hex. It reports an error if you have not sampled a color.
For a workflow that needs a value at a known position without clicking, use Pick Color at Point instead. It returns JSON, explained below.
Recipe: capture a region by hand#
Create PixelStick Screenshot with Capture Screenshot Region. Run it, resize the Snap Frame, click Snap, and use the save dialog. This action opens an interactive tool; it does not return a saved image or wait for your capture before the next shortcut action.
For a fixed rectangle without the frame, use Capture Region. Give it X, Y, Width, Height, and optionally an Output Path. It writes PNG and returns JSON containing the path and image dimensions. The folder must already exist and be writable. Use a new filename if you want to keep an earlier capture.
Recipe: hide the app or toggle the ruler#
Which part do you want to hide? PixelStick's ruler overlay and its measurement panel are separate. Choose the action that matches your goal:
| Your goal | Use this | What to expect |
|---|---|---|
| Hide the whole app while PixelStick is active | Command + H | The standard macOS Hide command; no shortcut needs to be created |
| Hide PixelStick with your own keyboard combination | Apple's Hide App action, targeting PixelStick Pro | Hides the app's windows while keeping the app running |
| Hide or show just the ruler and guides | PixelStick's Toggle Measurement Overlay action | Reverses overlay visibility; the measurement panel can remain visible |
| Bring the ruler and panel back | PixelStick's Show Rulers and Panel action | Explicitly shows the measurement interface |
Make a keyboard shortcut to hide the whole app
This answers the common question: “Command-H works, but can I use my own shortcut?” Yes. The current Hotkeys preferences explain controls and actions; they do not offer a configurable whole-app Hide key. Apple Shortcuts supplies that part.
- Open Shortcuts on your Mac and create a new shortcut.
- Name it Hide PixelStick Pro.
- Search the action library for Hide App. Add Apple's action, then choose PixelStick Pro as its app. This is an Apple action, so it is not in PixelStick's own action list.
- Click Run once. PixelStick should hide and continue running. Bring it back by clicking its Dock icon or selecting it with Command + Tab.
- Open Shortcut Details with the ⓘ button, click Add Keyboard Shortcut, and press a key combination you want to use. Choose a combination that your other apps do not already use.
- Test that combination while working in another app. If macOS requests permission, review and allow the permission needed for your shortcut.
Keep this shortcut to the single Hide App action. You do not need to add Open PixelStick Pro before it. To make an explicit return shortcut, create Show PixelStick Pro with PixelStick's Show Rulers and Panel action and give it a different keyboard combination.
Apple's Run a shortcut while working on your Mac explains keyboard shortcuts and other ways to launch one. Command + H affects the front app; a shortcut with PixelStick Pro selected targets PixelStick instead.
Toggle only the ruler and guides
Create Toggle PixelStick Ruler, add PixelStick's Toggle Measurement Overlay action, and assign a keyboard shortcut through Shortcut Details → Add Keyboard Shortcut. It hides only when the overlay is currently visible. Running it again shows the overlay.
The panel can stay on screen. This action is useful when you want to clear the ruler away while keeping its readouts available; it does not mean “hide the whole app.”
For a dependable show shortcut, use Show Rulers and Panel. There is no dedicated Hide Ruler action in this version, so do not label a toggle as an unconditional hide command.
Recipe: a repeatable design setup#
Create Prepare Design Ruler with Open PixelStick Pro, then Center Ruler. Add Show Rulers and Panel if you want an explicit final show step.
You can add Toggle Cursor Coordinates or Toggle Measure in Points, but each reverses the existing setting. Running the shortcut twice reverses it twice. For a consistent everyday setup, set your preferred units and coordinate visibility once in Preferences, then leave those toggles out.
Complete PixelStick actions#
Every action exposed by the current app is listed here. Actions marked direct download are unavailable in the Mac App Store build.
| Action | Input and behavior | Output |
|---|---|---|
| Open PixelStick Pro | Show the measurement interface | No value |
| Center Ruler | Reset to a compact centered ruler | No value |
| Show Rulers and Panel | Bring the ruler and panel forward | No value |
| Toggle Measurement Overlay | Reverse ruler/guide visibility | No value |
| Toggle Eyedropper | Reverse color picking; screen capture permission required | No value |
| Toggle Cursor Coordinates | Reverse floating X/Y visibility | No value |
| Capture Screenshot Region | Open interactive Snap Frame | No captured file value |
| Copy Measurement | Read the existing ruler and copy length, delta, and angle | The copied text |
| Copy Last Color | Copy the most recent formatted color | The copied text |
| Toggle Measure in Points | Reverse pixels/points mode | No value |
| Get Color at Cursor | Sample at the pointer's current position | JSON text |
| Pick Color at Point | X and Y in AppKit screen coordinates | JSON text |
| Get Current Measurement | Read the current ruler, without moving it | JSON text |
| Measure Between Points | From X/Y and To X/Y; calculate straight-line geometry | JSON text |
| Capture Region | X/Y, Width/Height, optional Output Path | JSON text with saved PNG path |
| Set Scale | Exact Scale Name; optional exact Group Name | JSON text with selected scale metadata |
| Purchase PixelStick Pro | Open Purchase preferences (direct download) | No value |
| Check for Updates | Request a Sparkle update check (direct download) | No value |
Read an action's JSON result in Shortcuts#
JSON is text with named fields. You can use it in Shortcuts without programming.
For example, build this to calculate the distance between two positions:
- Add Measure Between Points. Enter From X
0, From Y0, To X3, To Y4. - Add Get Dictionary from Input, using the previous action's result.
- Add Get Dictionary Value and choose the key
length. - Add Show Result using that value. The result should be
5.
The complete measurement response has these fields:
{
  "length": 5,
  "unit": "px",
  "deltaX": 3,
  "deltaY": 4,
  "angle": 53.13010235415598,
  "aX": 0,
  "aY": 0,
  "zX": 3,
  "zY": 4
}
Coordinate detail: the X/Y parameters of Pick Color at Point, Measure Between Points, and Capture Region use macOS AppKit screen space, measured in points, with Y increasing upward. Measure Between Points currently labels its calculated result px, but it performs arithmetic on the input coordinates without multiplying by the display's Retina factor. At 2×, a 100-point span occupies 200 backing pixels. Do not mix these input coordinates with a pixel-mode panel readout.
Get Current Measurement uses the ruler's current display mode and reports unit as px or pt. Its angle is a signed heading from horizontal. It does not include the separate calibrated real-world result.
Color actions return hex, red, green, blue, alpha, formatted, and colorSpace. RGB components are normalized from 0 to 1. The current color App Intents do not return Lab; the URL API below does.
Capture Region returns path, width, height, x, and y. Its returned image dimensions are image pixels, while the input rectangle is in points. Set Scale returns name, group, unit, and factor. The factor is PixelStick's stored scale factor; a script should not assume it is pixels per unit. Supply the exact saved profile name. A duplicate name can be disambiguated with Group Name.
Siri, Voice Control, and triggers#
For Siri, say the name of a shortcut you created. Built-in app phrases also include Open PixelStick Pro, Center ruler in PixelStick Pro, Pick color with PixelStick Pro, Take screenshot in PixelStick Pro, Copy measurement in PixelStick Pro, and Copy last color in PixelStick Pro. A toggle phrase still reverses the current state; it does not mean “always turn on.”
Voice Control can execute a shortcut containing a PixelStick action. Enable Voice Control in macOS Accessibility settings and use its custom-command controls to run your shortcut.
Automation triggers vary by macOS version. Newer versions of Shortcuts on Mac provide automation controls; older versions do not have the same trigger interface. If your version offers a trigger, attach it to Prepare Design Ruler, choose an available event such as an app opening or time of day, and review that trigger's run settings. Do not expect an unattended automation to position the ruler, click a color, or complete the save dialog for you. For those jobs, use the actions with coordinate inputs.
Apple's Shortcuts User Guide for Mac covers version-specific controls and permissions.
Terminal and URL automation#
You can run a shortcut you made from Terminal:
shortcuts run "Copy PixelStick Measurement"If a shortcut ends with a text result, you can also write that output to a file. Apple's command-line guide explains inputs, outputs, and exit status.
For scripts that call PixelStick directly, use pixelstickpro://. Original PixelStick uses pixelstick://, so both apps can coexist.
| URL | What it does |
|---|---|
pixelstickpro://color/cursor?format=hex |
Sample under the pointer |
pixelstickpro://color/at?x=100&y=200&format=hex |
Sample an AppKit screen point |
pixelstickpro://measure/current |
Read the current ruler |
pixelstickpro://measure/between?fromX=0&fromY=0&toX=3&toY=4 |
Calculate geometry from coordinates |
pixelstickpro://capture?x=0&y=0&width=800&height=600&out=/tmp/pixelstick-shot.png |
Capture a point-space rectangle to PNG |
pixelstickpro://scale/select?name=ScaleName&group=GroupName |
Select an existing calibration or preset |
For example:
open 'pixelstickpro://measure/current'Responses are written asynchronously to:
~/Library/Caches/PixelStick Pro/automation-response.jsonThe URL API wraps successful responses in {"ok":true,...} and failures in {"ok":false,"error":"..."}. A current measurement appears under measurement, with nested a and z coordinates. This differs from the flat JSON returned by App Intents. The URL color response appears under color and includes Lab data as well as color values.
A script should use a unique reply file per request. Add reply=file:///absolute/path/to/reply.json to the URL and wait for that new file before reading it. URL-encode spaces and other special characters in profile names and paths. Do not read the default response file immediately after open; it may still contain the previous request's result. Avoid sending simultaneous requests to the same reply path.
The developer repository includes PixelStick/scripts/pixelstick-cli.sh, a convenience wrapper for these routes. Its default response-file polling can return an earlier response if that file already exists, so use unique replies for workflows where freshness matters. PixelStick does not bundle a dedicated MCP server in this version.
If a shortcut does not work#
| Symptom | What to check |
|---|---|
| PixelStick actions are absent | Launch the installed Pro app once, then reopen Shortcuts. Search for an exact action name. Confirm you are using Pro rather than the original app. |
| No measurement is available | Show the ruler and move its handles before collecting a result. |
| No color has been sampled | Turn on the eyedropper and click a color before Copy Last Color. |
| The wrong measurement was copied | Remove Center Ruler from the collecting shortcut. Prepare, measure, then copy. |
| A toggle turns the tool off | It was already on. Use Show Rulers and Panel for an unconditional show action. |
| Color or capture fails | Grant screen capture permission to PixelStick Pro and relaunch if requested. |
| Scale not found | Use the exact scale and group names shown in the app. |
| Capture cannot be saved | Choose an existing writable folder; confirm Width and Height are positive. |
| Coordinates appear doubled or halved | Input coordinates use points; panel display and saved image dimensions may use pixels. |
| Purchase or updates action is missing | These actions belong to the direct-download build. |
10. Troubleshooting#
| Problem | What to try |
|---|---|
| Scaling shows pixels only | No calibration active - expand Calibrate, pick a profile, or run Calibrate Measurement |
| Wrong distances after zooming | Recalibrate; browser/image zoom changes the pixel-to-real-world ratio |
| Overlay / ruler not responding | Try ⌘⌥⌃⇧Esc to force-hide the overlay, then General → Show Rulers & Panel. If a screen-reading tool fails, check Screen Recording permission and relaunch. |
| Dragging a handle also selects or moves Finder items | Update to 3.0.7 or later. Ordinary A/C/Z dragging does not require Accessibility permission or an administrator account. If it still happens, report your app version/build, which handle you dragged, and whether Finder was frontmost. |
| Guides disappear with multiple monitors | Starting with 3.0.7, PixelStick draws each display separately. Try General → Show Rulers & Panel. If the ruler is off screen, use Reset Position, which moves it to the main screen. If the problem remains, send the app/macOS versions and a screenshot of your display arrangement, including each display’s resolution and scaling. Tell support whether the panel remains visible; send an app crash report only if the app quits. |
| Finder blocked while eyedropper is on | Update to the latest build - overlay stays click-through during eyedropper; click on screen to sample color |
| Ruler stuck after closing Preferences | Quit and relaunch PixelStick, or use General → Show Rulers & Panel |
| Panel hidden behind other windows | General → Show Rulers & Panel or Move Panel to Main Screen |
| Presets seem inaccurate | Calibrate against the on-screen scale bar instead |
| Cursor X/Y hard to read (light mode) | Update to the latest build - coordinates use adaptive light/dark styling |
| “Invalid license” with a Lemon Squeezy key | Use the key from your Lemon Squeezy purchase email (PixelStick Pro or recent PixelStick). Test-mode keys from the Lemon Squeezy dashboard are accepted too. |
| Legacy key in Activate field | That key is for the previous app - on Purchase, use Owners of the original PixelStick for upgrade pricing |
| Snap frame size ≠ Preview | Default is image pixels (saved file). See §7 Snap Frame dimensions |
| Ruler counts look “half” of Preview | Default ruler mode is screen pixels. If you enabled Measure ruler in points, turn it off under Preferences → General → Units (optional) |
11. Purchase and license#
Direct-download builds use Preferences → Purchase (choose a plan) and Preferences → License (activate your key).
Open PixelStick Pro in the Plum Amazing Store to compare the available lifetime, monthly and yearly options. Check the current price and billing terms there before purchasing. Keep your receipt and license email.
The free tryout and what happens afterward#
The direct-download app includes a 15-day tryout with all Pro features. Afterward, the ruler and guides remain available. The unlicensed app limits eyedropper picks and snapshots to three of each per day, freezes color history, and limits persistence of preferences and calibrations. The status message in the app shows what remains available. Activate a purchased license to restore full access. These direct-download licensing controls do not apply to the Mac App Store build.
Before a reset or upgrade, keep a record of important calibration values and palette exports. A trial limit and a macOS screen-capture permission problem have different remedies: purchasing does not grant system permissions.
Who can activate here at no extra charge#
If you purchased PixelStick recently and received a Lemon Squeezy license key by email, open Preferences → License, paste the key, and click Activate. No additional purchase is required for the current version.
Owners of the original PixelStick#
If you bought the earlier PixelStick from the Plum Amazing store:
- Open Preferences → Purchase.
- Click the original-PixelStick line to show the key field.
- Paste your Plum Amazing store license key and click verify your license key. Extra spaces before or after the key are ignored.
- After a successful check, a dialog appears. Tap PixelStick Pro Discount to open Lemon Squeezy checkout with the upgrade already applied, or Cancel to stay in Preferences. In 3.0.4, checkout applies the 25% owner offer through December 31, 2026. Check the discount and final total before paying. This replaces the earlier upgrade offer in this app. The discount is not shown as a code in the app.
- Do not paste the original key into the Lemon Squeezy Activate field on the License tab - that field is for Lemon Squeezy keys only.
If you received a direct owner-announcement email, its purchase button also applies the owner offer; you do not need to find your original key to use that email link. If you cannot find either your registration or the email, contact Tech Support so we can check your earlier purchase.
If you already purchased PixelStick Pro, tap the License tab at the top of Preferences and enter your Lemon Squeezy license key.
If Activate shows a message that your key looks like a previous-version registration key, follow the steps above.
Updating on the same Mac: quit PixelStick, then install the newer app or use Check for Updates. You do not need to deactivate before replacing the app. Your license is stored separately in macOS Keychain; Deactivate is for releasing this computer’s activation when moving it elsewhere.
Recovering a saved license: if the saved license cannot be read after an update, open Preferences → License and choose Retry Keychain access… when the access warning appears. macOS may ask for your login Keychain password, normally your Mac login password. Choose Always Allow for PixelStick’s own licensing item if you want it to remember permission. This authorizes that item, not every password in your Keychain. Cancelling leaves the saved activation in place. Startup and background checks do not open these permission dialogs.
If the app still shows no active license, enter the same Pro key and choose Activate. When the saved computer activation ID is available, PixelStick verifies that existing activation without requesting another one. An unreadable record, rejected activation or uncertain earlier request stops recovery with a message; it does not automatically spend another computer activation. If the ID cannot be recovered, contact Tech Support with the exact error. Do not delete Keychain records, use Clear local license data, or buy another license to troubleshoot it. Never send your Mac password or a screenshot showing the complete key.
Using more than one Mac account: this update adds an optional Other users on this Mac section, so one existing computer activation can cover separate macOS logins on that same computer. Earlier builds saved activation separately for each login. For ordinary first-time activation, enter your key and click Activate; you do not need to open this section. Putting the app in /Applications makes it available to those accounts; the sharing step makes the activation available too.
- In the login where PixelStick is already activated, open Preferences → License and expand Other users on this Mac, below the ordinary license controls.
- Click Set up other users on this Mac… if offered. Have an administrator approve PixelStick in System Settings → General → Login Items & Extensions, then return to the License tab. Your current activation keeps working during setup.
- Click Use license for all users on this Mac. You need an internet connection: PixelStick verifies and reuses the existing activation rather than requesting another computer activation from the store.
- Open the same installed app from another account. The License tab should say License active for all users on this Mac without requiring the key again.
- Check the tools you use. Sharing a license does not share preferences, calibration profiles or color history, and it does not grant macOS privacy permissions. Ordinary ruler dragging needs neither Screen Recording nor Accessibility approval. The magnifier, color sampling and screenshots still need screen access in the login where you use them; follow macOS prompts for those tools.
If sharing does not finish: the working account's copy is kept until the shared record has been saved and read back. Keep using that account and retry sharing or contact Tech Support. Do not activate again simply to try sharing. If the app reports a missing computer activation ID, contact support to resolve that information while keeping the working account activated.
If the helper is disabled: re-enable it before entering the key again. Disabling the helper in macOS does not release the store activation. The other accounts need the helper to read their shared activation; their personal settings remain separate.
Moving or recovering a shared activation: Deactivate warns that it affects every account using that activation, then releases this computer's seat at the store. If an online release fails, the app checks that computer activation before attempting to restore the working record. If the store no longer accepts the instance, local access stays disabled; a lost reply must not restore an activation that was already released. Restore existing shared activation verifies an existing seat rather than creating another one; a recently interrupted release has a short wait before recovery is offered. After a completed deactivation, that restore button is not offered. Enter your key in Activate if you want to activate this Mac again. Clear local license data disables access without releasing a store seat and retains an inactive, protected recovery record so old account caches cannot silently restore it. Use Clear only for a stuck or already-released activation. If another account already used a separate seat in an older version, contact Tech Support to review those redundant activations; sharing cannot automatically inspect every user's private Keychain.
Manage license: use Deactivate to release the current computer activation before moving the key to another Mac. Refresh info checks the registered name and email. Clear local license data removes account-local licensing information without freeing a store activation; for a shared activation, it disables shared access and retains the protected recovery record described above.
Legacy vs new PixelStick#
The new PixelStick is a major upgrade from the legacy Objective-C app. Same core idea - an on-screen ruler - but rebuilt in Swift/SwiftUI with modern calibration, licensing, and macOS integration.
| Feature | Legacy PixelStick | PixelStick Pro |
|---|---|---|
| What it is | On-screen ruler | Relative ruler - calibrate once, measure in any unit |
| Platform | Objective-C / AppKit (classic UI) | Swift / SwiftUI rewrite |
| License | Legacy registration key (ps-…) |
Lemon Squeezy license key |
| Upgrade path | - | PixelStick Pro Discount checkout after verifying an original PixelStick key on Purchase |
| On-screen ruler | Yes - drag A/Z handles | Yes - drag A / C / Z (circle, square, diamond) |
| Real-world units | Basic scaling / presets | Universal calibration - any unit (mi, µm, ly, fathoms, custom) |
| Calibration Card | No | Yes - bundled reference card + SVG; teaches the relative ruler |
| Scan Legend (OCR) | No | Yes - Vision OCR; optional on-device parsing on supported Macs |
| Saved calibrations | Limited | Named profiles; manage, rename, delete |
| Secondary unit display | No | Yes - Units menu (e.g. ly + pc) |
| Map measurement | Google Maps zoom presets (approximate) | Presets + calibrate against on-screen scale bar (accurate) |
| Guides | Basic | Straight and circle guides (Preferences) |
| Magnifier / loop | Yes | Live while dragging; Round or Square; adjustable position and distance; pixel-box keys 1-9 (Key 9 is 3 × 3); green/blue rim beads for zoom and size |
| Handle lock | - | Right-click or Control-click A / C / Z; magnifier stays |
| Fine nudge / big nudge | Arrows if overlay focused | Arrows = 1 screen point, Shift-arrow = 10 screen points after handle lock |
| Eyedropper / color | Yes | Stays on; history drawer; palettes; WCAG contrast |
| Dark Mode | Classic chrome | Panel follows macOS Light / Dark |
| Screenshots | Yes | Yes - PNG, JPEG, TIFF, and more |
| Click-through overlay | Yes | Yes - measure while using other apps |
| Shortcuts / Siri | - | App Intents |
| Hotkeys | Yes | Yes - reference in Preferences |
| Updates | Sparkle (classic feed) | Sparkle (Pro feed) |
| macOS | Older releases supported | macOS 15+ (current direct-download build) |
More details: plumamazing.com/pixelstick/upgrade/ - full comparison and upgrade instructions for legacy owners.
12. Tips#
- When measuring, position the endpoints inside the area to be measured.
- The easiest way to get both dimensions of a region: drop an endpoint exactly on a corner, read the height, then drag the other endpoint to the opposite corner for the width.
- Hold Shift while dragging A or Z to pull toward horizontal, vertical, or 45° - like a magnet, not a lock. Great for clean measurements when you want them, and easy to leave when you don’t.
- Use the Copy Measurement Shortcuts action to copy the ruler readings. Use the color row's copy button for a color value.
- Pause the pointer, hold Option, or lock a handle, then drag the green bead to change the pixel box and the blue bead to resize the loop.
- In general, changes take effect immediately - flip a setting and try the ruler right away to see the difference.
For demonstrations of measuring maps, satellite images, and other material, visit PixelStick videos. Some clips show earlier interfaces; use this manual for the current control names.
13. From the mailbag (real questions)#
Real questions from PixelStick users over the years - still useful today.
"I'm an astronomer. How do I make a custom unit like AU, where 1 AU is some number of pixels?"
Two ways, both under Calibrate:
- If you know the scale: open Calibrate Measurement, turn off Use current ruler measurement, and enter the known Pixel length. Then enter the corresponding real-world value and custom unit. For example, if 250 pixels represent 1 AU, enter pixel length
250, value1, and custom unitAU. Name and save the profile. Check another known distance before using it for further measurements. - If you have a reference image: measure a known 1 AU distance on screen with the ruler, then Calibrate Measurement → value
1, unitAU, and Save. Every measurement now reads in AU. Add a secondary unit likelyorpcfrom the Units menu if you want two at once.
"I'm an orthopaedic surgeon - how do I measure the angle of knee flexion?"
- Open a photo of the femur, knee, and tibia.
- Put the circle endpoint on the knee (the joint / vertex) and the diamond endpoint along the femur.
- Choose Ruler → Set Baseline to hold that direction with a dashed reference and zero the angle readout.
- Swing the diamond along the second feature. With Map Mode off, the panel reports the signed angular difference directly. See Angles & baseline for the clockwise convention and examples.
(The same recipe works for any "angle between two features": leaf venation, crystal faces, roof pitch, a golf swing.)
"With Shift held so the handles are on a horizontal line, I get two different distance numbers - which is right?"
Read the px or pt suffix first. Length is straight-line distance; Delta gives the separate X/Y components. On a horizontal line, its unrounded absolute X difference should agree with Length in the same units. Small discrepancies can come from rounded coordinates. The current app does not add a pixel for inclusive endpoint counting.
Ideas under discussion (not current features)
14. Ideas we’re considering (not in this beta)#
These suggestions remain future ideas and are not included in version 3.0.2.
These are discussion notes, not a promise of shipping dates. PixelStick stays a relative ruler - one calibration, then everything on screen is in your units. If you want to weigh in, write support@plumamazing.com.
Two sticks / leftover gap#
Not a second copy of PixelStick, and not a second panel. Still one overlay and one panel.
Today you have one stick (handles A-C-Z) plus optional circle/straight guides. The idea is a second stick on the same overlay - a second pair of handles you can park on another feature. The panel would add a few rows: length of stick 2, and the gap (shortest distance, or ΔX/ΔY) between the two segments.
Typical uses: “is this button still 8 px from that one,” “does this sofa fit between these two walls on the floor plan,” “spacing between two cells / two stars.” You would turn the second stick on from the panel; you would not launch another PixelStick.
Scale-bar assist (one-tap calibration)#
You can already drag the ruler across a labeled bar and use Scan Legend (see §4). That is two steps: measure the bar, then OCR the label.
Scale-bar assist would collapse that into one gesture on maps, drawings, and microscope/telescope captures that already print a bar like 500 ft or 50 µm.
A plausible flow
- You click Calibrator → Scale bar (or a camera-adjacent “scan bar” control).
- A small snap frame appears - same family as today’s screenshot frame, but meant to wrap the bar and its label, not the whole view.
- You size the frame around
──── 500 ft(or50 µm,10 kpc,1 nmi). - PixelStick, in that frame only:
- Finds the bar (a short high-contrast line or ladder).
- Measures that bar in screen pixels.
- Reads the label with the same Scan Legend stack (Vision OCR, then unit parse: ft, µm, kpc, …).
- The Calibrate sheet opens already filled: “this many pixels = 500 ft.” You glance, name the profile (“Map downtown,” “40× objective”), and save.
If OCR is unsure, you still type the number - the pixel length of the bar is already done. Zoom or rotate the map later, and you run the assist again (same as today’s calibration: it is tied to this on-screen scale, not to the whole planet).
That is what “make the relative-ruler story obvious” means: the map already told you the scale; PixelStick should believe the map.
For astronomers and biologists (telescopes and microscopes)#
These people already live on plate scale and objective magnification. Features that would earn their keep:
- Named instrument profiles - “Celestron 8″ + ASI camera,” “Nikon 40× + 0.5× adapter.” Store arcsec/pixel or µm/pixel once, not a one-off calibration every session.
- Small-angle helper - given a calibration in arcseconds and a distance (or redshift later), show physical size as a second unit (pc, kpc, AU). Biologists already do the inverse: µm on the slide vs. field of view.
- Eyepiece / camera FOV - enter focal length + sensor size (or a known FOV) and get a circle guide that is “this eyepiece’s field” on the image.
- Stage-micrometer & scale-bar assist - the one-tap bar above is the daily path for both fields; Hubble JPEGs and wet-lab exports both print a bar.
- Star / cell FWHM - drop the circle guide on a star or nucleus and read diameter in the current unit (seeing, or nucleus size).
- Transect count - park the stick across a feature; click to count objects along it (colonies, vesicles, field stars). Optional, easy to ignore.
- Publication snap - snapshot with burned-in scale bar + length so the figure you email matches what you measured.
- Freeze-then-measure - live camera feeds move; freeze a frame (or a region) and measure on the freeze so the cell does not swim away mid-drag.
None of that requires a second app. It is the same stick, better calibration, and a few readouts those labs already compute by hand.
Other items from the same discussion#
- Freeze, then measure - lock a screenshot and run the ruler on that still.
- Stamp the proof - export the snap with length, angle, and scale drawn on it.
- Drop a file on PixelStick - PNG or PDF page; same relative ruler, no live screen.
- Eyedropper area + ΔE - average a few pixels; show distance from the last saved color.
- Contrast pair - two picks, live WCAG ratio.
- Palette from the snap - unique colors inside the frame.
- Nearest named color - closest CSS / common name for a pick.
- Corner angle - three clicks (two legs and a vertex), in addition to the stick’s heading.
15. Credits and history#
PixelStick has measured Mac screens since 2012. It's made by Plum Amazing - originally created by Ryan Leigland, with later updates by Mark Fleming and Bernie Maier, and rebuilt from the ground up in Swift/SwiftUI for the current release.
We love hearing how people use PixelStick - from galaxy photos to microscope slides to knee X-rays. Suggestions and bug reports are always welcome.
Help: plumamazing.com/pixelstick · Support: support@plumamazing.com
Revision history#
| Date | Manual version | Changes |
|---|---|---|
| 2026-11-02 | 3.0.8 | Preserved activation across updates and Keychain read/save failures; added explicit permission retry and existing-instance recovery without requesting another activation. |
| 2026-11-01 | 3.0.7 | Explained handle-only mouse interaction, per-display drawing and multi-monitor recovery, ordinary dragging without Accessibility permission, the retired line context menu, shared activation and reactivation after deactivation. |
| 2026-10-30 | 3.0.6 documentation draft | Clarified screenshot close/Escape restoration, Option-click Camera, retained guide choices, panel fit and readable Hotkeys help for the next update. Added typed whole-point grid spacing over 10–4000 pt and a draft workflow for sharing one computer activation across logins on the same Mac, kept under a closed optional section. Not published. |
| 2026-10-29 | 3.0.6 documentation draft | Prepared next-update Control-click instructions for A/C/Z, clarified screen-point nudges and current per-account activation. Not published. |
| 2026-10-29 | 3.0.6 | Clarified length and angle locks, using both together, Shift snapping, keyboard nudges and screen-point rounding; updated the download for the lock repair. |
| 2026-10-17 | 3.0.5 documentation draft | Expanded the overview and color-sampling language. Saved for review after the 3.0.5 release; not published. |
| 2026-10-17 | 3.0.5 | Compact two-column General preferences; optional tooltip help; scheduled update checks; clearer permission guidance; improved continuous print/PDF layout. |
| 2026-10-15 | 3.0.4 | Updated release references for the replacement owner checkout code; the 25% offer and its terms are unchanged. |
| 2026-10-15 | 3.0.3 | Updated the verified-owner checkout instructions for the 25% offer through December 31, 2026; added a research-log Shortcuts recipe with calibration and provenance cautions. |
| 2026-10-04 | 3.0.2 | Updated the manual for the full 3.0.2 release and its normal download and corrected automatic-update channel; retained the established chapters, illustrations and complete Shortcuts reference. |
| 2026-10-04 | 3.0.1 | Added saved screen-grid density presets and custom spacing instructions, including a visual comparison exercise; updated Reset Position to Command-R in both menus; linked beta 11 and the new website manual from the app's Help controls; checked Copy Measurement and Hide App recipes in Apple Shortcuts. |
| 2026-10-03 | 3.0.1 | Integrated complete Shortcuts recipes and scripting reference, including hiding the whole app with a custom keyboard shortcut; added learning paths, current Pro screenshots, historical context, sourced quotations, a visual zoom lesson and color exercise; documented the upcoming restored ruler commands and saved magnifier shape, position and distance controls. |
| 2026-09-16 | 3.0.0 | Magnifier loop is circular. Green rim bead changes the pixel box; blue rim bead changes loop size. |
| 2026-09-09 | 3.0.0 | Handle lock (fine/big nudge). Expanded classic-vs-Pro table. Calibration Card framed as the relative ruler. Website copy handoff. |
| 2026-09-03 | 3.0.0 | Current measurement panel screenshot; panel toolbar/readouts table updated. New section: ideas under discussion (second stick, scale-bar assist, astronomy/microscopy). |
| 2026-08-29 | 3.0.0 | Shift-drag snap is magnetic (cardinal / intercardinal) like original PixelStick. Overview states PixelStick is a relative ruler. |
| 2026-08-24 | 3.0.0 | Magnifier loop stays live while dragging A/Z/C; yellow center cell always marks the landing pixel (grid overlay remains optional). |
| 2026-07-15 | 2.21.0 | Color Pro: WCAG contrast checker in eyedropper drawer; saved named palettes; export .gpl, .json, .css, .ase; display color-space sampling. Automation: programmatic App Intents, pixelstick:// URL API, scripts/pixelstick-cli.sh. See Documentation/Automation_API.md. |
| 2026-07-15 | 2.20.0 | Shortcuts & Siri - App Intents table and examples in Preferences → Hotkeys; Purchase PixelStick intent (direct builds). See Documentation/Shortcut_Examples.md. |
| 2026-07-15 | 2.19.0 | Ruler/cursor units preference wired up (default screen pixels; optional points mode); clearer Preferences layout (Screenshots, Units optional). Note for users of legacy Use macOS coordinates (points). |
| 2026-07-15 | 2.18.0 | Snap Frame dimension display preference (image pixels, points, or both); explanation of points vs pixels on Retina displays. |
| 2026-07-09 | 2.17.0 | Merged the best of the classic (2012-2017) manual: concepts (coordinate system, Length vs Delta, baseline), right-click menu, Tips, "From the mailbag" Q&A, and credits/history. |
| 2026-07-06 | 2.16.2 | Embedded first screenshots (overview, panel, calibration card, guides, preferences). |
| 2026-07-06 | 2.16.2 | Added title versioning for AI edits; screenshot folder and image embed guidance. |