A photographic studio guide for Android
iWatermark family for Android
Make your first photo, build a reusable identity, and prepare a consistent batch. A guide to visible marks, hidden information, and thoughtful photo presentation.
App version 6.0.0-beta.23 Updated 2026-10-11
Android studio guide · Pro Plum beta.23, build 600023 · Manual revised October 11, 2026
This guide covers the Android Pro Plum beta and Android 7.0 or newer. iOS instructions belong to the iOS manual. The version above identifies the app described; the manual can be updated separately from the app.
Welcome. iWatermark helps you add your name, logo, signature, or other marks to photos before you share them. You can work on one photo or a batch. Your original media stays in place; export creates new files.
The family consists of iWatermark, iWatermark+, and iWatermark Pro, built from the same Android project. This shared manual describes the full feature set in iWatermark Pro, the first new Plum release being prepared. The feature limits and upgrade arrangements for the other two editions are not finalized. Do not assume that a license for one edition unlocks another.
The new Pro Plum app installs separately from earlier Plus Plum betas and existing Google Play apps. Saved watermarks and settings do not automatically transfer between separate apps. Export important watermark presets before changing apps. Google Play Pro distribution will follow the Plum release.
A watermark is information you add to a copy of a photo. It can be visible, such as your name, or stored in the file, such as copyright metadata. Neither a visible mark nor a hidden message can prevent someone from copying a photo. Choose a mark that serves your purpose, then check the saved result.
Find your way #
- Compare the editions
- Purchasing and plans
- Download and install the Plum beta
- Start with your first photo
- Check device recommendations
- Import your own photos
- Use the main canvas
- Preview a batch in the photo tray
- Make and edit watermarks
- Export one photo or a batch
- Activate or deactivate a license
- Solve common problems
- Contact support
- Look up a term
Compare the editions #
The table below is the proposed family lineup. The current Pro beta exposes the full existing toolset; license-controlled lower tiers are not implemented yet. Historical features and purchase rights must be confirmed before replacing older apps. The Android proposal also needs a separate iOS compatibility review before it describes an iOS release.
| Feature or watermark | iWatermark | iWatermark+ | iWatermark Pro |
|---|---|---|---|
| Text, bitmap graphics/logos, QR codes | Yes | Yes | Yes |
| Signature | Yes | Yes | Yes |
| Borders | Yes | Yes | Yes |
| Redact/pixelate | Yes | Yes | Yes |
| Arc text and legacy text banners | No | Yes | Yes |
| Vector graphics | No | Yes | Yes |
| Metadata watermark | No | Yes | Yes |
| Existing StegoMark | No | Yes | Yes |
| Lines | No | Yes | Yes |
| SocialID | No | No | Yes |
| Provenance Label | No | No | Yes |
| Photo filters | No | No | Yes |
| Video watermarking | No | Yes | Yes |
| Photo batches, thumbnail tray, resizing, export controls | Yes | Yes | Yes |
| StegoMark 2 | No | No | Planned, not available |
StegoMark 2 is planned for Pro and is not available in this beta. It is different from the existing StegoMark. No release date is promised.
Legacy text banners and grouped watermarks require further migration work and visual comparison. A successful import alone does not guarantee that every old setting will look identical. Keep exported backups and the old app until you have checked the results.
Purchasing and plans #
Try iWatermark Pro and every feature free, for as long as you like, without advertising. Until licensed, Created with iWatermark Pro appears on the photo preview and on exported copies, including copies you share or print. The small translucent notice chooses white or black from the area behind it to remain subtle and readable. Your original photo is unchanged. Each edition uses its own name in the notice.
The centered shopping cart / license control opens licensing. When purchasing is configured for your edition, Purchase and the preview notice open that edition's Plum checkout in your browser. Text in an exported JPG or PNG is ordinary pixels and cannot open a purchase link. Purchasing is not yet available in this Pro beta. Its checkout and license product are awaiting configuration and verification; the app stays in free shareware mode. The earlier Plus product is not a Pro purchase.
Purchasing supports the evolution of the family and provides the features included in the edition you choose, new exports without the trial notice, upgrades during your license period, and technical support at [email protected]. The Pro device allowance has not been finalized; check the terms shown in the verified checkout when purchasing becomes available.
The approved Android Pro prices are US $0.99 monthly, US $9.99 yearly, or US $19.99 lifetime. These licenses are for Android only; a future family bundle will be priced separately. Lifetime is a one-time purchase; monthly and yearly are subscription options. Checkout is not open yet: the product, variant prices and license behavior must be verified before sales begin. Confirm the final billing and device terms in checkout. The lower editions' feature limits and subscription upgrade/downgrade process are still being finalized.
Lemon Squeezy provides your receipt and license key. Save the email and activate the key in the matching edition while connected to the internet. Manage billing through your receipt or Lemon Squeezy My Orders. How subscription licenses work.
Already exported photos are unaffected by cancellation. Deactivating a device does not cancel subscription billing. See activation and device transfers before selling, giving away, resetting, or replacing a device.
Download and install the Plum beta #
The iWatermark Pro beta.23 APK requires a verified official download link. Visit the Android product page for current availability and check the edition and version before downloading; an older Plus download is not this Pro beta. It requires Android 7.0 or newer. Download only through the official Plum Amazing website, not a forwarded copy or a lookalike site. A SHA-256 checksum accompanies published APKs.
- Tap the download link on the Android device. When it finishes, open the downloaded APK from the browser's download notification or Files → Downloads.
- If Android asks for permission to install from this source, open the settings it offers. On Android 8 or newer, allow installs from the browser or Files app you used, then return and tap Install. On Android 7, the setting is usually Settings → Security → Unknown sources; allow just this installation if your device offers that choice.
- Open the edition you installed after installation. For your first test, choose Try Sample Photo and export one copy. The Pro trial copy should include Created with iWatermark Pro.
- After installation, you can turn off Allow from this source (or Unknown sources on Android 7). Keep Google Play Protect enabled. If Android reports that this specific download is harmful, stop and contact Plum Amazing support rather than turning off a security check.
The Pro Plum app installs beside earlier Plus apps. It does not import that app's settings automatically. Future Plum beta updates must come from Plum Amazing and use the same signing identity; install a newer Plum APK over this app to keep its local data. Android's wording may vary by device maker. See Google's instructions for apps from other sources and Android's version-specific guidance.
Device recommendations #
The APK installs on Android 7.0 or newer. For the best beta experience, we recommend a relatively recent phone or tablet with Android 10 or newer and at least 4 GB of RAM. If you regularly export large photo batches or videos, a faster device with 6 GB or more is a sensible choice. These are provisional recommendations, not guarantees: photo size, video format, storage speed, and processor performance also matter.
An earlier beta was tested on a Samsung SM-T350 tablet with Android 7.1.1 and about 1.4 GB of RAM. It opened, previewed a photo, and saved a single watermarked photo, but interactions were less smooth and that export took about nine seconds. On devices with less than 2 GB of RAM, Show photo tray starts off to reduce work; you can turn it on in Import Media. The app may run below the recommended hardware level, but smooth previews and quick exports cannot be promised there. If speed matters, use a faster device with more RAM; otherwise, keep the tray off and allow extra time for processing. Start with one photo and a short video before trying a large batch on older hardware. Android 7.0 itself has not yet been tested on a physical device.
Your first photo #
Choose a photo you have permission to use, or try the included sample. The app makes an exported copy and leaves your original untouched.
- Tap the photo icon at the lower left of the canvas.
- In Import Media, choose Try Sample Photo, Photo Library, Google Photos, Browse Files, or Take Photo. Select one photo. The Export/Share badge becomes 1. The welcome guide also has a Try Sample Photo button.
- Tap the Watermarks icon in the blue bar. Its badge shows how many watermarks are active. Select a watermark or tap Create to make one. Tap Done to return.
- Move a visible watermark on the photo, or open its settings with the sliders icon. Try changing its text, size, color, and position.
- Tap Export/Share. Review the number of photos, selected watermarks, and destination album, then confirm. Find the new copy in the named photo album. Tap Share Photo in the completion dialog to open Android's sharing choices.
Expected result: your gallery contains a new copy with the selected watermark. The original still looks the same. In shareware mode, the copy also has the trial notice. If the result is wrong, edit the watermark and export again from the original. Removing a watermark in the app does not erase it from a previously exported copy.
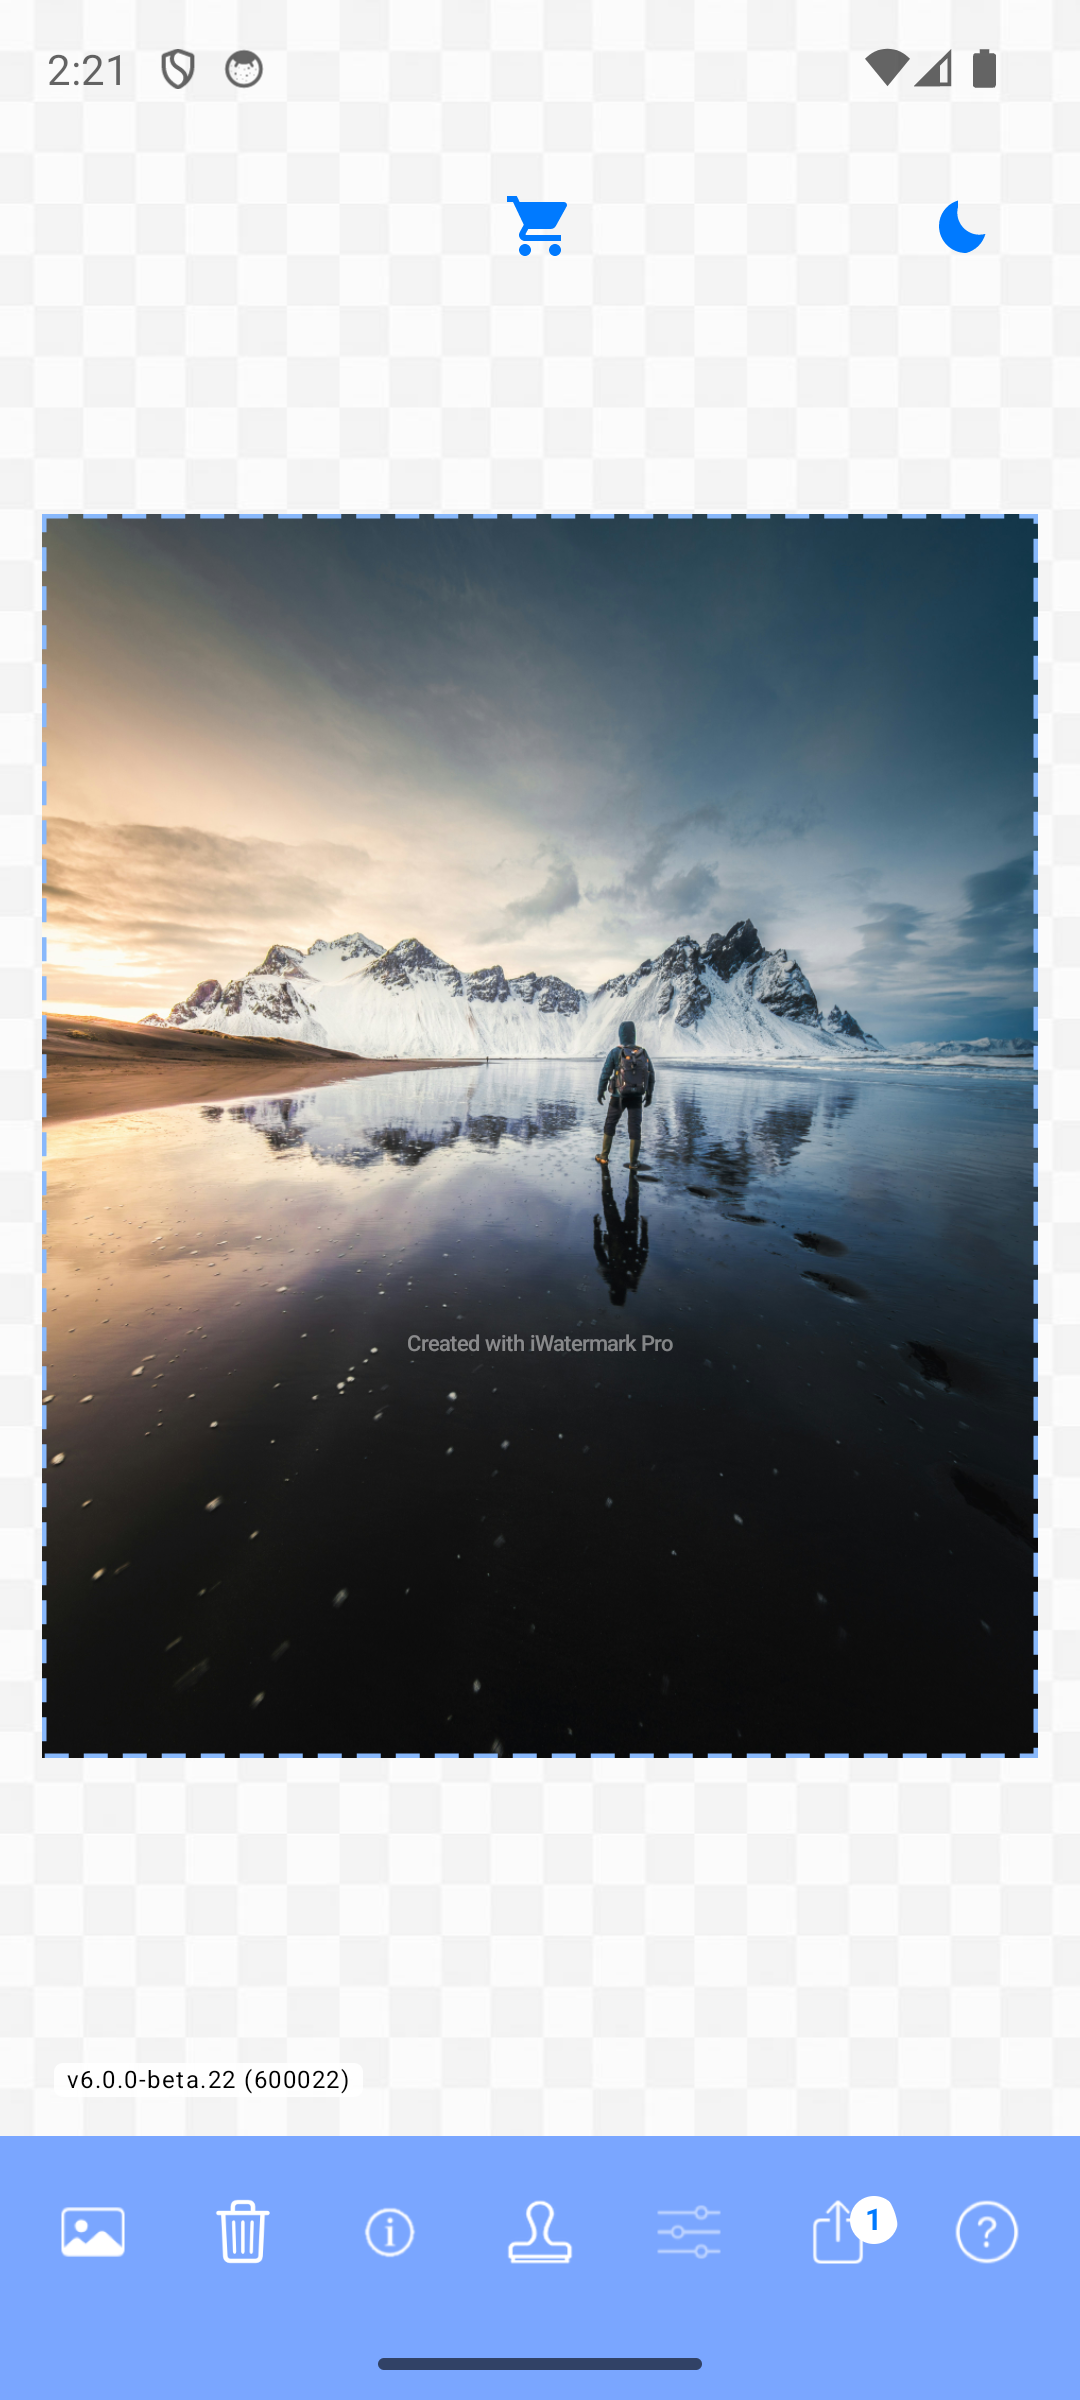
A small exercise: make a text mark with your own name. Preview it first on the dark water, then on the bright sky. Try a different color or a faint background and decide which is easier to read. Use the preview as a guide and inspect the exported file before sharing.
The included sample photo is credited to Marco Grosso on Unsplash in Import Media. It has no camera or GPS EXIF data; Photo Info reports only information actually available from the file. The earlier sunset sample was removed because its source and rights could not be verified.
Beta trial: Every feature is available before purchase. Until you activate a license, a small translucent Created with mark naming your edition appears on new photo exports. Activating a license removes that mark from later exports; it does not modify files you already exported.
Import photos and video #
Tap the photo icon in the bottom blue bar to open Import Media.
- Photo Library opens Android's photo picker. It shows photos on the device and photos offered by an available cloud photo provider, such as Google Photos when configured on your device. Choose one or several photos.
- Google Photos opens Google Photos' own image picker when that app is installed. You can choose one or several photos; if Google Photos is unavailable, the app opens Photo Library instead.
- Browse Files opens Android's file picker. Use it for Downloads, folders, an inserted SD card when Android offers one, and available storage providers. The picker offers its own search and location controls; the app does not scan every file on the device.
- Select Video chooses a video for watermarking.
- Try Sample Photo loads the included Marco Grosso photo without copying it into your gallery. It can be previewed, watermarked, exported, and shared like a photo you import. Unsplash's license allows free commercial use; credit is appreciated.
- Select Using Info (slower) lets you narrow a photo selection using file information before importing.
- Take Photo opens the camera. Paste Photo uses an image on the clipboard. Delete Media clears the current import from the canvas; it does not delete the source file from your device.
If you drag photos into an Android emulator, Android normally places them in Download. Choose Import Media → Browse Files → Downloads. The photos may not appear immediately in Photo Library. Android explains this in Install and add files to the emulator.
Android's pickers decide which cloud services and folders are offered. If a cloud photo is missing, make it available locally in its provider app or use Browse Files to find a downloaded copy. For many files, test a small batch first to confirm the format and destination. See Android's guides to the photo picker and file picker.
To import from an SD card, insert and mount it, then choose Browse Files and select its storage location in Android's picker. The current export flow saves to the device's Pictures/iWatermark+ album; it does not offer an SD card export destination.
Main canvas #
The canvas previews the currently selected photo and its active watermarks. A blue outline around a watermark shows the item you can move or edit. The preview is a guide; inspect an exported copy for final quality.
The bottom blue bar, from left to right, contains:
- Import Photo/Video: open Import Media.
- Delete Photos: clear the loaded media from the app.
- Photo Info: inspect the selected photo's details and metadata.
- Watermarks: open the watermark list. Its badge counts active watermarks.
- Edit Watermark: edit the currently focused active watermark.
- Export/Share: export the selection. Its badge counts the imported photos, which can differ from the watermark badge.
- Help: open the manual.
The top controls include a purchase or license control and a light/dark appearance control. The version and build number stay in the lower-left corner of the canvas; the Help (?) icon is at the right end of the blue bar. Include the version and build when reporting a problem.
Photo tray and batch preview #
When two or more photos are selected, the tray appears in the blue navigation area if Show photo tray is enabled. It shows small previews without loading the whole batch as full-size images.
- The number at the upper left is current photo of total photos, such as 5 of 8.
- Swipe the thumbnails with your finger, or use the left and right arrows to move through them. Tap a thumbnail to show that photo on the canvas. Your active watermarks are previewed on the photo you choose.
- The compact size menu offers S, M, L, and XL thumbnails. M is the initial size; the choice is remembered.
- Select the Singly radio choice to export only the photo currently shown on the canvas.
- Select the Batch radio choice to export every imported photo. Only one mode can be selected at a time; tap Export beside the choices to continue. Batch is selected initially.
- The normal Export/Share icon in the bottom bar exports the entire selection.
To hide or show the tray, open Import Media and change Show photo tray. Swipe the Import Media panel upward if the switch is below the visible area. The choice is remembered. On devices with less than 2 GB of RAM, including some older tablets, the tray starts off and the switch warns that previews may be slow. You can turn it on if the device handles it well. Hiding the tray does not remove photos from the batch. Use the export badge and confirmation dialog to check the batch count.
A batch that still looks deliberate #
For a collection of travel photos, make one quiet name or website mark and reuse it throughout the set:
- Import three photos, including a bright scene and a dark scene.
- Turn on Show photo tray if needed. Tap each thumbnail to inspect the same active mark on different photos.
- Adjust its position, size, and color with the whole set in mind. From photo suggestions help choose a color, but they do not automatically change a user text mark for every image.
- Choose Singly and export one test copy. Inspect the saved text and any QR code at full size.
- Return to the tray, choose Batch, and confirm the number of photos before exporting the set.
The selected thumbnail changes your preview; it does not by itself reduce the export queue. Use the radio choice and confirmation count to decide whether you are exporting one or all.
Photo Info and metadata #
Tap the info icon after selecting a photo. Photo Info groups available file, camera, rights, and location fields. A map is shown only when the photo actually contains coordinates. A missing field means Android or the image did not provide it; it is not filled with sample values. The selected thumbnail in a batch controls which photo's information you see.
Metadata can reveal where a photo was taken. Review it before sharing, and use an Export Options watermark if you want to remove metadata from exported copies.
Watermarks list #
Open Watermarks from the blue bar. Tap a watermark's selection control to make it active or inactive. Several watermarks can be active together. Tap its settings control to edit it, or use Edit Watermark on the main canvas for the focused item. Create opens the list of available watermark types. Done returns to the canvas.
The list has a search field and an Organize control. Its bottom bar includes a focus-next control, Create, deselect/reselect, export selected watermarks, and Help. Exporting a watermark creates a shareable .iwm file; it is a backup or reusable preset, not a watermarked photo. To restore a saved watermark, use Import Watermarks in the list and choose the .iwm file in Android's picker. Keep a copy of important custom watermarks outside the app before changing devices or uninstalling.
A saved watermark is a reusable recipe, not a modified photo. You can turn the recipe off without deleting it, edit it for your next export, or export it as a preset backup. A batch is the group of source media you selected. Active watermarks are applied to that group when you export.
The eye is a temporary peek: press and hold it to view the canvas behind the list or settings. Release your finger to return to the same controls. Peek does not save or cancel your changes.
Organize and delete several watermarks #
Tap Organize above the watermark list. Drag the handle at the right side of a row to change its order; moving a mark to the top pushes the previous first mark down. Tap Done to keep the order or Cancel to discard the changes.
To remove several marks, check the boxes beside them, then tap the trash icon in the top bar. Read the confirmation and tap Delete; tap Done to save the deletion. You can tap Cancel in the organizer to restore the list from when you opened it. Export your important custom watermarks first if you may need them later.
Create a watermark #
Open Watermarks → Create. The picker groups visible marks, invisible marks, and photo transformations. Choose a type, give it a recognizable name, adjust its settings, and tap Save. A new watermark becomes the active item; you can later select several from the Watermarks list. Cancel discards an unsaved new watermark. In the visible group, Provenance Label and SocialID follow Redact/Pixelate.
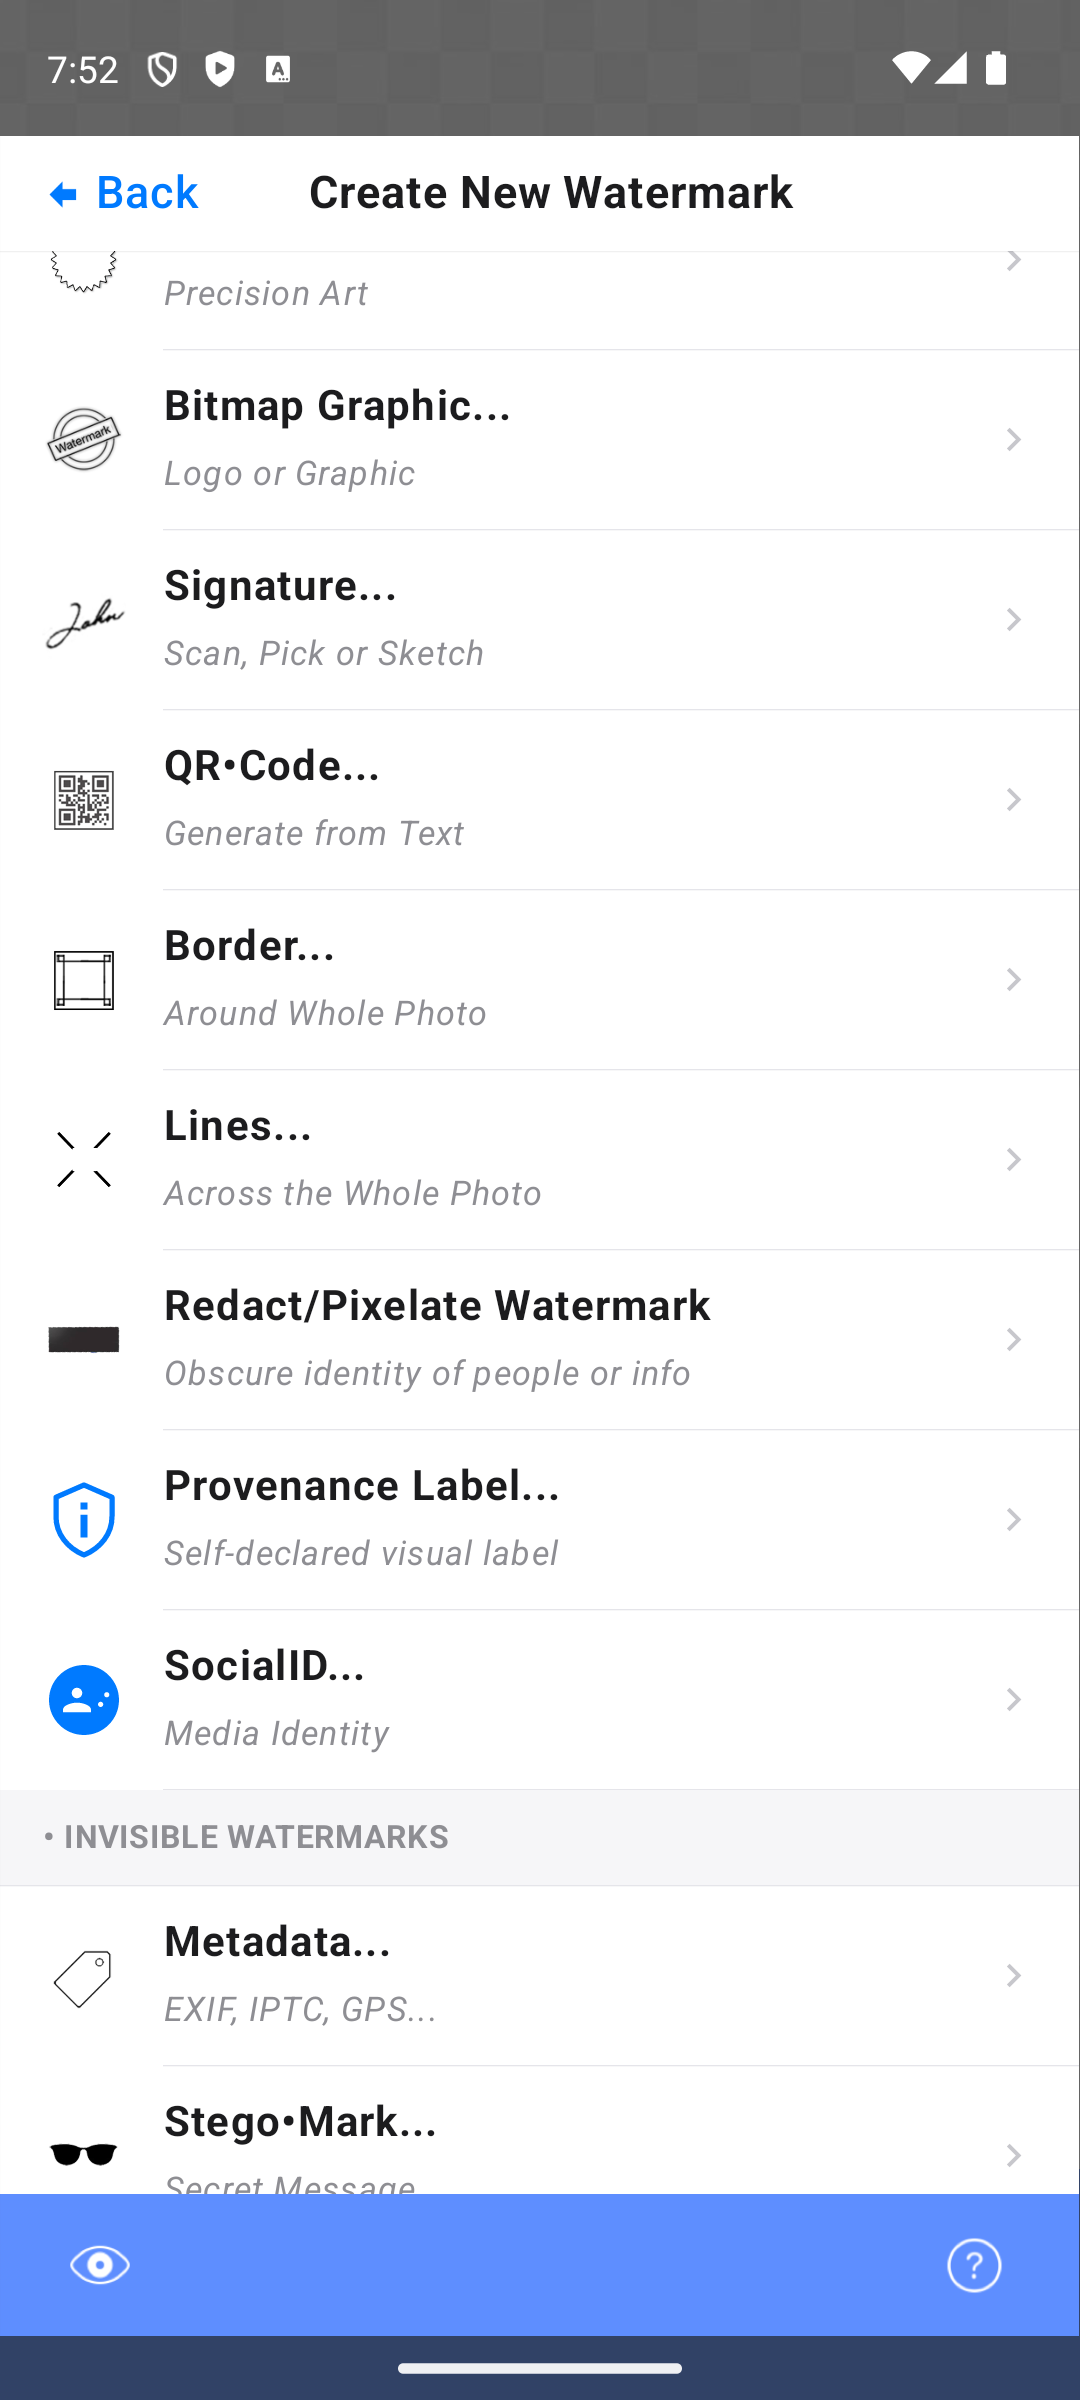
Try a short text mark first. For a batch, preview several different photos in the tray before exporting all: a color or position that works on one photo may be hard to read on another.
Text #
Use Text for a name, copyright line, website, or dynamic tag. Enter the text, then adjust font, size, angle, opacity, color, background, shadow, effect, and position. Keep text legible against both bright and dark areas. A subtle shadow or background can help more than a louder color.
The Color row shows four small From photo suggestions when a photo is selected. Tap one to apply it, or tap the larger square for the full color picker. Suggestions sample both common colors and distinctive smaller areas; they are a starting point, so check the final preview.
The effect choices include emboss and engrave styles. Open an effect's controls to adjust its lighting and depth. Very thin fonts or low-contrast photos may make relief hard to see.
Choose a font #
Tap Font in Text or Arc Text settings. Try a few weights and sizes on the actual photo. If a decorative font is difficult to read in the preview, choose a simpler one or add a background.
Insert a changing tag #
Use Insert Tag to put photo or watermarking information into text. For example, a photo-date tag can differ for each item in a batch. Verify the result with several tray previews, especially if source photos have missing metadata. If a photo has no camera date, author, or GPS information, those photo tags are left empty. Current Date uses the device's date when you export; it does not claim to be the date the photo was taken.
Position and tile #
Open Position from a watermark's settings to place it relative to the image. You can also move a selected visible mark on the canvas and use the nudge controls for small adjustments. Tiling repeats a mark across the photo; inspect the export to be sure it does not obscure the subject.
Text on Arc #
Use curved text around a circular path. Set its text, font, radius, spacing, direction, size, color, and position. This is useful for seals and emblems.
Bitmap Graphic #
Choose a logo or other image. A transparent background usually gives the cleanest result. Resize, tint, mirror, or position it in the settings. Check sharpness on an exported full-size photo; a small bitmap can look soft when enlarged.
Vector Graphic #
Choose vector artwork when you want edges that remain crisp at different sizes. Set its scale, color, and position in the preview.
Signature #
Make a signature by scanning, picking an image, or drawing it. Place it where it remains visible without covering important details. Save the watermark for reuse.
QR Code #
Enter the text or URL to encode, then choose its size, color, and position. Leave enough contrast and quiet space around the code. Scan an exported copy with another device before relying on it.
For example, encode your portfolio URL and place the code away from busy details. Make a test export, scan it, and check the destination. If it fails, increase its size and contrast and leave a clear margin around it. A code that looks attractive but cannot be scanned does not serve its purpose.
Border #
Add a frame around the image. Adjust its inset, size, and opacity, then preview on both portrait and landscape photos.
Lines #
Add line patterns over a photo, with controls for style, width, color, and opacity. Preview at export size if the pattern is fine.
Redact / Pixelate #
Use a solid or pixelated area to obscure visible details. Position it carefully and inspect the exported image. For sensitive information, verify that it is truly hidden in the saved copy before sharing. This is a visual editing tool, not a guarantee that metadata or other copies lack the information.
Provenance Label #
Add a visible label with a short description and optional creator name. The label says it is unverified. It does not create a cryptographically signed C2PA Content Credential or an invisible signature. Treat it as a visual statement, and verify any creator claim independently before publishing it. The C2PA explainer describes what a real Content Credential entails.
Provenance Label starts off when created. It appears on previews and exports only after you select it in the Watermarks list. A beta.14 update also turns off previously selected copies once; you can reselect them when you want the label.
SocialID / Media Identity #
Build a visible creator identity with your name, handle, or website. Check any generated link or code in an exported file before sharing widely.
SocialID also starts off when created and appears only while selected in the Watermarks list. Beta.14 turns off previously selected copies once so you can deliberately opt in again.
Metadata #
Add author, copyright, comments, or keywords to the exported photo's metadata. These fields may be removed when another app recompresses or shares the image. A visible mark is useful when attribution must be obvious.
StegoMark #
Embed a message with an optional password in a supported photo export. Keep the password somewhere safe: the app cannot recover a forgotten password for you. Re-encoding, cropping, or social-media processing can damage hidden data, so test the exported copy before relying on it. A StegoMark is not a substitute for a visible credit line or a secure backup.
Photo Filter #
Choose a filter and tune its strength. It changes the exported copy, so compare the result with the original photo and check skin tones and highlights.
Resize Photo #
Set the crop, zoom, pan, or output size. Check the preview for cut-off subjects and export a sample before running a large batch.
Export Options #
This special watermark stores output choices such as image format, compression, metadata removal, and destination album. It is not a visible mark. Available photo formats in this beta include Automatic, JPEG, PNG, and WEBP. If a recipient or service requires a particular format, export one example and inspect it first.
Export and share #
Tap Export/Share in the main blue bar to export the entire selection. For a batch with the tray visible, choose Singly or Batch, then tap the tray's Export control. The confirmation dialog shows the queue size and active watermark names. Change the destination album if desired, then confirm.
The app reports progress and a completion summary. Tap View in Photos / Gallery to open a saved copy, Share to send it, or Done to return. Review failed items before telling anyone the whole batch succeeded. Find saved copies in the named photo album. Originals remain where they were. A trial export receives a small Created with mark naming the installed edition; the confirmation dialog reminds you before processing.
For a video, use Import Media → Select Video, choose a watermark, then export. Video encoding can take longer and depends on the device and file. Try a short clip first, then check playback, sound, orientation, and mark placement in the saved file.
Before sharing a sensitive photo #
Work on a copy and consider both what you can see and what the file carries. Redact the visible private details, then use Photo Info to inspect available metadata and Export Options to choose whether to remove it. Export one copy and inspect that saved file. A black rectangle in a preview does not prove that location metadata has been removed.
Keep reusable watermark backups #
- Open the Watermarks list and select the presets you want to keep.
- Use the list's export-selected-watermarks control and save the
.iwmfile through Android's sharing choices to a location you can find again. - Try Import Watermarks with that file before relying on the backup. Keep any original logo artwork and fonts separately too.
Presets are different from finished photo exports. Keep both when moving devices. Do not uninstall the old app until you have checked the replacement app and its imported presets.
License activation and device management #
A license activation associates your key with a device. The Android Pro activation limit is not yet confirmed. The license service enforces the limit configured for the purchased product; this beta does not promise three devices. Normal updates of the same installed edition keep its saved activation. The steps below apply once Pro purchasing and activation are available and verified.
Tap the centered shopping cart / license control to open the license dialog. Choose Purchase for the Plum checkout, or enter the key from your purchase email and tap Activate. Activation requires an internet connection. A successful activation shows License activated in green. New exports omit the trial notice; files you exported earlier are not changed. The ? button opens this section of the manual.
Before selling or giving away a phone or tablet, open the dialog and tap Deactivate while online. This releases that device's slot and returns the app on that device to unlicensed shareware mode. Your key and remaining activations stay yours. Deactivate before a factory reset or moving to a replacement device too, when possible. Uninstalling or resetting the app does not automatically release a device activation on Lemon Squeezy's servers.
Do not deactivate for ordinary app updates or just to close the dialog. Use Close for that. Deactivate affects this device only and does not cancel a monthly or yearly subscription or delete your photos. Manage subscription billing separately through your receipt or the customer portal.
If a device is lost, broken, already reset, or you reach the activation limit, contact [email protected] with your purchase email and order number so we can help recover the occupied slot. Avoid sending your full key in public posts, screenshots, or reviews. You can find purchase details through My Orders. See Lemon Squeezy's licensing guide for how device instances and activation limits work.
The current license implementation keeps a saved activation while offline and attempts validation when online, no more than once per day. If the service reports that the license is no longer valid, the saved activation is cleared and the app returns to shareware mode. Network failures retain the saved activation. The app does not currently enforce a separate local subscription-expiry date; subscription expiry and cancellation behavior must be verified with the actual Pro product before sales open. Activation and deactivation require an internet connection. See Purchasing and plans for the approved Android-only prices.
Versions and updates #
The version and build number appear in the app. The Plum beta is a separately signed Android package. Install future Plum updates over this package using the same source and signing identity; an APK from the older Play app is not its update.
The earlier Plus Plum beta checks a small JSON file at downloads.plumamazing.com for newer Plus Plum versions. This Pro beta has no update feed configured yet. Once configured for the matching edition, when a newer Plum version is available, the app can show a notice and open its download link; it does not download or install an APK without your action. The old Google Play edition follows its own update path.
Moving from an older iWatermark app #
Updating the same installed edition and installing a separate edition are different operations. The Pro Plum beta installs separately from older Plus apps and does not automatically inherit their saved watermarks or purchases.
The current importer accepts legacy .iwk4 files, ZIP bundles, and newer .iwm presets. Use Import Watermarks in the Watermarks list to choose an exported file through Android's file picker. A graphic preset may need its companion image; an old file path alone is not the artwork.
Check imported text, fonts, size, placement, rotation, opacity, and graphics against an export from the old app. Legacy groups and text banners are known compatibility gaps in this beta. If a preset imports as a placeholder or looks different, keep the original and contact support with a non-sensitive example. Existing basic iWatermark migration still needs validation against that older app.
Permissions and privacy #
Android's system photo and file pickers let you choose the media you want to import. Camera access is needed only when you use Take Photo. On older Android releases, saving a copy to the gallery may require storage permission. You can review permissions in Android Settings → Apps → your iWatermark edition → Permissions; exact labels vary by device.
The app needs network access for license activation and validation, optional update checks when configured, and links you choose to open. A selected photo can carry location and other metadata. Use Photo Info and Export Options if you want to inspect or remove that information from exported copies.
Appearance, touch controls, and accessibility #
The moon/sun control changes the app's light or dark appearance; this choice is remembered. It changes the workspace, not the colors you have chosen for a watermark. Drag a selected visible mark on the canvas, use settings for more deliberate changes, and press and hold the eye control to peek. Release to return to the same settings.
If text or controls are difficult to use, review your device's Android display and accessibility settings. Support varies by device. This beta has not had a complete TalkBack, large-text, keyboard, or switch-access review, and the guide does not claim dedicated keyboard shortcuts.
Sharing into the app #
From an Android app that offers sharing, select a photo or video, open Share, and choose your installed iWatermark edition if Android lists it. The app can receive one item or multiple items through Android's share system. It also registers an Open with route for supported photo/video content. Which choices appear depends on the sending app and its file access permissions.
This Android edition does not provide Apple App Intents or an Apple Shortcuts integration. There is no documented public scripting or AI automation interface in this beta. Android sharing is a user-operated import route, not unattended batch automation.
Questions and fixes #
I cannot find a photo. Try Photo Library for device and available cloud photos, or Browse Files for Downloads and other folders. If you dropped a file into an emulator, look in Downloads. Check whether Android's picker can access the cloud account or storage provider.
The main canvas shows one photo, but Export says eight. A batch has one active preview at a time. Turn on Show photo tray in Import Media to inspect the batch. Choose Singly or Batch in the tray before tapping Export.
The tray is missing. It appears only when at least two photos are selected and the switch is on. It starts off on devices with less than 2 GB of RAM. Open Import Media to change the switch.
An export has the trial mark. Open the license dialog and check whether the device says it is licensed. Activate a valid key while online, then export a new copy. Existing files do not change.
The app feels slow on an older tablet. Hide the photo tray, use smaller batches, and test a short video or lower-resolution photo. The app supports Android 7.0 and newer, but large files and video encoding need enough memory and processing speed. If it repeatedly fails, send support your device model, Android version, app version, and a reproducible example.
Photo Info has no location. Many photos contain no GPS coordinates, or a provider may remove them. The app only shows a map when coordinates are present.
The output looks different from the preview. Inspect the saved file at full size. Fonts, relief effects, tiny QR codes, redaction, and video processing deserve a one-file test before a large batch.
Help and support #
The manual is online and opens in your browser from Help in the app. An internet connection is needed; you can use your browser’s print or save controls to keep a personal copy. If you need a hand, email [email protected]. Include the app version and build number, your Android version and device model, what you expected, what happened, and the steps that reproduce it. A screenshot of the UI or a non-sensitive sample file helps. Please remove private photo location, license keys, and other personal information before sending files.
Your reports guide the next beta. Thank you for helping improve the iWatermark family.
Terms at a glance #
| Term | Meaning here |
|---|---|
| Watermark / preset | A saved recipe for information or an effect applied during export. |
| Active / selected | Turned on in the Watermarks list for the current workflow. |
| Canvas | The workspace showing one photo and its active visible marks. |
| Batch | The imported group of photos processed together. |
| Bitmap | An image made of pixels; enlarging a small logo can soften its edges. |
| Vector | Artwork described by shapes rather than a fixed grid of pixels. |
| Opacity | How solid or transparent a visible mark appears. |
| Metadata / EXIF / IPTC | Information stored in a photo file, such as camera details or authorship fields. Not every file or provider supplies it. |
| StegoMark | A hidden message embedded in supported image exports. Processing can damage it. |
| Activation | A device using one of the slots allowed by a license. |
| Deactivation | Releasing that device slot; it is separate from canceling a subscription. |
| APK | The Android installation file used for this direct-download beta. |
Revision history #
| Manual revision | App scope | Changes |
|---|---|---|
| 2026-10-11 | Pro Plum 6.0.0-beta.23, build 600023 | Online-only Help, corrected Redact Help target, approved Android Pro prices and accurate pending activation/expiry terms. |
| 2026-10-10 | Pro Plum 6.0.0-beta.22, build 600022 | Shared reader standard, searchable contents, family proposal including planned StegoMark 2, practical photo/batch/backup lessons, migration cautions and glossary. |
| 2026-10-07 | Pro Plum beta.22 | Family branding and Pro trial notice; Plus retained as a separate existing target. |
| 2026-10-06 | Plus Plum beta.21 review build | Purchasing guidance, three-device licensing explanation and compact photo tray instructions. |
The current Pro beta has no configured purchase product or update feed. Lower-tier license switching, complete legacy migration, and StegoMark 2 are not implemented. Review one exported photo before a large batch and retain backups while testing.