FAQ
iWatermark Versions
Q: What is the difference between iWatermark+ Free or Lite and iWatermark+?
A: They are exactly the same except that iWatermark+ Free or Lite puts a small watermark that says ‘Created with iWatermark+ Lite’ at the top of every exported watermarked photo. Many will find this meets their watermarking needs or at least allows testing the app fully. Otherwise upgrade to the regular version which eliminates that watermark. In the Free/Lite version a button to upgrade to the regular version is on the main page. Upgrading supports the evolution of iWatermark+.
Q: What is the difference between iWatermark+ and the desktop versions for Mac/Win?
A: Desktop computers have faster processors and more memory, so they can handle photos that are much higher resolution. The desktop versions are easier to use on large batches of photos. The desktop version is another link in the chain of a photographers workflow. The iPhone/iPad version are designed to allow you to use touch to change the various parameters. Both are designed to fit their hardware. For more info tap here iWatermark for Mac and iWatermark for Win. With this link you get 30% off on either of those or you can get any of our Mac software like iClock (highly recommended productivity replacement for the Apple menubar clock). This is a link that will put a 30% off coupon in your cart. Contact us if you have any question. Our site is Plum Amazing.
Problems/Errors
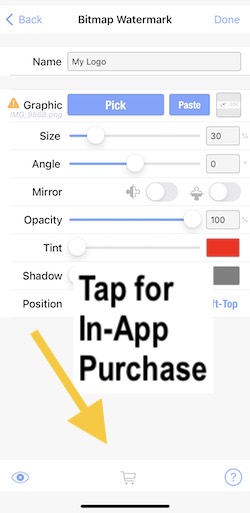
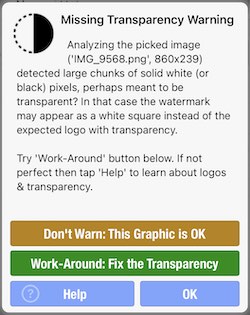
Q: Why is my logo showing as a white box/rectangle/square/background instead of having transparent parts.
A: It means that you are using a jpg instead of a png with transparency. To learn more about that go to ‘Creating a ‘Bitmap/Logo Watermark’.
Q: I had a crash, freeze or error message what do I do.
A: Its rare but a crash could happen for the reasons below. Use the solution to each of the 5 problems to fix it.
1. Problem: Something is wrong with the phones OS.
Solution: Make sure you have the latest version of iWatermark+ and latest iOS. Restart the phone to restore to its default state.
2. Problem: The app is corrupt due to a bad download.
Solution: Redownload the app from the app store.
3. Problem: High resolution photos are using more memory than is available.
S Solution: To test use regular iPhone/iPad photos first. SLR photos under 10 megs should work, SLR photos 10 megs or higher may not work. The new iPad Pro released April 2021 has a lot more memory, 8 or 16 GB, then iPads or iPhones, so it should be able to handle much larger photos. What iWatermark+ can do depends on both iOS software and iPhone/iPad hardware. SLR photos may be pushing the limit depending on the photo size and your iOS hardware. iWatermark+ works on bigger photos then ever before but keep in mind the limitations of memory in your iOS devices, iPad Pro is different than iPhone 4s, etc. Experiment.
4. Problem: Not enough memory left on the device.
Solution: Simply delete a podcast, video or other temporary content. Make sure you have at least a Gig of memory available on your device.
5. Problem: Watermarks are using too much memory.
Solution: Turn all watermarks off. Then turn them back on one at a time. Use fewer watermarks and use watermarks that require less memory. The ‘Custom Filters’ and ‘Borders’ in that order are memory hogs, be careful using these. You can also kick other apps out of the multi-tasker to make more memory (RAM) available.
6. Problem: A particular photo won’t watermark or gives an error.
Solution: Send us the original photo and send some details of the problem.
If you have tried all of the solutions above and can’t fix the problem then we want to know. Email us the details to reproduce it. If we can reproduce it then we can fix it.
Watermarks
Q: How easy is it to remove the watermarks?
A: Not easy. That is the purpose of a watermark to deter thieves. It depends on the various factors. Is it visible or invisible? It depends on the watermark type (text, graphic, qr, signature, banner, lines, compass, stegomark, metadata, resize, filter. etc.). It depends on where the watermark is on the photo. It depends if it’s a single watermark or tiled on the image. It depends on the color of the watermark? There are a lot of factors that control how hard it is to remove. Ultimately if a thief is determined, has the time and the tools they can remove a watermark. Some are just way more difficult to remove. You have decide what you want to achieve. That’s why iWatermark+ has so many watermarks. Each expresses a different type of deterrence.
TIP: In US copyright law if on a stolen photo it’s discovered that someone has also removed a watermark a judge is more likely to come down heavy on the thief because of the obvious intent.
Q: I have my watermarked photo but accidentally deleted my original photo without the watermark. Can I remove the watermark from this photo?
A: Not easily and not in iWatermark. Watermarking is designed to protect your photo and prevent others from removing the watermark as much as possible. It is purposely difficult and in some cases impossible to remove a watermark. One can try using a photo editor like Photoshop to do it. But that will be challenging and is not going to return the photo to the exact original.
IMPORTANT: iWatermark always works on copies of the original and never on the original. Your originals are always safe unless you delete them. Don’t delete your originals and always back up your photos.
If you delete your original photo it may still be found in iCloud, in Albums in the ‘Recently Deleted’ folder, the photo could also be on your Mac, Dropbox, Google Photos and/or other services you use to backup photos.
Graphic and Quality
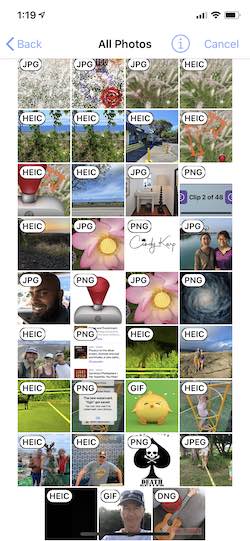
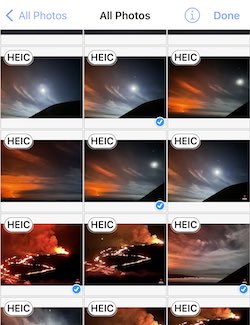
Q: Does iWatermark+ support Adpple’s new HEIC files?
A: .HEIC files, often called ‘Live Photos’, contain 2 resource files , jpeg and mov. Currently when you select a Live Photo we watermark only the jpg (photo) component. A future version will provide an option to watermark either the jpg or the mov (QuickTime video) component.
Q: How do i create the special type of graphic, a logo that has transparent areas that can be used as a watermark?
A: That type of graphic is called a .png with transparency.
If your graphic designer created it then ask for a high resolution PNG file from them.
To do it yourself use Photoshop, GIMP (free on Mac and Win), Acorn, Affinity Photo or similar app then follow these steps.
1) create a layer and paste your graphic object.
2) magic wand all the whiteness, then hit delete. You are left with the checkerboard background which is
3) hide the background layer
4) save as PNG. A transparency cannot be created with .jpg it must be a .png with transparency file.
The Preview app on Mac OS can also be used to make a .png with transparency. More here.
For details search the web for a tutorial on creating a PNG graphic with transparent background.
Q: How do I import a logo/graphic from a Mac, Win PC or the web onto my iPhone/iPad.
A: There are a number of ways.
- Email (easiest) – email logo or graphic to yourself. Then go to that email on your mobile device and click and hold on the attached file to save it to your devices Camera Album. Next Create a Graphic Watermark.
- Apple’s Airdrop – if you are familiar with it Airdrop can be used to import logo/graphics onto an iPhone/iPad. Info on Airdrop on the Mac. Info on using Airdrop on iPhone/iPad. To share a png logo from Mac to iOS, hold the control key and tap the logo file and in the finder on the Mac and a dropdown menu appears. On this menu choose Share and in the next dropdown menu choose Airdrop. When Airdrop appears after a moment or two it should show your iOS device, click once on that and it will show progress of sending the file and a beep at the end. If no iOS device appears then make sure Airplay is turned on for your iOS device. Next Create a Graphic Watermark.
- From the iPhone/iPad or Mac you can Copy & Paste a graphic direct into the Graphic Watermark.
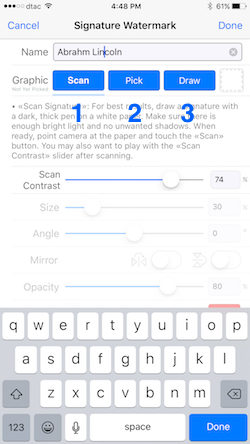
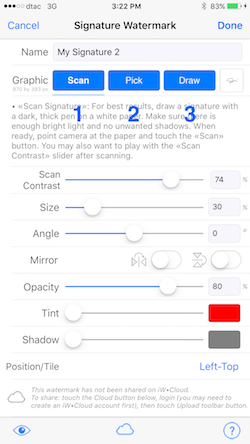
- Scan Signature Watermark – can be used to import a signature or scan in an image. It uses the camera to scan a logo on paper and produce a PNG file. Using the original artwork will be higher resolution. Go here to learn more.
Q: Why do I see a white box around my companies logo?
A: This means the logo you are trying to use is a jpg and not a transparent png. PNG’s can have transparency JPEG’s do not.
Solution: Follow the steps above to import, then use a png format logo file. Make sure to read more details about the graphic/logo watermark and png files at this link.
 WARNING: If you put a .png in your Camera Album and ‘Optimize Photo Storage’ is checkmarked on, then that .png is changed to a .jpg and compressed. This can be confusing the .png you uploaded is changed to a .jpg without telling you. If you import you logo (changed to a .jpg) into iWatermark+ you will get the white box around the logo (because .jpg does not support transparency).
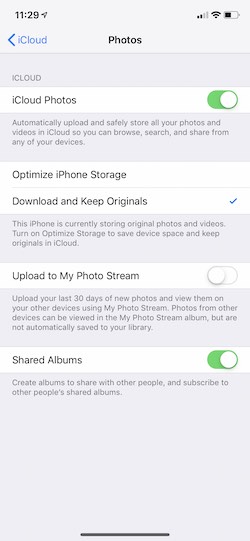
PROBLEM: In iOS Settings Photo:iCloud. If the setting ‘Optimize iPhone Storage’ is checked that causes the problem.
SOLUTION: Checkmark the ‘Download and Keep Originals” (see screenshot). That setting is better anyway because it keeps your original photo and it’s format. Thanks to Lori for discovering this.
Also do not use iTunes to import logo/graphics. Do not open your logo in the photo picker. These both turn the png into a jpg which will show your logo in a white box.
Q: I have the logo/graphic on my device, how do I import it into iWatermark+
A: Details are in Create a Graphic Watermark above.
Q: Does iWatermark Pro save a photo in highest resolution to the photo album?
A: Yes, iWatermark+ saves in the highest resolution to the photo album. It may show you a reduced resolution for your display to improve speed but the final output is equivalent to the input. You can also email watermarked photos straight from the app at your choice of resolutions including the highest resolution. It may be that if you are trying to email from the photo album itself and you are on 3g (not wifi) Apple is choosing to lower the resolution of photos. That has nothing to do with iWatermark. It does have something to do with choices by Apple, ATT and maximizing the 3G bandwidth.
Q: Why is my logo pixilated, blurry and look low quality?
A: If the resolution of the area of the photo covered is higher then the resolution of the watermark, then it will cause the watermark to look blurry or blocky. Always make sure to have your logo/bitmap graphic be equal or higher resolution than the area of the photo it covers.
Your logo is a bitmap. What you put it on (your photo) and how much you scale it influences how it looks. If your logo is 50×50 and you put it on a 3000×2000 photo then the watermark is either going to be very small or look very pixelated.
SOLUTION: Before import make sure your bitmap logo is a resolution appropriate for the size of photo you will be applying the watermark to. For photos taken with iPhone cicca 2016 or later, 2000 pixels or higher on either side is fine. But as photo sizes increase over time so will the need for bitmap graphic resolution for a watermark to increase.
To sum it up iWatermark uses the api/tools supplied to us by Apple which is also what Photoshop and other apps use. While resaving jpg’s changes photos the actual the visible difference is controlled by the jpg algorithm, not the apps, and is basically imperceptible.
Q: Why doesn’t my photo and or watermark look highest resolution?
A: We reduce the quality of the onscreen preview to save memory and cpu. It is hardly noticeable except maybe on retina screens. This does not affect the exported quality which will be exactly the same as the original. If you want there is a preference which you can turn on to show ‘Retina Preview Quality’.
Q: Does watermarking reduce the resolution of the original photo?
A: It doesn’t change the resolution at all.
Q: Does iWatermark change the quality?
A: As you know all apps duplicate the photo they are editing. Then when they resave it, it becomes a new file. JPG is a compression format, which means it’s an algorithm which works to reduce the size of the photo and keep the humanly visible quality the same. That means it will be slightly but not visibly different. Every time you save a photo there will be slightly different arrangement of pixels. The pixels are not always identical but jpg does the best it can to make them look exactly the same. This is true of Photoshop and every other photo editing app. Each of them use the very same tools to re-save jpg’s. Our apps allow control over quality vs size the same way photoshop and a few other apps do. You can change that in the prefs but we don’t recommend it because it’s impossible to see any difference and harder still to tell which is better. You may want to google and read about ‘size vs quality’ if you are not familiar.
Settings/Permissions
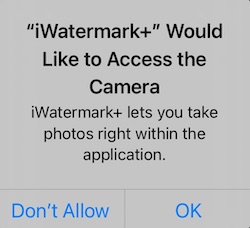
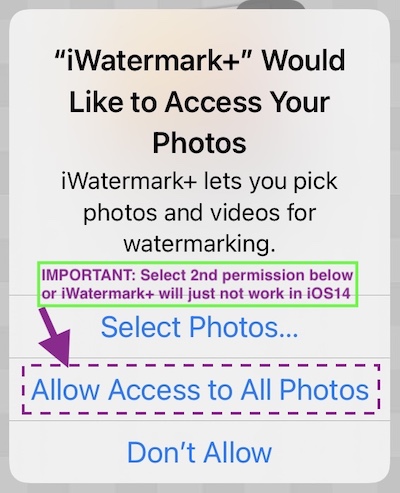
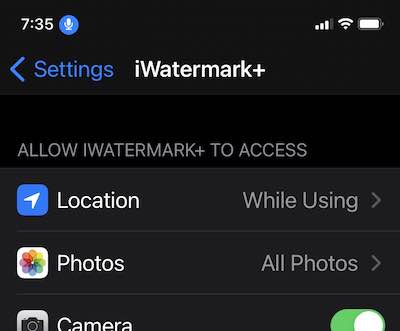
Q: A dialog said I don’t have permission to access the Photo Library, what do I do?
A: iWatermark+ lets you pick photos or videos for watermarking. Your access to the Photo Library has been restricted in some way. If you use Apple’s Screen Time system preference turn it off and see if iWatermark+ has access. It may even be that your parent/guardian set your Screen Time permissions that are preventing you from using iWatermark+ fully. If the problem is not Screen Time then go to: Privacy:Photos:iWatermark+ and make sure that it’s set to ‘Read and Write’ and for camera access go to: Privacy:Camera:iWatermark+ and make sure it’s turned on (green). More details about ‘Permissions’ is at this link.
Q: How do I move iWatermark+ and all its data (settings and watermarks) to a new iPhone or iPad?
A: Apple controls this not us. Here is what they say.
https://support.apple.com/en-us/HT201269
There are 2 parts to move the app and the data. Both need to be there to have all the previous settings. Here is another good explanation.
Sales
Q: I just bought the app, why does the ‘Created with iWatermark’ still appear on my exported photos?
A: You are still opening and using iWatermark+ Free/Lite not the paid version of iWatermark+.
Solution: Delete iWatermark+ Free/Lite which has Free/Lite in a green banner on the icon. Use the paid version instead.
Q: What do I do if I have a sales question?
A: We don’t control iOS app sales at all. Apple controls sales totally for iOS apps. Google controls sales on Google Play. Apple and Google do not share the names/emails or any info on who buys the apps with us. We can not add or delete a duplicate order. They charge your credit card. They don’t give us your name or your email address. For all sales questions please contact Apple or Google.
Q: I lost my phone and need to redownload iWatermark+. Do I have to pay again?
A: No. App stores let you redownload apps you already bought and their policies are at those links. Just use the same account/apple id you bought it with. If you bought a new phone and are moving from iOS to Android or vice versa then you need to buy again because we don’t control the sales they do.
Q: If I want to use iWatermark for both iPad and iPhone, do I need to pay for two apps or just one?
A: No! iWatermark+ is a universal app, it works great on iPad/iPhone, so, no need to pay twice. The same iWatermark works fine on iPhone and iPad. Legally you are the owner of both and you can have your software on both. Also Apple has a family plan. This plan allows you to buy an app once and everyone in the family gets to use the app on their iphone/ipad. For more about the Family plan contact Apple.
Q: Don’t all app makers make millions of dollars?
A: Pokemon and some games might make that but a utility for the minor niche of watermarking, unfortunately for us, does not. iWatermark+ is actually a remarkably complex and powerful piece of software. A decade ago no one would have believed it possible for such an app to work on a phone. Even now people don’t realize the amount of work in the programming, documentation, tech support, graphics, admin, marketing, video creation and constant updating involved and what an incredible deal buying iWatermark for a few dollars is. Apple has always seriously benefitted from 3rd party app developers making software for their hardware. We get $3 to pay for hardware, programming, tech support, advertising, graphics, admin, etc., so, the fact is, we are not rich or even close. If you like iWatermark+ and realize how unique and advanced it is compared to other watermarking apps and you want to see it get more powerful features, then please tell others about it. If they buy that helps insure we eat and you get a constantly evolving and better app. Thanks!
Q: How come iWatermark+ is not #1 in the Apple App store when i search under watermark? Someone told me about your app but it took an hour to find it.
A: Thanks. We don’t know. Many write and tell us the same thing.
Font
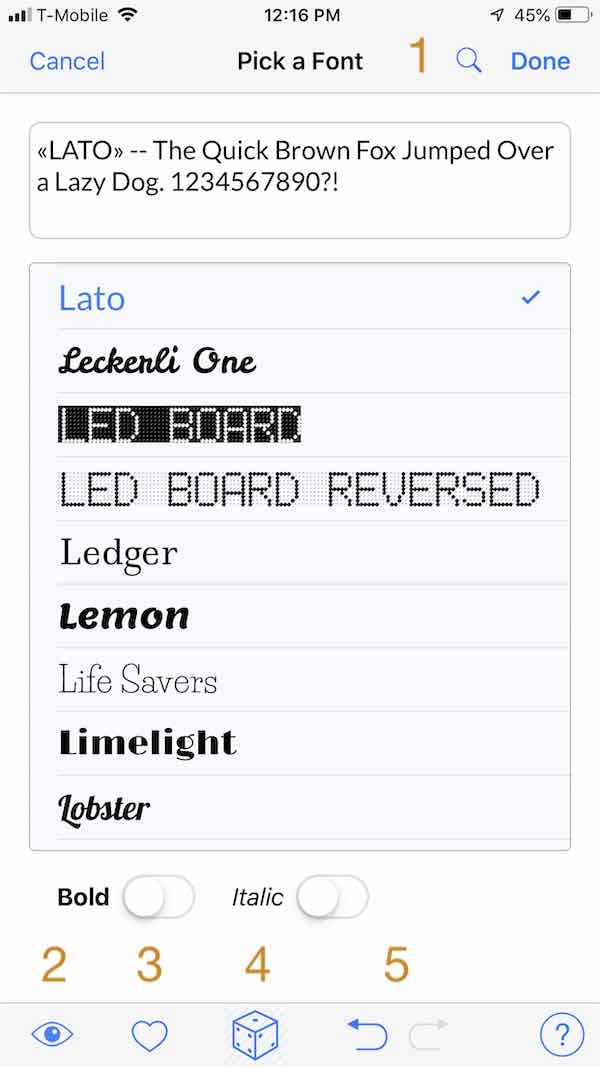
Q: How do I use the fonts from iWatermark+ on the Mac or Win Version or even in another desktop app?
A: To get the fonts out of the iWatermark+ iPhone app you need to find where the iPhone app is stored on the Mac.
In iTunes, applications pane, control+click an app, and choose “Show in Finder”.
It will reveal a file located here:
Macintosh HD > Users > *User Name* > Music > iTunes > Mobile Applications
and will highlight the file called iWatermark.ipa When transferred to the Mac or Win is the iWatermark application.
Copy this file. option key and drag this file to the desktop to copy it there. it should now still be in the original folder and a copy on your desktop.
Change the name of the desktop one’s extension to .zip. so it should now be named iWatermark.zip
Double click to unstuff. you will now have a folder, inside are these items:
Click on the Payload folder then control click on the iWatermark file and you will get the dropdown menu above.
Click on ‘Show Package contents’ and inside there you will find all the fonts.
Double click a font to install it on the Mac.
Q: The font size setting only allows selecting font size from 12 to 255. Can we make it bigger?
A: Typing a size into the field next to the slider can give a size from 6 to 512 pts. Whereas the slider only allows dragging between 12 to 255 pts.
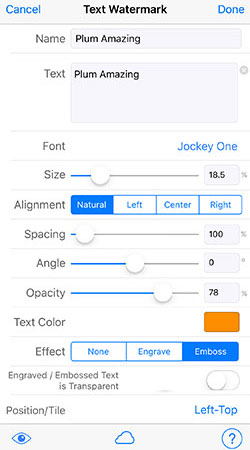
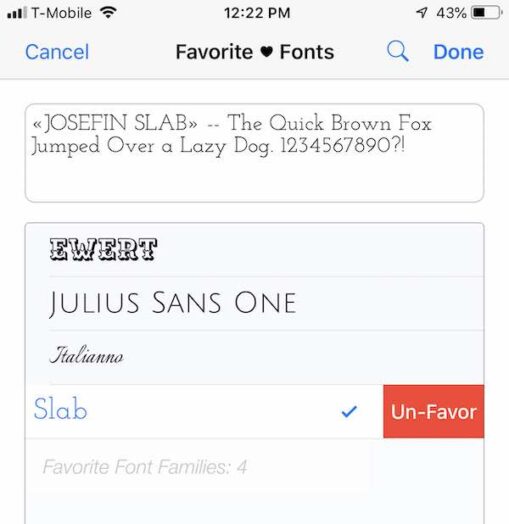
Q: How do I have different fonts and font sizes in one text watermark?
A: It’s not possible in one text watermark. The solution is make two separate text watermarks.
Miscellaneous
Q: How many originals/copies of a photo are there with watermarking.
A: There are 3 different scenarios:
1. If you take a photo with Apples (or some other) camera app then that is the original, iWatermark+ then duplicates and watermarks that duplicate.
2. If you take a photo from within iWatermark+ that photo gets watermarked so there is only 1.
3. If you watermark using iWatermark+ within Apple Photos as an Editing Extension then it’s different because the Apple Photos app does not duplicate the original, it edits in layers and you can revert those edits. iWatermarks watermarks are put on as a layer in the Apple Photos app. Choose ‘Edit’ and hit ‘Revert’ to remove a watermark put on within Apple’s Photos app.
Q: I choose ‘Do not allow iWatermark+ access to photos’ by accident. How do I turn that on for iWatermark?
A: Go to settings:privacy:photos, find iWatermark+ in the list of apps and turn on the ‘access to photos’ switch for iWatermark+.
Q: Is there a size limitation on photos?
A: Yes. Every year it gets a little bit larger. This makes it easier for developers like ourselves to support opening and manipulating larger images. It is quite amazing that a phone can open SLR photos but there are limits. Newer SLR’s create higher res photos each year and new iPhones can open higher res photos each year. It’s a race.
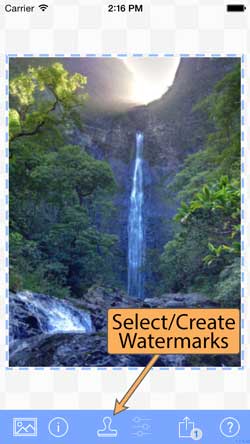
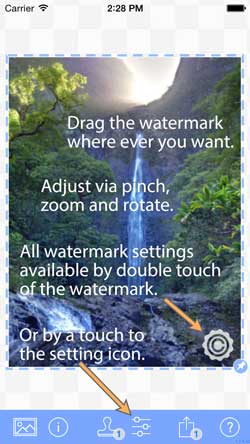
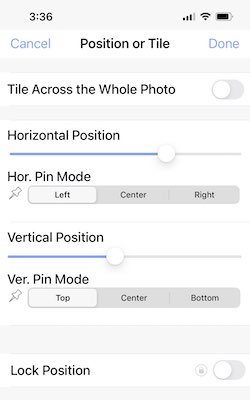
Q: How do I move the watermark?
A: To move the watermark just touch it with your finger and drag it wherever you want. You can also change the font size, scale (using pinch/zoom) and change the angle (two finger twist) directly by touch. When you rotate the angle with two fingers you will notice that the watermark locks in at the cardinal points 0, 90, 180, 270 degrees. The watermark location can also be changed from the item called ‘Position’ located at the bottom of the settings in most watermarks.
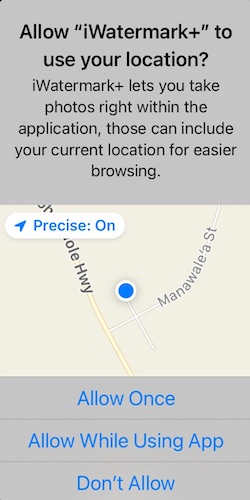
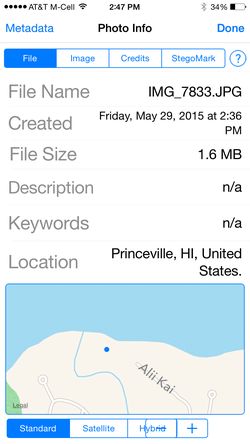
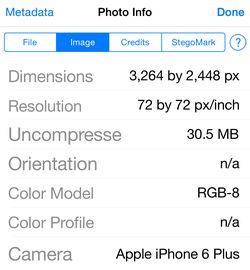
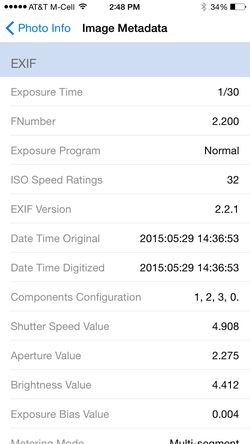
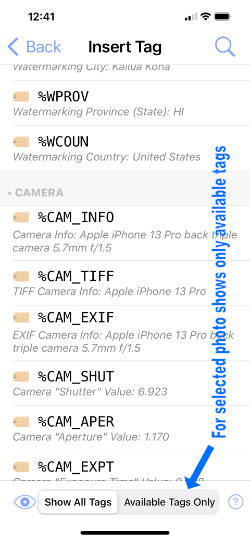
Q: Does iWatermark pass on the EXIF info from the original photo?
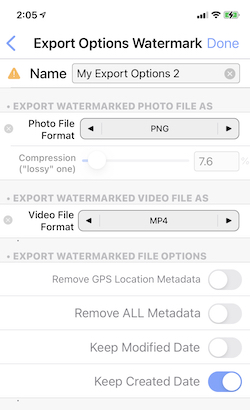
A: Yes, any watermarked photo you save to the Photo Album or send via email has all the original EXIF info including GPS info. If you want GPS always removed then there is a setting for that in the preferences and also by using ‘Export Options‘ watermark. You can view EXIF and other here.
Q: I speak Dutch but the app is showing to me in Swedish, how do I fix this?
A: This can happen in rare cases, it has to do with iOS. You can set a primary and secondary language in the system prefs. since there is no other localized languages yet for iWatermark+ only English the app is trying to go to the secondary language and at some points you must have that set to Swedish. Close the app, go to the system prefs and reset to just Dutch, restart. Now the system will just open in English.
Q: How does Photo Stream work? Do I add a photo to Photo Stream instead of the Camera Roll?
A: This is controlled by Apple not by us. More info is here.
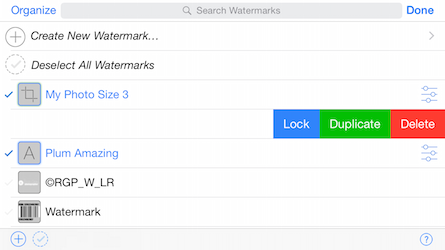
Q: How do I delete the example signatures and logos that are provided?
A: In the Watermarks page touch the watermark and drag left, this will show a red delete button on the right side, touch that to delete that watermark. Or go to organize at the top left of the page where you can also delete watermarks or drag them around to change their order.
Q: How do I upload to Flickr?
A: Download the Flickr app from the app store. It’s free and it has an iOS sharing extension built in. That means when you export from in iWatermark+ it can go straight to “Flickr. Just remember to fill in your user info in General:Settings:Flickr on your iOS device for first time set up for logging in.
Video
Q: I noticed after transferring video to my Mac that the video was compressed?
A: That is not iWatermark+ but may be the process you use to transfer the video to the Mac or PC. These articles have more info:
OSXDaily – Transfer HD Video from iPhone or iPad to Your Computer
SoftwareHow – How to Transfer Videos from PC to iPhone without iTunes
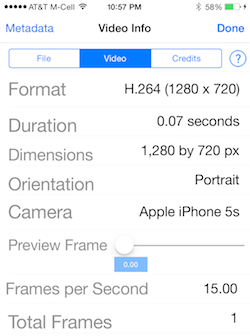
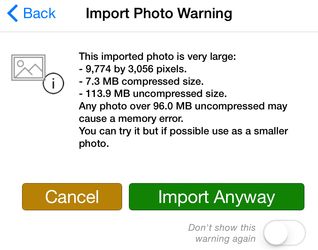
iWatermarks present limits are any photo over 100 MB uncompressed may cause a memory error. The uncompressed size is different then the file size. You may be able to open a file like the pano in the screenshot below but to watermark it takes at least twice as much memory. This number we are sure will continue to get better every year.
Having said all that, feel free to try if you get the warning below, it won’t hurt anything and we’ve found it quite often works and depends on the device you have. We promise as more is possible in the hardware of iPhones and iPads we will expand what is then possible in software.

Why Watermark
Q: Why should I watermark the photos I put on Facebook, Twitter, Instagram, Tumblr, etc.
A: Excellent question! Because most of those services remove the invisible metadata in your photo, so there is nothing tying that photo to you unless you put a visible watermark on it. Anyone can drag your Facebook picture to their desktop and use or share to others with no connection between you and your photo and no info in the file that says you created or own it. A watermark makes sure that everyone is clear on the fact that the photo is your IP (intellectual property). A photo you take could go viral. Be prepared. The owner of a watermarked photo is much more likely to be acknowledged, credited and perhaps even paid. To see what metadata is removed by Facebook, Twitter, Instagram, Google+ etc look here.
Q: Do any of these watermarks prevent people from stealing the art I post online and using it for their own purposes?
A: A watermark warns most people off and by it’s presence, lets people know the owner cares about their intellectual property. A watermark does not stop people who are determined to steal. Along with the Copyright Act, a watermark definitely helps defend your photo.
We are not lawyers and we are not offering advice. Below is our take on this. Consult your lawyer for legal details.
It’s important to understand the US Copyright Act for photos. The law says the photographer owns the copyright on each photo they take. An exception is when the image falls into the “work-made-for-hire” category.
Copyright for photographers means owning the photo as property. With ownership, come exclusive rights to that property. For photographic copyrights, the ownership rights include:
(1) to reproduce the photo;
(2) to create derivative works based upon the photo;
(3) to distribute copies of the photograph to the public by sale or other transfer of ownership, or by rental, lease, or lending;
(4) to display the photograph publicly;
Found in the U.S. Copyright Act at 17 U.S.C. 106 (http://www.copyright.gov/title17/92chap1.html#106)
Your signature or another visible watermark with your logo may increase the damages. From what i have seen of the law online, an image with watermark may increase the damages up to $150,000 instead of just $30,000. It does make sense to put an visible watermark on a photo to: 1) let people know it is your intellectual property and 2) increase the damages if they they are caught willfully disregarding or removing your watermark and using your photo.
If the photographer did not register the image before the infringement started, the photographer can seek “actual damages.” If the photographer registered before the infringement started, the photographer can seek either actual damages or statutory damages. Watermarks only matter when it comes to statutory damages, and then only when it comes to proving willfulness. The watermark itself does not increase available damages. Photographers who do not register their copyrights before infringements start will have little legal benefit from using watermarks.
If there was copyright management information in the embedded metadata stored in the file, OR if there was a watermark that included copyright management information, and if the infringer removed or altered the metadata or the watermark, and if the photographer can prove that the purpose of the removal of the metadata or watermark was to conceal, induce or facilitate copyright infringement, then special damages may be available to the photographer under the Digital Millennium Copyright Act (DMCA). However if the watermark was not “copyright management information,” there is no penalty for its removal or alteration, there is no benefit for the presence of the watermark, legal or otherwise. For example, if the watermark is just a word or phrase or symbol or icon, there is no benefit of the watermark, unless it communicates (1) the identity of the copyright owner (such as name, logo, contact info) or (2) identifying information about the image, or (3) rights information (copyright notice, registration number, rights statement, etc)
If the photographer registered the photograph before the infringement started, then the watermark might benefit the photographer. Or not.
(1) A watermark can block a claim of “innocent infringement.” If a watermark is legible and includes a valid copyright notice, then the infringer is barred by law from claiming “innocent infringement” in an effort to reduce statutory damages to as low as $200. A “valid” copyright notice has 3 elements: (a) name of copyright owner, (b) copyright symbol, and (3) year of first publication of the image. If any one of these 3 elements is missing (missing year, missing name, missing copyright symbol) the copyright notice is invalid and can’t be used to prevent the infringer from claiming innocent infringement. The copyright owner can replace the circle c with the word “copyright” or the abbreviation “Copyr” but neither of these words are recognized by law in other countries. None of the above applies to a situation in which the photographer failed to register the photograph before the infringement started.
(2) The act of removing a watermark can indicate willfulness. Statutory damages (available only if the photographer registered the photograph before the infringement started) are between $750 and $30,000 per image infringed. This means that the court has the discretion to award as little as $750 or as much as $30,000. If the photographer is able to prove to the court that the registration was “willful” then the range of damages increases to $30,000 to $150,000. Courts rarely award the maximum. It is quite difficult to prove the infringement was willful. Willful means that the infringer knew that the usage was illegal, and then proceeded to intentionally infringe. It is a mindset. If the infringer removed or altered a visible or steganographic watermark, this can possibly indicate willfulness, unless the watermark was accidentally cropped, or if it was cropped without the intent to conceal the infringement. Again, if the photographer failed to register the image before the infringement started, willfulness is not considered by the court, and the presence/removal of the watermark has little if any bearing.
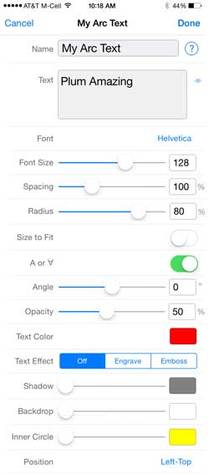
IMPORTANT: The signatures of John Hancock, Ben Franklin, Galileo are just examples of graphic watermarks. They are the authentic signatures of these individuals. Each was scanned in, digitized, the background removed and saved as .png files. The are included for fun and to show what is possible. We recommend you use the signature watermark in iWatermark+ to create your own signature or use your logo for your photos. See the info in the Q&A above about how to create and put your own signature or logo into iWatermark. If you don’t want to create your own graphic watermark you can always create text watermarks as you need them.


 IMPORTANT:

 iWatermark+ Lite
 iWatermark+


 Then you see the menu (below) where you select ‘No Info’, ‘File Type’, ‘File Size’, ‘File ‘Date’, ‘Dimensions’ to display on top of the thumbnails. Very handy, right? Second part of the menu is File Order where you can select, ‘Sort by Info’ and ‘Invert Order’.
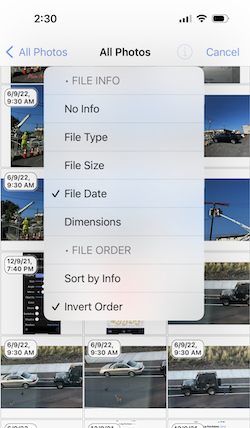


 A page slides up and looks like this. Tap on iWatermark+. If you don’t see it tap on the More item and find iWatermark or other apps that edit photos there.
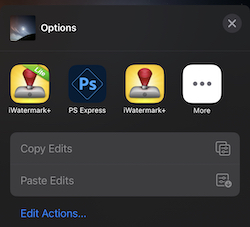